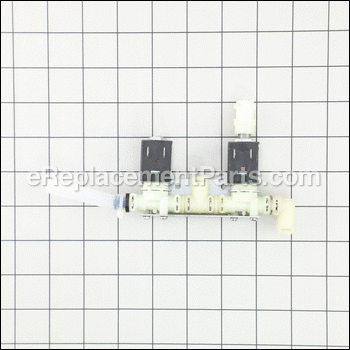
This solenoid valve kit, also known as the solenoid valve assembly, is sourced from the original manufacturer for use in espresso machines. It is responsible for controlling the flow of water or steam within the machine. It operates on a standard voltage of 120 volts, and includes the safety valve, solenoid coil, and solenoid valve. Does not include set of O-rings, these are sold separately. Over time the solenoid valve assembly can fail due to several reasons including the fluids/debris entering and blocking the valve, overheating or physical damage to the solenoid coil, faulty electrical wiring, or mechanical wear on the moving parts of the assembly. A faulty solenoid valve kit will result in a noisy machine, low water pressure, and difficulties properly brewing coffee. To remove the valve solenoid kit, you will need to disassemble the appliance. Once you have accessed the valve assembly, take a note of how the wire connectors and water lines are attached for the installation process later. It may be helpful to take a picture with your phone. Disconnect the water lines and wire connectors. Remove the fasteners that secure the solenoid valve assembly in place and carefully pull it out of the machine. Mount the new assembly in place and reconnect the wiring and water lines to their appropriate slots. Reassemble the espresso machine to complete the repair.
Valve Solenoid Kit 120v Jlt SP0100757
OEM part for: Breville
Part Number: SP0100757
7 - 12 business days
Jump To:
Frequently Purchased Together ?
Compatibility
This Valve Solenoid Kit 120v Jlt will fit the following 17 machines. Confirm this part works with your model, and view the detailed model diagrams and repair help we have to offer.
Displaying 17 of 17 matching models.
Breville
Show More Compatible Models17 total model matches. Try the above search to narrow your results.
This is the official OEM part for the following brands:
- Breville
This item works with the following types of products:
- Espresso
This part replaces obsolete part #: SP0010228, BES860XL/14, BES870XL02.14, BES870XL/02.14, SP0013662, SP0010230, SP0013665, SP0020444
Customer Part Reviews ?
- 1
- 2
- 3
Questions & Answers ?
Our customer Service team is at the ready daily to answer your part and product questions.

Ask our Team
We have a dedicated staff with decades of collective experience in helping customers just like you purchase parts to repair their products.
Does this fit my product?Questions & Answers for Valve Solenoid Kit 120v Jlt
Customer Repair Instructions ?
All our customer repair instructions are solicited directly from other customers just like you who have purchased and replaced this exact part.
Breville 870xl was making loud buzzing noise when trying to pull shots, shots not pouring properly.
Tool Type
Espresso
Difficulty
Easy
Time
15-30 minutes
Tools Used
Screwdriver, Pliers
Parts Used
Noisy solenoid, poor expressing of coffee.
Tool Type
Espresso
Difficulty
Medium
Time
15-30 minutes
Tools Used
Screwdriver, Pliers
Parts Used
Making a loud buzzing sound, loss of pressure
Tool Type
Espresso
Difficulty
Medium
Time
15-30 minutes
Tools Used
Screwdriver, Pliers, Small zip-tie
Parts Used
1. Removed the water tank.
2. Removed the four screws holding the top cover in place.
3. Removed the caps and screws at the water tank base.
4. Cut the zip-tie on the left side to the drain.
5. Removed the clips at the tops of the lines leading to the solenoid.
6. Removed the screws at the base of the solenoid.
7. Rotated the solenoid around the supply line to the boiler to remove it.
8. Reversed the above steps to install the new solenoid.
Solenoid valve stuttering
Tool Type
Espresso
Difficulty
Medium
Time
30-60 minutes
Tools Used
Screwdriver, Pliers
Parts Used
Banging sound from machine and would not pump enough water to make to make an espresso
Tool Type
Espresso
Difficulty
Medium
Time
30-60 minutes
Tools Used
Screwdriver, Pliers
Parts Used
unusual loud buzzing noise while making an espresso, low water pressure while brewing, water drain pan filled up faster than usual
Tool Type
Espresso
Difficulty
Medium
Time
15-30 minutes
Tools Used
Screwdriver, Pliers
Parts Used
2 run the grinder empty
3 pop the 3 plastic caps hiding the screws under the water tank support
4 removed the 2 screws under the top of the machine (one by the tamper the other by the filter/brewing head)
5 remove the 2 screws on the back of the machine holding the top aluminum tray
6 removed the grinder assembly
7 remove the top aluminum tray,
8 disconnect the ground cable from the tray
9 remove the back cover (do not disconnect the water hose) and move it out of the way
10 take a picture of the wires to the solenoids in case you forget which one goes where, and do the same for the hoses.
11 disconnect all the stiff plastic hoses in the way (those going to the solenoid assembly and in the way of removing it) : pull the metal pin (u shaped) and recover the red o-rings (they have to be slid on the hose before reassembly - be carefull not to twist, roll, or damage them in any way)
12 disconnect the wires to the assy.
13 replace the assy.
14 follow those steps backwards for reassembly
Buzzing sound and low pressure at the group head
Tool Type
Espresso
Difficulty
Medium
Time
30-60 minutes
Tools Used
Screwdriver, Pliers
Parts Used
Barista Express making loud noise/low pressure when brewing
Tool Type
Espresso
Difficulty
Easy
Time
15-30 minutes
Tools Used
Screwdriver, Pliers
Parts Used
Coffee Machine was not working
Tool Type
Espresso
Difficulty
Medium
Time
15-30 minutes
Tools Used
Screwdriver, Pliers
Parts Used
Breville BES870XL No water to brew group
Tool Type
Espresso
Difficulty
Easy
Time
15-30 minutes
Tools Used
Screwdriver, Pliers, Adjustable Wrench
0. Unplug machine
1. Removed water tank, and bean hopper
2. Removed top and back cover, they don't completely come off due to the electronics
3. Took pictures of the Solenoid Valve Assembly so I could put the water lines and electrical lines back in the correct order.
4. Pulled clamps holding water lines from Solenoid Valve Assembly
5. Pulled electrical lines from Solenoid Valve Assembly
6. Unscrewed and removed old Solenoid Valve Assembly
7. Placed new Solenoid Valve Assembly into spot and screwed in place
8. Replaced electrical and water lines based on my pictures.
9. Replaced back and top cover
10. Loaded bean hopper and water reservoir
11. Plunged it in and pulled a test shot. Worked perfectly.
Frothing Spout With O Ring
1. Used adjustable wrench to removed old tip
2. Used adjustable wrench to replace new tip
3. Very simple
OEM stands for Original Equipment Manufacturer and means the part you’re buying is sourced directly from the manufacturer who made your product. At eReplacementParts, we sell only genuine OEM parts, guaranteeing the part you’re purchasing is of better design and of higher quality than aftermarket parts.
Learn MoreOur product descriptions are a combination of data sourced directly from the manufacturers who made your product as well as content researched and curated by our content & customer service teams. This content is edited and reviewed internally before being made public to customers.
Our customer service team are at the ready daily to answer your part and product questions. We have a dedicated staff with decades of collective experience in helping customers just like you purchase parts to repair their products.
All our part reviews are solicited directly from other customers who have purchased this exact part. While we moderate these reviews for profanity, offensive language or personally identifiable information, these reviews are posted exactly as submitted and no alterations are made by our team.
All our customer repair instructions are solicited directly from other customers just like you who have purchased and replaced this exact part. While we moderate these reviews for profanity, offensive language or personally identifiable information, these reviews are posted exactly as submitted and no alterations are made by our team.
Based on data from past customer purchasing behaviors, these parts are most commonly purchased together along with the part you are viewing. These parts may be necessary or helpful to replace to complete your current repair.
All our installation videos are created and produced in collaboration with our in-house repair technician, Mark Sodja, who has helped millions of eReplacementParts customers over the last 13 years repair their products. Mark has years of experience in selling and repairing both commercial and residential products with a specialty in gas-powered equipment.
This data is collected from customers who submitted a repair instruction after replacing this exact part. Customers can rate how easy the repair was to complete and how long it took. We aggregate this data to provide a repair rating that allows customers to quickly determine the difficulty and time needed to perform their own repair.


