


This replacement valve reed is a n authentic OEM item that is specially designed for Craftsman air compressors. Reed valves are commonly used in high-performance versions of the two-stroke engine, where they control the fuel-air mixture admitted to the cylinder. As the piston rises in the cylinder a vacuum is created in the crankcase beneath the piston. Please note this metal reed valve is sold individually.
Valve, Reed E100229
OEM part for: Craftsman
Part Number: E100229
$13.15
In Stock
Jump To:
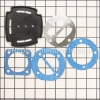
Frequently Purchased Together ?


Compatibility
This Valve, Reed will fit the following 8 machines. Confirm this part works with your model, and view the detailed model diagrams and repair help we have to offer.
Craftsman
Show More Compatible ModelsThis item works with the following types of products:
- Compressor Parts
Customer Part Reviews ?
Average Rating (out of 5):
Click to filter by ratings:
5 stars
5
4 stars
1
3 stars
0
2 stars
0
1 stars
0
< PREV
- 1
Easy repair
Works well. Fit as it should.
Guest -
December 15, 2020
Verified Purchase
compressor parts
This is the third time I have used replacement parts and every time has been just what I needed to get the job done.
Guest -
December 5, 2019
Verified Purchase
Compressor back on line!
Nice job!
Guest -
October 31, 2019
Verified Purchase
Good
Came early and was what I needed
Chuck -
October 12, 2019
Verified Purchase
Easy repair the exact part I needed
Reeds were perfect air compressor works great
Guest -
September 16, 2019
Verified Purchase
Worked as expected
Part as expected. Worked as expected.
Guest -
April 27, 2020
Verified Purchase
Questions & Answers ?
Our customer Service team is at the ready daily to answer your part and product questions.

Ask our Team
We have a dedicated staff with decades of collective experience in helping customers just like you purchase parts to repair their products.
Does this fit my product?Questions & Answers for Valve, Reed
No questions have been asked yet
Customer Repair Instructions ?
All our customer repair instructions are solicited directly from other customers just like you who have purchased and replaced this exact part.
One of the reeds on my Harbor Freight compressor was broken.
Jeffrey - April 21, 2016
👍 8 of 8 people found this instruction helpful
Tool Type
Compressor
Difficulty
Easy
Time
Less than 15 minutes
Tools Used
Socket set
Parts Used
The new reeds, which also fit a Sears compressor, were a perfect fit for mine.
Very cost effective alternative to a new compressor or dealing with Harbor Freight on the parts.
Very cost effective alternative to a new compressor or dealing with Harbor Freight on the parts.
Did you find this story helpful?
Thanks for voting and helping fellow customers!
Compressor was only pumping up to 25-30 lbs pressure. Removed
Wayne - February 21, 2017
👍 3 of 3 people found this instruction helpful
Tool Type
Compressor
Difficulty
Easy
Time
30-60 minutes
Tools Used
Screwdriver, Socket set, Nutdriver, Adjustable Wrench
Parts Used
1. Removed compressor head and disassembled it.
2. Removed old gaskets and cleaned through.
3. Removed reeds.
4. Drained oil from the reservoir for compressor lube.
5. Removed rubber gasket and cleaned reservoir.
6. Installed new rubber gasket for reservoir head.
7. Installed new gaskets and reeds for compressor head and reassembled.
8. Added lube oil to the reservoir.
9. Started compressor, built up 120 lbs. pressure.
10. Works as advertised, good.
Did you find this story helpful?
Thanks for voting and helping fellow customers!
no pressure above 20psi.
Ron - April 10, 2020
Tool Type
Compressor
Difficulty
Medium
Time
Less than 15 minutes
Tools Used
Screwdriver, Socket set, Wrench Set, Nutdriver
Parts Used
The gasket kit has not arrived as yet still waiting so i can complete the repair! order kit mid March. Valve Reed Kit here.
Did you find this story helpful?
Thanks for voting and helping fellow customers!
Air Compressor would not build air beyond 40 pounds
Michael - February 1, 2019
Tool Type
Compressor
Difficulty
Easy
Time
30-60 minutes
Tools Used
Wrench Set, Nutdriver, scraper for gasket removal
Parts Used
Actually I changed the gasket and reeds but the problem still exist. I have to read more because I am not sure where to go next.
Did you find this story helpful?
Thanks for voting and helping fellow customers!
Compressor would only make 20 lbs of pressure.
Frank - April 7, 2018
Tool Type
Compressor
Difficulty
Easy
Time
15-30 minutes
Tools Used
, Allen wrenches
Parts Used
1. Removed the compressor head.
2. Removed the reed seat.
3. Removed the old gaskets.
4. Installed the new gaskets and the reeds.
5. Torqued the head bolts.
Ran compressor 120 lbs, works great.
2. Removed the reed seat.
3. Removed the old gaskets.
4. Installed the new gaskets and the reeds.
5. Torqued the head bolts.
Ran compressor 120 lbs, works great.
Did you find this story helpful?
Thanks for voting and helping fellow customers!
Bad head gasket
Mark - February 12, 2018
Tool Type
Compressor
Difficulty
Medium
Time
30-60 minutes
Tools Used
Socket set, Nutdriver, Adjustable Wrench, Wire brush
Parts Used
Watched video on u tube, took head off , cleaned off old gasket replaced it with new one.
Very easy due to the video instructions.
Very easy due to the video instructions.
Did you find this story helpful?
Thanks for voting and helping fellow customers!
The compressor was runing but did't produce compressed air.
Gyorgy - January 14, 2018
Tool Type
Compressor
Difficulty
Easy
Time
15-30 minutes
Tools Used
Pliers, Power Drill, Socket set
Parts Used
1. Remove the compressor head.
2. Remove the old gaskets.
3. Clean up the engine head, and remove the old reed valves.
4 Install the new reed valves and the gaskets.
5. Install the compressor head.
2. Remove the old gaskets.
3. Clean up the engine head, and remove the old reed valves.
4 Install the new reed valves and the gaskets.
5. Install the compressor head.
Did you find this story helpful?
Thanks for voting and helping fellow customers!
Compressor would not build pressure
Richard - January 12, 2018
Tool Type
Compressor
Difficulty
Easy
Time
15-30 minutes
Tools Used
Screwdriver, Allen wrench
Parts Used
Removed compressor cover (Screwdriver)
Removed pipe from compressor head to tank. (Adjustable wrench)
Removed compressor head, gaskets and reed valves.(Allen wrench)
Removed old gaskets from surfaces.(Scrapper and utility knife)
Installed new gaskets and reed valves.(Allen wrench)
Reinstalled pipe from compressor head to tank.(Adjustable wrench)
Reinstalled compressor cover (Screw driver)
Started compressor to verify operation.
Did you find this story helpful?
Thanks for voting and helping fellow customers!
Low compression
leroy - December 22, 2017
Tool Type
Compressor
Difficulty
Easy
Time
15-30 minutes
Tools Used
Wrench Set, Allen wrench and scraper
Parts Used
Pulled off the head and replaced the broken gasket..I read the reviews from other customers that had similar problems such as I..very helpful..
Did you find this story helpful?
Thanks for voting and helping fellow customers!
Compressor leaks air and will not build up pressure
Lawrence - December 11, 2017
Tool Type
Compressor
Difficulty
Medium
Time
1-2 hours
Tools Used
Adjustable Wrench, Alan Wrench
Removed cylinder head.
Removed valve plate.
Removed valve reeds.
Removed all of the old gaskets attached to these parts. Thoroughly cleaned where parts of old gaskets were still attached. Prepared them for new parts.
Also had to replace oil filler cap because part of plastic threads were damaged.
Replaced all of these parts and compressor is working again.
Did you find this story helpful?
Thanks for voting and helping fellow customers!
Load More Install Stories
OEM stands for Original Equipment Manufacturer and means the part you’re buying is sourced directly from the manufacturer who made your product. At eReplacementParts, we sell only genuine OEM parts, guaranteeing the part you’re purchasing is of better design and of higher quality than aftermarket parts.
Our product descriptions are a combination of data sourced directly from the manufacturers who made your product as well as content researched and curated by our content & customer service teams. This content is edited and reviewed internally before being made public to customers.
Our customer service team are at the ready daily to answer your part and product questions. We have a dedicated staff with decades of collective experience in helping customers just like you purchase parts to repair their products.
All our part reviews are solicited directly from other customers who have purchased this exact part. While we moderate these reviews for profanity, offensive language or personally identifiable information, these reviews are posted exactly as submitted and no alterations are made by our team.
All our customer repair instructions are solicited directly from other customers just like you who have purchased and replaced this exact part. While we moderate these reviews for profanity, offensive language or personally identifiable information, these reviews are posted exactly as submitted and no alterations are made by our team.
Based on data from past customer purchasing behaviors, these parts are most commonly purchased together along with the part you are viewing. These parts may be necessary or helpful to replace to complete your current repair.
All our installation videos are created and produced in collaboration with our in-house repair technician, Mark Sodja, who has helped millions of eReplacementParts customers over the last 13 years repair their products. Mark has years of experience in selling and repairing both commercial and residential products with a specialty in gas-powered equipment.
This data is collected from customers who submitted a repair instruction after replacing this exact part. Customers can rate how easy the repair was to complete and how long it took. We aggregate this data to provide a repair rating that allows customers to quickly determine the difficulty and time needed to perform their own repair.