


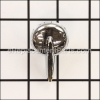
This is an Original Manufacturer Sourced replacement part used on Delonghi Espresso Makers. It is the part that delivers Steam. This Steam Valve Tap Assembly is made out Plastic and Metal. It is Sold Individually. Please note the O-Ring for the tube is Sold Separately.
You would need a Screwdriver and Pliers to complete this job.
• Make sure to Unplug the unit before starting the repair
• First you want to remove all Screws from the back of the Espresso Machine
• This will allow you to slide Two (2) Side Panels backwards to remove them
• Remove Two (2) Screws that hold Display/Control Panel
• Then you want to remove the Steamer Knob
• Lift up the Panel and remove the Pin
• Disconnect the Tube from the Old Tap Assembly
• Connect the New Tap Assembly and re-connect the tube
• Reassemble the unit
Valve Assembly With Frother AS13200153
OEM part for: DeLonghi
Part Number: AS13200153
Jump To:
Product Description ?
- Classification: Part
- Weight: 0.09 lbs.
- Shipping: Ships Worldwide
Frequently Purchased Together ?


Compatibility
This Valve Assembly With Frother will fit the following 19 machines. Confirm this part works with your model, and view the detailed model diagrams and repair help we have to offer.
DeLonghi
Show More Compatible ModelsThis item works with the following types of products:
- Coffee Maker Parts
This part replaces obsolete part #: 7332180500, 7313216621, 7332183200, 7332165700
Customer Part Reviews ?
- 1
Questions & Answers ?
Our customer Service team is at the ready daily to answer your part and product questions.

Ask our Team
We have a dedicated staff with decades of collective experience in helping customers just like you purchase parts to repair their products.
Does this fit my product?Questions & Answers for Valve Assembly With Frother
Customer Repair Instructions ?
All our customer repair instructions are solicited directly from other customers just like you who have purchased and replaced this exact part.
Leaking steam wand valve
Tool Type
Coffee Maker
Difficulty
Easy
Time
Less than 15 minutes
Tools Used
Screwdriver, Pliers
Parts Used
The tap got jammed and blew apart somehow
Tool Type
Coffee Maker
Difficulty
Medium
Time
15-30 minutes
Tools Used
Screwdriver, Power Drill
Parts Used
https://www.youtube.com/watch?v=G7jLrL78byM
Broken knob; tap dripping when machine powered on
Tool Type
Coffee Maker
Difficulty
Medium
Time
30-60 minutes
Tools Used
Screwdriver
Steaming head needed replacement
Tool Type
Coffee Maker
Difficulty
Medium
Time
15-30 minutes
Tools Used
Screwdriver, Pliers
Parts Used
----BEFORE ANYTHING ELSE MAKE SURE TO UNPLUG THE MACHINE!!! BE SAFE----
First, using a phillips head screwdriver, remove all the screws from the back of the espresso machine.
Once that is done you should be able to remove the two side panels by sliding them backwards.
The display piece/control unit where all of the buttons are housed has two screws on each side, remove those as well.
Remove the steamer knob carefully (nearly broke the tap unit removing ours, be gentle)
At this point you should be able to gently flip up the front cover/control section, revealing some of the mechanicals underneath.
For us, we just needed to replace the lower piece, there is a small clip that holds it in place. I removed that clip with pliers, and did the same with the new unit. I then slid the new piece into place on the machine and replaced the clip.
After that, just reinstall the panels in the reverse of removal.
frother and water tank leaks
Tool Type
Coffee Maker
Difficulty
Medium
Time
30-60 minutes
Tools Used
Screwdriver, Pliers, needlenose pliers
2. dissembled back cover first by removing screws. took a little force to remove it. each side then was removed. would have been nice to know to slide it up since it has some hooks at the top.
3. frother was just 3 screws. The small o ring inside the cavity where the plastic water line attached was retrieved with a toothpick and reused in the new frother assembly.
4. reassembled sides and then back cover making sure the panels were positioned properly. I had to do this several times as the water tank side panel needed to interlock properly with the bottom.
5. After about 45 minutes, I tested the frother and tank. success-no leaks.
Steam valve was leaking water, not producing steam
Tool Type
Coffee Maker
Difficulty
Easy
Time
15-30 minutes
Tools Used
Screwdriver, Pliers
Parts Used
2. Remove left and right side panels.
3. Carefully pry off steam knob with 2 bladed screwdrivers.
4. Remove 4 screws that hold front control panel and move panel to the side. ( no need to disconnect wire harness)
5. Steam valve now exposed. Carefully remove spring clip for plastic hose that goes into valve. Needlenose pliers work best.
6. Remove 3 screws for steam valve.
7. Fit new valve and screws. Seat hose fully in valve and secure with spring clip.
8. Reverse procedure to reinstall panels.
9. Turn on machine and test steam function.
10. Make a cappuccino and enjoy.
Tap does not come with new o-ring for water supply line.
Tool Type
Coffee Maker
Difficulty
Easy
Time
30-60 minutes
Tools Used
Screwdriver, Pliers, pick, lube
Parts Used
Removed steam/water knob.
Removed front panel.
Removed two wires to tap microswitch.
Removed 3 screws holding existing tap.
Removed water line to tap.
Removed existing tap.
Mounted new tap.
Replaced O-ring on water line and reinstalled water line.
Connected wires to micro switch.
Tested, no leaks.
Reinstalled steam knob and panels.
caffee maker
Tool Type
Coffee Maker
Difficulty
Easy
Time
30-60 minutes
Tools Used
Socket set, Wrench Set
Parts Used
Low water pressure because of leak in valve for steamer.
Tool Type
Coffee Maker
Difficulty
Medium
Time
30-60 minutes
Tools Used
Screwdriver, Pliers
Parts Used
Leaking water
Tool Type
Coffee Maker
Difficulty
Medium
Time
15-30 minutes
Tools Used
Screwdriver
Parts Used
OEM stands for Original Equipment Manufacturer and means the part you’re buying is sourced directly from the manufacturer who made your product. At eReplacementParts, we sell only genuine OEM parts, guaranteeing the part you’re purchasing is of better design and of higher quality than aftermarket parts.
Our product descriptions are a combination of data sourced directly from the manufacturers who made your product as well as content researched and curated by our content & customer service teams. This content is edited and reviewed internally before being made public to customers.
Our customer service team are at the ready daily to answer your part and product questions. We have a dedicated staff with decades of collective experience in helping customers just like you purchase parts to repair their products.
All our part reviews are solicited directly from other customers who have purchased this exact part. While we moderate these reviews for profanity, offensive language or personally identifiable information, these reviews are posted exactly as submitted and no alterations are made by our team.
All our customer repair instructions are solicited directly from other customers just like you who have purchased and replaced this exact part. While we moderate these reviews for profanity, offensive language or personally identifiable information, these reviews are posted exactly as submitted and no alterations are made by our team.
Based on data from past customer purchasing behaviors, these parts are most commonly purchased together along with the part you are viewing. These parts may be necessary or helpful to replace to complete your current repair.
All our installation videos are created and produced in collaboration with our in-house repair technician, Mark Sodja, who has helped millions of eReplacementParts customers over the last 13 years repair their products. Mark has years of experience in selling and repairing both commercial and residential products with a specialty in gas-powered equipment.
This data is collected from customers who submitted a repair instruction after replacing this exact part. Customers can rate how easy the repair was to complete and how long it took. We aggregate this data to provide a repair rating that allows customers to quickly determine the difficulty and time needed to perform their own repair.