


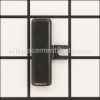
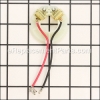
This is a Genuine Manufacturer Sourced replacement part used on certain Makita Drills. This is a Plastic Switch with Wire Leads. Switch handles on/off function of the tool. They also have a role in electric breaking, they can momentarily reverse electrical polarity. Because switches use mechanical internals, they will degrade and wear out over time, eventually needing replacement.
Switch 650747-2
OEM part for: Makita
Part Number: 650747-2
$42.45
In Stock
Jump To:
Frequently Purchased Together ?


Compatibility
This Switch will fit the following 27 machines. Confirm this part works with your model, and view the detailed model diagrams and repair help we have to offer.
Makita
Show More Compatible ModelsThis item works with the following types of products:
- Cordless Drill Parts
- Drill Parts
- Hammer Drill Parts
This part replaces obsolete part #: 650731-7, 650637-9
Repair Videos ?
Watch the Repair Video for
Switch

Articles:
|
Swap your switch. Step-by-step instructions show you how to easily remove and install the switch on your Makita cordless...
April 04, 2016
|

Customer Part Reviews ?
Average Rating (out of 5):
Click to filter by ratings:
5 stars
9
4 stars
0
3 stars
0
2 stars
0
1 stars
1
< PREV
- 1
Factory part and great instruction video.
Once you remove the attachment screws and cut the tape label at the bottom remove the top right side. Take pictures with your phone on how the wire is routed for the switch. The spade wire connectors are on real tight so use pliers to carefully pull straight off. When removing the wires it would be helpful to have another hand holding the armature down as not to pull it out of the left side like I did. Heed this advice as it was then a challenge to get it back together as parts went flying.
Now it’s a good time to check wear on the brushes and use air to blow out the dust and dirt.
First time is the hardest but having the pictures helped get it back together and I’m sure it will live for another ten years.
Steve -
August 8, 2023
Verified Purchase
Easy fix
Worked great
Guest -
October 28, 2022
Verified Purchase
MRO BUYER
great and fast service :)
Attn: -
August 10, 2022
Verified Purchase
Easy repair, great part, worked as expected.
The part was in good condition. Arrived when expected. the drill works great now.
Dawn -
June 9, 2022
Verified Purchase
Satisfied customer
Fast service, part fit perfectly. Happy customer.
Guest -
November 24, 2020
Verified Purchase
Easy repair on switch
Repaired switch on majors cordless drill. No problem with repair
Robert -
April 20, 2020
Verified Purchase
Trigger switch replacement
Resources on ereplacements site helped determine the correct p/n and order it. I did the repair and hammer drill works great.
Wayne -
November 27, 2019
Verified Purchase
Makita drill trigger switch
Found trigger to be exact original part, great quality and easy to replace. The price was a little more than I wanted to pay but I didn't want to buy a new drill due to a failed trigger switch. The shipping was fast. I will use EReplacementParts in the future.
Guest -
October 3, 2019
Verified Purchase
wide range of available parts
Original parts, great schematics, and very good customer service.
robert -
June 17, 2019
Verified Purchase
Part was right, shipping department are liars
Match the part number to what you need, not rocket science. But the lying email saying my part was shipped an hour and half after ordering, That's terrible. Ordered Thursday AM and shipped late Monday. Asked about it, and no response. Terrible and lying customer service.
bob -
July 26, 2019
Verified Purchase
Questions & Answers ?
Our customer Service team is at the ready daily to answer your part and product questions.

Ask our Team
We have a dedicated staff with decades of collective experience in helping customers just like you purchase parts to repair their products.
Does this fit my product?Questions & Answers for Switch
No questions have been asked yet
Customer Repair Instructions ?
All our customer repair instructions are solicited directly from other customers just like you who have purchased and replaced this exact part.
Switch was working erratically and I was afraid it would fail altogether.
Michael - November 4, 2016
👍 3 of 3 people found this instruction helpful
Tool Type
Cordless Drill
Difficulty
Medium
Time
15-30 minutes
Tools Used
Screwdriver
Parts Used
Removed 8 screws to remove drill case to gain access to switch.
Removed one wire at a time from the old switch and hooked up the same wire on the new switch, thus eliminating any chance of connecting them in the wrong spot in the new switch.
Replaced the drill case and screws.
Tested and it worked like new.
Really grateful that this switch was available for this Makita Cordless drill. I use this almost everyday. A $30 part restored a $150 drill I would be lost without.
Did you find this story helpful?
Thanks for voting and helping fellow customers!
Switch defective.
jose - February 28, 2016
👍 2 of 3 people found this instruction helpful
Tool Type
Cordless Drill
Difficulty
Easy
Time
Less than 15 minutes
Tools Used
Screwdriver
Parts Used
Take out the battery. Remove screws from housings. Remove one housing half. Make a wiring diagram. Disconnect the old switch, then connect the new switch following the diagram.Place the switch and wires in the housing so they do not get pinched. Place the screws in the housing and screw them together.
Did you find this story helpful?
Thanks for voting and helping fellow customers!
Drill wouldn't turn on.
STEVEN - November 14, 2021
Tool Type
Cordless Drill
Difficulty
Easy
Time
15-30 minutes
Tools Used
Screwdriver, Pliers
Parts Used
Replaced switch.
Did you find this story helpful?
Thanks for voting and helping fellow customers!
My cordless drill wouldn't start up, battery tested OK, determined the fault was with the switch
Ernie - February 5, 2019
Tool Type
Cordless Drill
Difficulty
Medium
Time
15-30 minutes
Tools Used
Screwdriver, Pliers
Parts Used
1. Removed the screws holding the drill together
2. Separated the two pieces of the drill
3. Removed the old switch one wire at a time replacing the old switch wires with the new switch
wires installing the switch with the forward/reverse lever in the correct position.
4. snapped the two pieces of the drill back together and reinstalled the screws.
5. Snapped a charged battery into place.
6. Pulled the variable speed trigger, wallah, worked like a champ.
Did you find this story helpful?
Thanks for voting and helping fellow customers!
Makita hammer drill wouldn't operate in either direction.
Tracy - November 7, 2018
Tool Type
Hammer Drill
Difficulty
Easy
Time
15-30 minutes
Tools Used
Screwdriver, None
Parts Used
Makita 18V lithium cordless hammer drill.
Removed battery.
Removed the case screws.
Carefully separated the case. Paying particular attention to internal parts and wiring positions and connections. Recommend taking a photo with your phone for ease of reassembly.
Disconnected 5 wires from old trigger switch and removed.
Removed heat-sink screw from old transistor. (Part of trigger-switch assembly). Pay attention to mounting position for ease of installation.
Applied heat-sink compound to mating surface of new transistor and installed screw through new transistor to heat-sink.
Connected 5 wires to new switch and installed in 1/2 of drill case.
Carefully installed other 1/2 of drill case.
Installed case screws, battery, and operationally tested all hammer drill functions.
Worked perfectly.
Did you find this story helpful?
Thanks for voting and helping fellow customers!
Drill wouldn't turn on
David - August 20, 2018
Tool Type
Cordless Drill
Difficulty
Medium
Time
15-30 minutes
Tools Used
Screwdriver
Parts Used
Removed cover per instructions and reinstalled part. It would have been easier had not one of the screws been difficult to remove and making sure no wires were pinched in installing new switch.
Did you find this story helpful?
Thanks for voting and helping fellow customers!
The switch failed to work in forward motion.
Deron - July 19, 2018
Tool Type
Cordless Drill
Difficulty
Medium
Time
15-30 minutes
Tools Used
Screwdriver, Pliers
Parts Used
Removed the old switch and replaced it with the new one. Quite simple, just make sure you write down how the wires were attached from the old switch, and reattach to the new switch.
Did you find this story helpful?
Thanks for voting and helping fellow customers!
Drill would not run in either direction.
Rodney - July 11, 2018
Tool Type
Cordless Drill
Difficulty
Medium
Time
15-30 minutes
Tools Used
Screwdriver
Parts Used
1. Found and watched a YouTube video for replacing this exact part.
2. Removed screws.
3. Pulled two halves apart.
4. Took photos of wire positions and connections.
5. Removed power transistor from heat sink.
6. Disconnected existing switch wires and removed switch.
7. Connected new switch wires.
8. Mounted new power transistor (part of new switch assy) to heat sink.
9. Re-assembled two drill halves.
10. Works like a charm!
Did you find this story helpful?
Thanks for voting and helping fellow customers!
Drill would stop after few seconds.
Joseph - April 18, 2018
Tool Type
Cordless Drill
Difficulty
Medium
Time
30-60 minutes
Tools Used
Screwdriver
Parts Used
Disassembled drill, removing screws. Detached one wire or connection at a time, so as to attach each new wire or connection as the old wire was taken out.
Did you find this story helpful?
Thanks for voting and helping fellow customers!
Stopped working
John - February 14, 2018
Tool Type
Cordless Drill
Difficulty
Expert
Time
30-60 minutes
Tools Used
Screwdriver, Phillips screwdriver
Parts Used
Disassembled unit completely replaced switch, reassembled
Did you find this story helpful?
Thanks for voting and helping fellow customers!
Load More Install Stories
OEM stands for Original Equipment Manufacturer and means the part you’re buying is sourced directly from the manufacturer who made your product. At eReplacementParts, we sell only genuine OEM parts, guaranteeing the part you’re purchasing is of better design and of higher quality than aftermarket parts.
Our product descriptions are a combination of data sourced directly from the manufacturers who made your product as well as content researched and curated by our content & customer service teams. This content is edited and reviewed internally before being made public to customers.
Our customer service team are at the ready daily to answer your part and product questions. We have a dedicated staff with decades of collective experience in helping customers just like you purchase parts to repair their products.
All our part reviews are solicited directly from other customers who have purchased this exact part. While we moderate these reviews for profanity, offensive language or personally identifiable information, these reviews are posted exactly as submitted and no alterations are made by our team.
All our customer repair instructions are solicited directly from other customers just like you who have purchased and replaced this exact part. While we moderate these reviews for profanity, offensive language or personally identifiable information, these reviews are posted exactly as submitted and no alterations are made by our team.
Based on data from past customer purchasing behaviors, these parts are most commonly purchased together along with the part you are viewing. These parts may be necessary or helpful to replace to complete your current repair.
All our installation videos are created and produced in collaboration with our in-house repair technician, Mark Sodja, who has helped millions of eReplacementParts customers over the last 13 years repair their products. Mark has years of experience in selling and repairing both commercial and residential products with a specialty in gas-powered equipment.
This data is collected from customers who submitted a repair instruction after replacing this exact part. Customers can rate how easy the repair was to complete and how long it took. We aggregate this data to provide a repair rating that allows customers to quickly determine the difficulty and time needed to perform their own repair.