


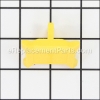
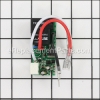
This is a genuine Ridgid replacement part that has been sourced from the original manufacturer and is intended to be used with table saws. The switch attaches to the front side of the saw and is used to relay electricity from the power cord to the motor assembly. This item is priced as a single item.
Switch 089290001701
OEM part for: Ridgid
Part Number: 089290001701
$30.20
In Stock
Jump To:
Frequently Purchased Together ?


Compatibility
This Switch will fit the following 1 machine. Confirm this part works with your model, and view the detailed model diagrams and repair help we have to offer.
Ridgid
This item works with the following types of products:
- Saw Parts
- Table Saw Parts
Customer Part Reviews ?
Average Rating (out of 5):
Click to filter by ratings:
5 stars
4
4 stars
1
3 stars
0
2 stars
0
1 stars
0
< PREV
- 1
Worked as expected
Was an exact replacement and I was up and running.
Frederick Ellis -
May 20, 2023
Verified Purchase
Rigid table saw did not work
Rigid table stopped working. Saw some burn marks at connections at switch. Purchased new one and replaced worked like a charm.
Guest -
July 5, 2020
Verified Purchase
Perfect fit
Part was as described and fit perfect.
Guest -
May 28, 2020
Verified Purchase
Excellent service, exact part, fast shipping!
You will now be my go to source for parts. My experience with your company was outstanding. Thank you!
Guest -
June 19, 2019
Verified Purchase
Installation was easy but the wires were very short on the saw itself making it a bit tricky. Advice given was accurate and a colourcode for wiring would be helpful. I found this on line at rigidforum.com .
This switch arrived in a week or so in off the shelf condition it was installed and works fine. Shipping charges could be lower for Canada as it was more for shipping than the part itself. Otherwise a very positive experience.
R. Newman
iGlobal -
September 13, 2019
Verified Purchase
Questions & Answers ?
Our customer Service team is at the ready daily to answer your part and product questions.

Ask our Team
We have a dedicated staff with decades of collective experience in helping customers just like you purchase parts to repair their products.
Does this fit my product?Questions & Answers for Switch
No questions have been asked yet
Customer Repair Instructions ?
All our customer repair instructions are solicited directly from other customers just like you who have purchased and replaced this exact part.
TABLE SAW HAD A BAD SWITCH.
William - June 24, 2019
Tool Type
Table Saw
Difficulty
Easy
Time
15-30 minutes
Tools Used
Screwdriver, Pliers, Adjustable Wrench
Parts Used
CUSTOMER HAD REMOVED OLD SWITCH . I HAD TO GET DIAGRAM TO REPLACE
SWITCH.
SWITCH.
Did you find this story helpful?
Thanks for voting and helping fellow customers!
Start/stop switch quit working
Robin - January 19, 2019
Tool Type
Table Saw
Difficulty
Medium
Time
15-30 minutes
Tools Used
Screwdriver, Pliers
Parts Used
Removed the fence storage shelf then removed the switch. Wires were very short making it a bit difficult to remove and reinstall. Reinstalled the fence shelf after replacing switch.
Did you find this story helpful?
Thanks for voting and helping fellow customers!
On/off switch failed
Michael - June 6, 2018
Tool Type
Table Saw
Difficulty
Easy
Time
15-30 minutes
Tools Used
Screwdriver, Pliers
Parts Used
Remove old switch.
Install new switch
Install new switch
Did you find this story helpful?
Thanks for voting and helping fellow customers!
Switch W/Key was faulty, needed to replace it.
Jerry - March 15, 2018
Tool Type
Table Saw
Difficulty
Easy
Time
15-30 minutes
Tools Used
Screwdriver
Parts Used
1 Removed old switch
2 Unplugged wires two at a time
3 Re-plugged wires keeping the order straight
4 Screwed new switch into place.
1 Unscrewed old hand-wheel
2 Screwed new wheel in place
It all went well. There is not much room to work on the Switch but take it easy and don't rush it.
2 Unplugged wires two at a time
3 Re-plugged wires keeping the order straight
4 Screwed new switch into place.
1 Unscrewed old hand-wheel
2 Screwed new wheel in place
It all went well. There is not much room to work on the Switch but take it easy and don't rush it.
Did you find this story helpful?
Thanks for voting and helping fellow customers!
No power
Michael - October 16, 2017
👍 1 of 2 people found this instruction helpful
Tool Type
Table Saw
Difficulty
Medium
Time
30-60 minutes
Tools Used
Screwdriver, Needle Nose Pliers, electrical tape
Parts Used
Remove 4 screws from switch housing.
Disassemble switch into 2 halves by prying the 2 holding tabs away with screwdriver.
Remove the main outer switch assembly.
Record the colors and locations of wires on the remaining old switch lower half.
Record the orientation of the new switch lower half with respect to the table/saw.
Disconnect wires from old switch lower half with needle nose pliers.
Hold the electrical housing metal cover plate tightly together with the metal electrical housing with electrical tape.
Disassemble NEW switch into 2 halves by prying the 2 holding tabs away with screwdriver.
Connect wires to new switch lower half with needle nose pliers.
Slide a screwdriver under the new switch lower half and between the connected wires as a support to hold the switch above the side of the machine.
Assemble New Main outer switch assembly by pushing down and snapping together with the new switch lower half in the correct orientation.
Remove the screwdriver used as a support.
Assemble the main switch housing with 4 screws.
Did you find this story helpful?
Thanks for voting and helping fellow customers!
Table saw wouldn't start
Angelo - June 5, 2017
Tool Type
Table Saw
Difficulty
Easy
Time
Less than 15 minutes
Tools Used
Screwdriver
Parts Used
Switch replacement fixed the problem. Saw starts as normal again!
Did you find this story helpful?
Thanks for voting and helping fellow customers!
Burnt out switch
Daniel - January 1, 2017
👍 1 of 2 people found this instruction helpful
Tool Type
Table Saw
Difficulty
Easy
Time
15-30 minutes
Tools Used
Screwdriver, Wire and wire connectors
Parts Used
1) Removed old switch
2) Extended wires for access to new switch
3) Replaced switch
Difficult to align screw holes on switch.
2) Extended wires for access to new switch
3) Replaced switch
Difficult to align screw holes on switch.
Did you find this story helpful?
Thanks for voting and helping fellow customers!
Switch was missing safe key
Andrew - January 21, 2023
👍 0 of 1 people found this instruction helpful
Tool Type
Table Saw
Difficulty
Easy
Time
Less than 15 minutes
Tools Used
Screwdriver
Parts Used
Removed old switch and replaced with new one that had the safe key on it.
Did you find this story helpful?
Thanks for voting and helping fellow customers!
On off switch failed
Michael - May 21, 2020
👍 0 of 1 people found this instruction helpful
Tool Type
Table Saw
Difficulty
Easy
Time
15-30 minutes
Tools Used
Screwdriver
Parts Used
Remove the 4 screws holding the switch assembly to the saw take the 4 screws out of the fence storage assembly under the saw to make room to work remove the 4 wire connection from the switch, make a diagram on where the wires go on the switch otherwise you will be looking for a wiring diagram on the internet. Manufacture didn't waist any money on wire here the wires are very short and have to follow exact path you also need to have fingers the size of a #2 pencil
Did you find this story helpful?
Thanks for voting and helping fellow customers!
OEM stands for Original Equipment Manufacturer and means the part you’re buying is sourced directly from the manufacturer who made your product. At eReplacementParts, we sell only genuine OEM parts, guaranteeing the part you’re purchasing is of better design and of higher quality than aftermarket parts.
Our product descriptions are a combination of data sourced directly from the manufacturers who made your product as well as content researched and curated by our content & customer service teams. This content is edited and reviewed internally before being made public to customers.
Our customer service team are at the ready daily to answer your part and product questions. We have a dedicated staff with decades of collective experience in helping customers just like you purchase parts to repair their products.
All our part reviews are solicited directly from other customers who have purchased this exact part. While we moderate these reviews for profanity, offensive language or personally identifiable information, these reviews are posted exactly as submitted and no alterations are made by our team.
All our customer repair instructions are solicited directly from other customers just like you who have purchased and replaced this exact part. While we moderate these reviews for profanity, offensive language or personally identifiable information, these reviews are posted exactly as submitted and no alterations are made by our team.
Based on data from past customer purchasing behaviors, these parts are most commonly purchased together along with the part you are viewing. These parts may be necessary or helpful to replace to complete your current repair.
All our installation videos are created and produced in collaboration with our in-house repair technician, Mark Sodja, who has helped millions of eReplacementParts customers over the last 13 years repair their products. Mark has years of experience in selling and repairing both commercial and residential products with a specialty in gas-powered equipment.
This data is collected from customers who submitted a repair instruction after replacing this exact part. Customers can rate how easy the repair was to complete and how long it took. We aggregate this data to provide a repair rating that allows customers to quickly determine the difficulty and time needed to perform their own repair.