


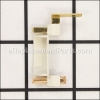
This is an authentic manufacturer sourced replacement part designed for use with Bosch hammer drills. This is an important part of the brush plate which helps to transfer the current. It is made out of metal and it is sold individually. To complete this repair you will need a screwdriver.
Switch Contact 1611329024
OEM part for: Bosch
Part Number: 1611329024
$4.99
Usually ships in 7 - 12 business days
7 - 12 business days
Jump To:
Frequently Purchased Together ?


Compatibility
This Switch Contact will fit the following 79 machines. Confirm this part works with your model, and view the detailed model diagrams and repair help we have to offer.
This item works with the following types of products:
- Rotary Hammer Parts
- Drill Parts
- Hammer Drill Parts
This part replaces obsolete part #: 1611329025
Customer Part Reviews ?
Average Rating (out of 5):
Click to filter by ratings:
5 stars
2
4 stars
0
3 stars
0
2 stars
0
1 stars
0
< PREV
- 1
Great parts
Part arrived on time . Keep up the good work thanks 🙏
Guest -
March 3, 2023
Verified Purchase
Good quality parts.
Arrived quickly and fit perfectly.
Guest -
April 29, 2020
Verified Purchase
Questions & Answers ?
Our customer Service team is at the ready daily to answer your part and product questions.

Ask our Team
We have a dedicated staff with decades of collective experience in helping customers just like you purchase parts to repair their products.
Does this fit my product?Questions & Answers for Switch Contact
No questions have been asked yet
Customer Repair Instructions ?
All our customer repair instructions are solicited directly from other customers just like you who have purchased and replaced this exact part.
Hammer drill suddenly stopped working Adapter Module melted and damaged the Switch Contact
Mark - November 26, 2022
Tool Type
Hammer Drill
Difficulty
Medium
Time
30-60 minutes
Tools Used
, torx bits
Take handle apart
Take gear box off.
Pull out armature
Pull windings out
Replace Adapter module
On Handle side Pull Brush holder
Replace Switch contact.
Reassemble
Take gear box off.
Pull out armature
Pull windings out
Replace Adapter module
On Handle side Pull Brush holder
Replace Switch contact.
Reassemble
Did you find this story helpful?
Thanks for voting and helping fellow customers!
Drill would not run in forward but would run in reverse
Jerry - December 23, 2021
Tool Type
Hammer Drill
Difficulty
Hard
Time
30-60 minutes
Tools Used
Screwdriver, square screw driver, small screwdriver or dental pick
Parts Used
DISCONNECT FROM ELECTRICAL POWER
Remove 3 screws from handle (square driver).
Remove the cover from the handle.
Take a picture to show how the wires are routed from the handle to the body of the drill. There should be enough slack in the wires that you don't need to disconnect any, but take a picture before disconnecting so that you can reconnect them properly.
Using tiny screwdriver or other small tool such as dental pick lift small springs holding brushes in place and move it out of the slot to the side so that brushes will slide back away from commutator.
Usually takes 5 or 6 tries before you get it moved to the side out of the way so it doesn't spring back against the brush.
Use small tool to push brushes all the way back in the slot
Lift brush holder off drill. If it does not come off easily the brushes are probably not all the way back in the slots.
This will expose the contact strips which you can't see with the brush holder in place.
Inspect contact strips.
Mine were pitted where the brush holder made contact for forward rotation.
I scraped the strips to expose fresh copper but could not remove the pits.
I coated the strip with silicone (dielectric) grease but put too much on the first time and had to disassemble everything to wipe off the excess grease after which the drill operated fine, but I ordered new contact strips just in case, because I don't know how long this fix will last.
To remove the contact strips, gently pry them up with a tiny screwdriver. Be careful not to bend them if you plan to clean and re-use them.
No need to worry about bending if you are going to replace them. I would coat the new contacts with dielectric grease (very thin film) to prevent corrosion, then gently press the three prongs into the slots.
As long as you have the brush holder out of the drill, inspect the electrical contact on the bottom of the holder. It is a small round "dot". If it is corroded or burned, now is the easiest time to replace the brush holder.
Also inspect the brushes. If they are short, consider replacing them also.
There is no easier time to replace these parts than when you have them in your hand.
To reassemble, install the new brushes in the holder but do not yet put the springs on top of the brushes. Install the contact strips, then gently push the brush holder onto the shaft until it is seated with the brushes on the commutator and the brush holder touching the contact strips. With a small tool return the springs to the slot to hold the brushes against the commutator.
Check the photo you took of the wire routing to get it the same way. Unless the wires are in the right place the handle will not go back together properly or you might pinch a wire and damage insulation.
Make sure the trigger goes all the way forward in its slot.
Place the cover on the handle, making sure the ball on the cord is properly seated and re-install the three screws.
Plug in the cord and make sure the drill operates both directions.
Cheap fix for an expensive, powerful drill.
Did you find this story helpful?
Thanks for voting and helping fellow customers!
Hammer drill overheated
John - December 26, 2018
👍 0 of 1 people found this instruction helpful
Tool Type
Hammer Drill
Difficulty
Hard
Time
15-30 minutes
Tools Used
Screwdriver
read on your site that the Bosch adapter module & switch contact parts were the ones that went bad--instead of the $38 trigger. Turns out that there are 2 switch contacts AND 2 adapter modules needed (i only bought one of pair of each - my bad for not studying the exploded view more closely). Took the drill apart & visually inspected the old switch contacts. Could not find any fault with them. So I tossed the drill & ate the cost of buying the module & switch contact. Bought a DeWalt hammer drill & completed my project.
Did you find this story helpful?
Thanks for voting and helping fellow customers!
OEM stands for Original Equipment Manufacturer and means the part you’re buying is sourced directly from the manufacturer who made your product. At eReplacementParts, we sell only genuine OEM parts, guaranteeing the part you’re purchasing is of better design and of higher quality than aftermarket parts.
Our product descriptions are a combination of data sourced directly from the manufacturers who made your product as well as content researched and curated by our content & customer service teams. This content is edited and reviewed internally before being made public to customers.
Our customer service team are at the ready daily to answer your part and product questions. We have a dedicated staff with decades of collective experience in helping customers just like you purchase parts to repair their products.
All our part reviews are solicited directly from other customers who have purchased this exact part. While we moderate these reviews for profanity, offensive language or personally identifiable information, these reviews are posted exactly as submitted and no alterations are made by our team.
All our customer repair instructions are solicited directly from other customers just like you who have purchased and replaced this exact part. While we moderate these reviews for profanity, offensive language or personally identifiable information, these reviews are posted exactly as submitted and no alterations are made by our team.
Based on data from past customer purchasing behaviors, these parts are most commonly purchased together along with the part you are viewing. These parts may be necessary or helpful to replace to complete your current repair.
All our installation videos are created and produced in collaboration with our in-house repair technician, Mark Sodja, who has helped millions of eReplacementParts customers over the last 13 years repair their products. Mark has years of experience in selling and repairing both commercial and residential products with a specialty in gas-powered equipment.
This data is collected from customers who submitted a repair instruction after replacing this exact part. Customers can rate how easy the repair was to complete and how long it took. We aggregate this data to provide a repair rating that allows customers to quickly determine the difficulty and time needed to perform their own repair.