


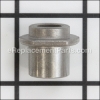
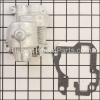
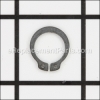
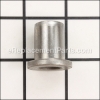
This is a genuine OEM sourced replacement front sleeve bearing which is used on Kitchen Aid stand mixers. It is the front worm gear bearing. It is made out of metal and it is sold individually.
To complete this repair you will need a screwdriver.
• First you want to remove the trim piece secures with one (1) screw
• Then remove the cover secured with four (4) screws
• This will allow you to remove the speed switch assembly secured by two (2) screws
• Then remove the gear cover secure by four (4) screws
• This will allow you to access the shaft bearing
• Remove the old bearing and replace it with a new one
• This may be a good time to check the rest of the internal components like gears for any damage or signs of wear and see if some of them may need to be replaced
Bearing WPW10170080
OEM part for: KitchenAid
Part Number: WPW10170080
Jump To:
Product Description ?
- Classification: Part
- Weight: 0.01 lbs.
- Shipping: Ships Worldwide
Frequently Purchased Together ?

Compatibility
This Bearing will fit the following 224 machines. Confirm this part works with your model, and view the detailed model diagrams and repair help we have to offer.
KitchenAid
Show More Compatible ModelsThis item works with the following types of products:
- Mixer Parts
This part replaces obsolete part #: w1070080, W10170080, 9703560
Questions & Answers ?
Our customer Service team is at the ready daily to answer your part and product questions.

Ask our Team
We have a dedicated staff with decades of collective experience in helping customers just like you purchase parts to repair their products.
Does this fit my product?Questions & Answers for Bearing
Customer Repair Instructions ?
All our customer repair instructions are solicited directly from other customers just like you who have purchased and replaced this exact part.
Mixer would not mix. Gear or worm gear strippped of teeth and planetary fell out of mixer
Tool Type
Mixer
Difficulty
Easy
Time
1-2 hours
Tools Used
Screwdriver, Pliers, Clip Pliers
Gears grinding
Tool Type
Mixer
Difficulty
Medium
Time
1-2 hours
Tools Used
Screwdriver, Ring clip pliers
https://www.youtube.com/watch?v=VeCiivPt7hk
Gears stripped
Tool Type
Mixer
Difficulty
Hard
Time
1-2 hours
Tools Used
Screwdriver, Pliers, Small snap ring pliers.
2.Removed Transmission cover
3.Removed all gears starting with vertical set.
4. Snap ring pliers were required to continue disassembly of vertical set of gears.
5. After taking vertical and horizontal gears out they were cleaned. Paper towels and q-tips worked well
6.Next cleaned transmission cover and housing.
7. Reassembled packing gears and trans housing with fresh food grade grease.
8. I replaced motor next. Marked where two wires from motor attach to control board.
9.Reassembled covers using a fresh gasket for trans cover. It is important to season gasket with a thin coat of food grade grease.
10. Tested and put to work.
Stripped out worm and follower gears
Tool Type
Mixer
Difficulty
Easy
Time
30-60 minutes
Tools Used
Screwdriver, file
2) Removed top of gearbox
3) Inspected gears and noted excessive wear
4) Cleaned out gearbox thoroughly to remove all old grease which was contaminated with steel & brass particles from the worm gears
5) Cleaned and greased all parts & bearings (both new and old) before installation
6) New follower gear would not slide onto output shaft due to burrs around drive pin hole in the output shaft. Light filing was required to remove high spots and allow new follower gear to slide properly into place.
7) Packed gearbox with grease and reassembled everything
Worm gear was stripped
Tool Type
Mixer
Difficulty
Medium
Time
30-60 minutes
Tools Used
Screwdriver, Snap ring pliers
2. Cleaned all old grease from gear housing.
3. Assemble all new parts and install
4. Pack gear housing with new grease.
5. Assemble gear housing, finish assembling mixer.
Worn out gears
Tool Type
Mixer
Difficulty
Easy
Time
15-30 minutes
Tools Used
Screwdriver, Pliers
Planetary gear wore out
Tool Type
Mixer
Difficulty
Easy
Time
30-60 minutes
Tools Used
Screwdriver, Mallet
Worn gears
Tool Type
Mixer
Difficulty
Medium
Time
30-60 minutes
Tools Used
Pliers
https://www.youtube.com/watch?v=VeCiivPt7hk
Replacing the transmission housing and shaft Bearing front
Tool Type
Mixer
Difficulty
Easy
Time
15-30 minutes
Tools Used
Screwdriver
Parts Used
1. Remove the label band around the head of the mixer by removing the one screw holding it in place.
2. Remove the 4 screw holding the cover for the head of the mixer in place.
3. Remove the mixer head.
4. Remove 4-5 screws holding the transmission housing in place.
5. Remove old transmission housing.
6. If the gasket is still good, apply some grease to the gasket to form a seal. Replace the gasket.
7. Replace the transmission housing.
8. Replace screws to secure transmission housing.
9. Replace the cover for the head of the mixer.
10. Replace screws to secure the cover.
11. Replace the label band and screw to secure it in place.
Mixer beater bar would slip under pressure
Tool Type
Mixer
Difficulty
Easy
Time
1-2 hours
Tools Used
Screwdriver, Tool to snap ring loose
OEM stands for Original Equipment Manufacturer and means the part you’re buying is sourced directly from the manufacturer who made your product. At eReplacementParts, we sell only genuine OEM parts, guaranteeing the part you’re purchasing is of better design and of higher quality than aftermarket parts.
Our product descriptions are a combination of data sourced directly from the manufacturers who made your product as well as content researched and curated by our content & customer service teams. This content is edited and reviewed internally before being made public to customers.
Our customer service team are at the ready daily to answer your part and product questions. We have a dedicated staff with decades of collective experience in helping customers just like you purchase parts to repair their products.
All our part reviews are solicited directly from other customers who have purchased this exact part. While we moderate these reviews for profanity, offensive language or personally identifiable information, these reviews are posted exactly as submitted and no alterations are made by our team.
All our customer repair instructions are solicited directly from other customers just like you who have purchased and replaced this exact part. While we moderate these reviews for profanity, offensive language or personally identifiable information, these reviews are posted exactly as submitted and no alterations are made by our team.
Based on data from past customer purchasing behaviors, these parts are most commonly purchased together along with the part you are viewing. These parts may be necessary or helpful to replace to complete your current repair.
All our installation videos are created and produced in collaboration with our in-house repair technician, Mark Sodja, who has helped millions of eReplacementParts customers over the last 13 years repair their products. Mark has years of experience in selling and repairing both commercial and residential products with a specialty in gas-powered equipment.
This data is collected from customers who submitted a repair instruction after replacing this exact part. Customers can rate how easy the repair was to complete and how long it took. We aggregate this data to provide a repair rating that allows customers to quickly determine the difficulty and time needed to perform their own repair.