

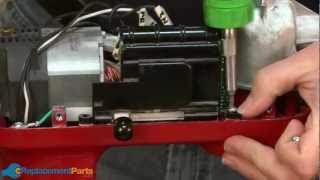
An OEM KitchenAid sensor. Part includes connection to clip to control assembly. It communicates to the control assembly how fast the motor is turning in KitchenAid mixers. It's attached to the motor frame using two clips on both sides of the sensor.
Replace this part if the mixer, when turned on to the lowest speed, ramps up from low to high only running for a few moments, and then turns off completely.
Removal Tips:
Unclip from control assembly first. Use needle nose pliers to pinch retaining clips on on sides of old sensor and gently pull straight up.
New part easily clips into place on the motor and attaches one way to the control assembly.
Stand Mixer Motor Control Boar WP9706648
OEM part for: KitchenAid
Part Number: WP9706648
$82.54
In Stock
Product Description ?
- Classification: Part
- Weight: 0.01 lbs.
- Shipping: Ships Worldwide
Compatibility
This Stand Mixer Motor Control Boar will fit the following 119 machines. Confirm this part works with your model, and view the detailed model diagrams and repair help we have to offer.
KitchenAid
Show More Compatible ModelsThis item works with the following types of products:
- Mixer Parts
This part replaces obsolete part #: WP9703312, 9703312
Repair Videos ?
Watch the Repair Video for
Stand Mixer Motor Control Boar
Articles:
|
This article will help you diagnose and repair a bad speed sensor or control switch on your KitchenAid Pro 6 mixer. ...
March 28, 2013
|

Questions & Answers ?
Our customer Service team is at the ready daily to answer your part and product questions.

Ask our Team
We have a dedicated staff with decades of collective experience in helping customers just like you purchase parts to repair their products.
Does this fit my product?Questions & Answers for Stand Mixer Motor Control Boar
No questions have been asked yet
Customer Repair Instructions ?
All our customer repair instructions are solicited directly from other customers just like you who have purchased and replaced this exact part.
My Kitchenaid Professional 6 mixer speed control was not working. I would turn it on high and it would go slow, then faster, then slow...etc....
Richard - November 17, 2015
👍 4 of 4 people found this instruction helpful
Tool Type
Mixer
Difficulty
Medium
Time
15-30 minutes
Tools Used
Screwdriver
My patient told me that the repair was easy so I ordered both parts just in case. The video showed me how to take apart the case and get down to the control board and speed sensor. Also the top of the mixer was loose on the base. I removed the motor unit and tightened the bolts holding the upper motor unit to the base using lock tight. I removed both the control assembly and the speed sensor. i marked the wires with masking tape to indicate where to put them on the new control assembly. Here is where it got a little tricky. The new control assembly had 4 attachment points where the original had 5. It turned out that there are two wires that came off the switch portion of the original control assembly. Only the wire that comes from the power cord to the original switch needed to be connected to the new control assembly. This wire came from the power cord with a connector to the original switch and another connector to the control assembly board. I taped the connector that had been attached to the switch with electrical tape and plugged in the end to the connector on the control assembly.
It worked perfectly.
It worked perfectly.
Did you find this story helpful?
Thanks for voting and helping fellow customers!
Needed a Sensor Hall Effect
Anthony - August 11, 2017
👍 3 of 3 people found this instruction helpful
Tool Type
Mixer
Difficulty
Easy
Time
Less than 15 minutes
Tools Used
Screwdriver
Parts Used
Followed the eReplacement parts video instructions.
How to repair the sensor Hall Effect.
It was very easy.
How to repair the sensor Hall Effect.
It was very easy.
Did you find this story helpful?
Thanks for voting and helping fellow customers!
Turned mixer on speed 2 and it spun up to speed 10 for 5 seconds or so, and shut off.
Joseph - December 15, 2016
👍 2 of 2 people found this instruction helpful
Tool Type
Mixer
Difficulty
Easy
Time
Less than 15 minutes
Tools Used
Screwdriver
Parts Used
After viewing the video on this website for the part, this is what I did:
1. Used a Philips screwdriver to remove one screw on the back of the Kitchen Aid Stand Mixer holding the vanity strip on, and removed the vanity strip.
2. Unscrewed four screws, that were beneath the vanity strip, two on each side, and removed the top of the mixer.
3. Unplugged the white plug of the sensor from the control board (noted which way it fits into the control board, so I did not plug the new one in, the wrong way).
4. Used the tip of a small flat-head screwdriver and pushed-in a tab on the black plug, which released the black plug of the sensor. The old sensor was now out.
5. Pushed the black plug of the new sensor back into the spot where I removed the old sensor removed in #4 above.
6. Plugged the white plug into the control board where I removed the old sensor in #3 above.
7. Plugged the mixer into the outlet and tested the mixer - it worked perfectly.
8. Unplugged the mixer and put the top back on the mixer, removed in #2 above.
9. Screwed the four screws back into the mixer, also removed in #2 above.
10. Put the vanity strip back on the mixer and screwed-in the final screw removed in #1 above.
11. Tested the mixer again - worked. Total time: about 10 minutes!
I was quoted $70 by Kitchen Aid to fix the mixer, plus it would have been a 50 mile round trip to take it to the repair center. Total cost, including shipping, after buying the part on this website: $14.40! Received the part on Saturday after ordering on Monday night.
Did you find this story helpful?
Thanks for voting and helping fellow customers!
When turned on at low speed it immediately went to high speed.
Jean - May 17, 2017
👍 2 of 3 people found this instruction helpful
Tool Type
Mixer
Difficulty
Easy
Time
15-30 minutes
Tools Used
Screwdriver
Parts Used
1. Removed the trim band with the name on it (one screw).
2. Removed the top housing of the mixer (4 screws).
3. Unplugged speed control from board then pressed the black clip at the bottom of the clip (other end of the sensor) and released it by pulling up on it.
4. Plugged in new speed sensor to board and clipped the other end back into the slot.
5. Put housing back on with the 4 screws then replaced the trim band with the 1 screw.
Mixer was unplugged while repair was being done.
Works like a charm. BTW the mixer was given to me because the previous owner could not find a repairman in town. Yay for me and You Tube (I watched your repair video to determine how to repair mixer and also to determine what was wrong).
Did you find this story helpful?
Thanks for voting and helping fellow customers!
Faulty sensor
DIana - January 4, 2017
👍 1 of 1 people found this instruction helpful
Tool Type
Mixer
Difficulty
Easy
Time
Less than 15 minutes
Tools Used
Screwdriver
Parts Used
1. Took the unit apart
2. Removed the old sensor
3. Installed the new part
4. Reassembled the mixer
2. Removed the old sensor
3. Installed the new part
4. Reassembled the mixer
Did you find this story helpful?
Thanks for voting and helping fellow customers!
When I turned on mixer, it would go to top speed and then shut off.
Nancy - November 25, 2016
👍 1 of 1 people found this instruction helpful
Tool Type
Mixer
Difficulty
Easy
Time
15-30 minutes
Tools Used
Screwdriver
Parts Used
Removed four screws to remove mixer cover. Unplugged the faulty cable and replaced with new cable Put cover back on and turned on the machine. Worked perfectly. I now had ten variable speeds on my Kitchen Aide mixer.
Did you find this story helpful?
Thanks for voting and helping fellow customers!
When I tried to use my mixer sometimes it would turn on and sometimes not, when it i did sometimes it wouldn't run at the correct speed
Gerald - June 18, 2016
👍 1 of 1 people found this instruction helpful
Tool Type
Mixer
Difficulty
Medium
Time
15-30 minutes
Tools Used
Screwdriver
I watched how to do the repair. First I removed the trim band then the 4 screws holding the top cover, second I labeled the wires according to where they went on the old speed control and disconnected them, then after removing the screws that held the speed control I removed and replace it with the new one and the the speed sensor, I then reassembled the cover and trim band and my 20 year old Kitchen Aid mixer works as good as new.
Did you find this story helpful?
Thanks for voting and helping fellow customers!
KitchenAid Stand Mixer would go at a very high speed (regardless of the setting) and then stop entirely
Stephanie - January 20, 2018
Tool Type
Mixer
Difficulty
Easy
Time
Less than 15 minutes
Tools Used
Screwdriver
Parts Used
1. Unscrewed and removed the metal band around the top of the mixer
2. Unscrewed the rest of the screws holding the top of the mixer together
3. Removed top
4. Identify the hall effect sensor, a small wire connected at the top of the machine
5. Removed the sensor by putting pressure on either side of the little black plastic piece on one end of the wire. I used two screw drives to do this as it was kind of hard to get to with fingers. The black piece had little arms that helped it stay in place that you had to pinch together.
6. Once old part was removed, pop the new one in place
Easy peasy!
Did you find this story helpful?
Thanks for voting and helping fellow customers!
Speed sensor went on our KitchenAid mixer
Rodrick - December 24, 2017
Tool Type
Mixer
Difficulty
Easy
Time
Less than 15 minutes
Tools Used
Screwdriver
Parts Used
Removed cover using screwdriver and pulled old part by hand. Installed in reverse. Easy!
Did you find this story helpful?
Thanks for voting and helping fellow customers!
Mixer would start at high speed, then stop working seconds later.
Kristi - October 12, 2017
Tool Type
Mixer
Difficulty
Easy
Time
15-30 minutes
Tools Used
Screwdriver
Parts Used
Watched your YouTube video. Unscrewed band and top of housing. Unscrewed control panel. Disconnected old sensor, clicked in New one. Replaced control panel, housing and band.
https://www.youtube.com/watch?v=41qTqTWQkMI
https://www.youtube.com/watch?v=41qTqTWQkMI
Did you find this story helpful?
Thanks for voting and helping fellow customers!
Load More Install Stories
OEM stands for Original Equipment Manufacturer and means the part you’re buying is sourced directly from the manufacturer who made your product. At eReplacementParts, we sell only genuine OEM parts, guaranteeing the part you’re purchasing is of better design and of higher quality than aftermarket parts.
Our product descriptions are a combination of data sourced directly from the manufacturers who made your product as well as content researched and curated by our content & customer service teams. This content is edited and reviewed internally before being made public to customers.
Our customer service team are at the ready daily to answer your part and product questions. We have a dedicated staff with decades of collective experience in helping customers just like you purchase parts to repair their products.
All our part reviews are solicited directly from other customers who have purchased this exact part. While we moderate these reviews for profanity, offensive language or personally identifiable information, these reviews are posted exactly as submitted and no alterations are made by our team.
All our customer repair instructions are solicited directly from other customers just like you who have purchased and replaced this exact part. While we moderate these reviews for profanity, offensive language or personally identifiable information, these reviews are posted exactly as submitted and no alterations are made by our team.
Based on data from past customer purchasing behaviors, these parts are most commonly purchased together along with the part you are viewing. These parts may be necessary or helpful to replace to complete your current repair.
All our installation videos are created and produced in collaboration with our in-house repair technician, Mark Sodja, who has helped millions of eReplacementParts customers over the last 13 years repair their products. Mark has years of experience in selling and repairing both commercial and residential products with a specialty in gas-powered equipment.
This data is collected from customers who submitted a repair instruction after replacing this exact part. Customers can rate how easy the repair was to complete and how long it took. We aggregate this data to provide a repair rating that allows customers to quickly determine the difficulty and time needed to perform their own repair.