

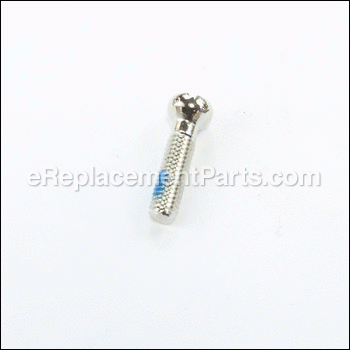


It is a genuine OEM sourced screw, it is not an aftermarket imitation. This high quality hardware is specially designed for use with Ridgid and Ryobi drills and drivers. It is generally used to secure the drill chuck. Includes (1) torx screw per order.
Screw M6x1.0x27mm Ni-plate 6613402
OEM part for: Ridgid, Ryobi
Part Number: 6613402
$4.99
Usually ships in 7 - 12 business days
7 - 12 business days
Jump To:
Product Description ?
- M6 X 1.0 X 27mm
- Classification: Part
- Weight: 0.01 lbs.
- Shipping: Ships Worldwide
Frequently Purchased Together ?


Compatibility
This Screw M6x1.0x27mm Ni-plate will fit the following 101 machines. Confirm this part works with your model, and view the detailed model diagrams and repair help we have to offer.
This item works with the following types of products:
- Drill Parts
- Hammer Drill Parts
- Cordless Drill Parts
This part replaces obsolete part #: 660134002
Repair Videos ?
Watch the Repair Video for
Screw M6x1.0x27mm Ni-plate

Customer Part Reviews ?
Average Rating (out of 5):
Click to filter by ratings:
5 stars
5
4 stars
0
3 stars
0
2 stars
0
1 stars
0
< PREV
- 1
Ridgid set screw
Your rep was very helpful in securing the right diameter screw. The replacemaent other sites had a different diameter. This one was a little longer but I was able grind off the extra length.
Guest -
July 31, 2023
Verified Purchase
Easy repair.
Needed to replace chucks on two mud mixers. Showed up quick and in good shape. Will order parts from them again.
Kris -
March 31, 2023
Verified Purchase
This was the one screw I could not find anywhere else thank you
I would definitely recommend this website for anybody who needs parts for the Ryobi drills sauce or any other item that may be missing or broken part
John -
September 4, 2021
Verified Purchase
Worked as expected
The part was fine. Where I was upset was the parts I ordered were delivered to our old address we moved from 5 years ago! I have ordered parts since moving to our present address a number of times and they were delivered with no problem.
Ramon -
August 19, 2020
Verified Purchase
👍 5 stars
👍the nice lady who helped us was awesome. Thank u for taking time to help us, especially during these hard times. We definitely will order again & give referral. 👍
Guest -
June 12, 2020
Verified Purchase
Questions & Answers ?
Our customer Service team is at the ready daily to answer your part and product questions.

Ask our Team
We have a dedicated staff with decades of collective experience in helping customers just like you purchase parts to repair their products.
Does this fit my product?Questions & Answers for Screw M6x1.0x27mm Ni-plate
No questions have been asked yet
Customer Repair Instructions ?
All our customer repair instructions are solicited directly from other customers just like you who have purchased and replaced this exact part.
Drill bit was jammed into cordless drill chuck. Could not get drill bit out of chuck. It was stuck.
Edward - January 20, 2018
👍 2 of 2 people found this instruction helpful
Tool Type
Cordless Drill
Difficulty
Medium
Time
Less than 15 minutes
Tools Used
Screwdriver, Narrow nosed vise grip, allen wrench
Parts Used
1 Tried putting drill bit in bench vise and pulled drill to remove bit. Finally broke bit off.
2 Opened the drill chuck as wide as it would go. Poured liquid wrench down into the drill chuck. Then used a narrow nosed vise grip to grab the end of the broken drill bit. Twisted slowly back and forth. Finally noticed that when I turned the bit clockwise, it seemed to be coming out. Kept turning the bit clockwise and it was kept coming out. Finally got it out.
3 Looked at the end of the bit and noticed thread marks on the end of the bit that had been stuck in the drill.
4 Realized that the screw that was supposed to be in the end of the armature that keeps the chuck from coming off was not there. Apparently it had fallen out and the bit I was using was about the same size as the threaded hole the screw came out of. The bit literally threaded itself into the hole which was why it couldn't be pulled straight out.
5 After getting the bit out, I put the short end of a 3/8 allen wrench in the drill chuck, tightened the chuck, laid the drill on the workbench with the chuck extending over the end of the bench, and hit the long end of the allen wrench with a hammer fast and hard counter clockwise. This loosened the chuck so I could remove it from the armature. I then could plainly see that the screw was completely missing and had not just broken off.
6 Then I ordered the make and model number of the replacement screw I needed. When I got it, being the chuck was off, I tested to make sure the screw was the right one, especially since the screw had to be a "reverse" screw. In other words, instead of "lefty loosey, righty tighty" , it is the reverse.
7 It was the right screw for the job. Screwed the chuck back on tight, put the screw in, and the drill is as good as new.
Did you find this story helpful?
Thanks for voting and helping fellow customers!
Chuck got old
Victor - November 30, 2017
👍 1 of 1 people found this instruction helpful
Tool Type
Cordless Drill
Difficulty
Easy
Time
Less than 15 minutes
Tools Used
Screwdriver, Allen wrench,hammer
Remove the screw from the middle of chuck
Install allen wrench in chuck
Hit with hammer to loosen chuck
Install new chuck
Install screw
Install allen wrench in chuck
Hit with hammer to loosen chuck
Install new chuck
Install screw
Did you find this story helpful?
Thanks for voting and helping fellow customers!
Chuck went bad
Dan - November 13, 2021
Tool Type
Cordless Drill
Difficulty
Medium
Time
15-30 minutes
Tools Used
Screwdriver
Parts Used
Removed the chuck, screwed on a new one.
Did you find this story helpful?
Thanks for voting and helping fellow customers!
Missing chuck and screw
Efrain - December 25, 2018
Tool Type
Drill
Difficulty
Easy
Time
Less than 15 minutes
Tools Used
Screwdriver
just replace the parts and I was good to go. excellent original part and easy to order. prompt delivery make it even easier for me. thank you. I recommend this site to order parts.
Did you find this story helpful?
Thanks for voting and helping fellow customers!
BROKEN CHUCK
Robert - December 6, 2018
Tool Type
Cordless Drill
Difficulty
Medium
Time
Less than 15 minutes
Tools Used
Screwdriver
Parts Used
1. Removed the old chuck (a real pain).
2. Ordered a new chuck and screw.
3. Screwed in both.
2. Ordered a new chuck and screw.
3. Screwed in both.
Did you find this story helpful?
Thanks for voting and helping fellow customers!
Bad chuck.
Ronnie - January 24, 2018
👍 1 of 2 people found this instruction helpful
Tool Type
Cordless Drill
Difficulty
Easy
Time
15-30 minutes
Tools Used
Screwdriver
I ordered the screw for the chuck so I could verify that the screw had reverse threads (it did) and the screw driver size, it was hard to see or tell what fit and if I stripped the head I could replace it. The screw came out very hard and I had to place the drill lightly in the vice to help hold, I had some concerns about breaking the plastic case but it came out.
Did you find this story helpful?
Thanks for voting and helping fellow customers!
The chuck screw snapped off
Larry - December 23, 2017
Tool Type
Cordless Drill
Difficulty
Easy
Time
Less than 15 minutes
Tools Used
Screwdriver
Parts Used
It was very simple to repair the drill with the screw I purchased.
1. I screwed the chuck back onto the drill.
2. There was thread lock on the screw already so I didn't need to add any. If your part doesn't have any, you should add a small drop of blue or red thread lock. I think the blue it good enough and can be removed.The red can only be removed with heat.
3. I inserted the screw, turning counterclockwise to tighten as chuck screws are reverse threaded.
Now my drill is back in working order. And it took no more than a couple minutes with the correct part.
Did you find this story helpful?
Thanks for voting and helping fellow customers!
Screw (M6 x 27 mm) Broke into two pieces
Thomas - November 19, 2017
Tool Type
Cordless Drill
Difficulty
Easy
Time
Less than 15 minutes
Tools Used
Screwdriver
Parts Used
Removed broken screw while drilling a pilot hole for inserting an easy out tool. The broken half of the bolt that was still in the drill came out while I was drilling the pilot hole. The broken piece was left hand thread and it turned out as the drill bit turned.
Did you find this story helpful?
Thanks for voting and helping fellow customers!
Chuck would not hold bits
Lee - February 25, 2017
Tool Type
Rotary Hammer
Difficulty
Medium
Time
15-30 minutes
Tools Used
Screwdriver, Socket ellen and impact
https://www.youtube.com/watch?v=usC8unA5RiA
I watched the above video, and before I knew it I had a new chuck on my drill.
Thank you.
I watched the above video, and before I knew it I had a new chuck on my drill.
Thank you.
Did you find this story helpful?
Thanks for voting and helping fellow customers!
OEM stands for Original Equipment Manufacturer and means the part you’re buying is sourced directly from the manufacturer who made your product. At eReplacementParts, we sell only genuine OEM parts, guaranteeing the part you’re purchasing is of better design and of higher quality than aftermarket parts.
Our product descriptions are a combination of data sourced directly from the manufacturers who made your product as well as content researched and curated by our content & customer service teams. This content is edited and reviewed internally before being made public to customers.
Our customer service team are at the ready daily to answer your part and product questions. We have a dedicated staff with decades of collective experience in helping customers just like you purchase parts to repair their products.
All our part reviews are solicited directly from other customers who have purchased this exact part. While we moderate these reviews for profanity, offensive language or personally identifiable information, these reviews are posted exactly as submitted and no alterations are made by our team.
All our customer repair instructions are solicited directly from other customers just like you who have purchased and replaced this exact part. While we moderate these reviews for profanity, offensive language or personally identifiable information, these reviews are posted exactly as submitted and no alterations are made by our team.
Based on data from past customer purchasing behaviors, these parts are most commonly purchased together along with the part you are viewing. These parts may be necessary or helpful to replace to complete your current repair.
All our installation videos are created and produced in collaboration with our in-house repair technician, Mark Sodja, who has helped millions of eReplacementParts customers over the last 13 years repair their products. Mark has years of experience in selling and repairing both commercial and residential products with a specialty in gas-powered equipment.
This data is collected from customers who submitted a repair instruction after replacing this exact part. Customers can rate how easy the repair was to complete and how long it took. We aggregate this data to provide a repair rating that allows customers to quickly determine the difficulty and time needed to perform their own repair.