


Video

Tools & Materials

Tines not turning? It's time to face the fix. Whether you are a casual cultivator or a legendary landscaper, eReplacementParts.com provides the parts, procedures and facts you need to fearlessly fix what fails you.
The transmission on your cultivator has many parts working inside of it. It starts with the clutch drum. The clutch engages the clutch drum to start the transmission turning. Worn pads on the clutch can cause the clutch to slip, disengage, or engage with low power. If this happens, you will see lots of dust (from the worn pads) and (often) bluing of the metal on the clutch drum.
From the clutch drum, the drivetrain continues into the transmission housings. Inside, there is a shaft and a series of gears that greatly reduce the RPM from the engine to the tine shafts. While reducing speed, the gears increase the amount of torque that is delivered to the tine shafts.
If the clutch and drum appear undamaged, there is likely a problem with the gearing in the transmission. Sometimes, if the gearing has gone bad, you can rotate the tine shaft by hand and hear a grinding sound (caused by the stripped gears). In (rare) cases of a total failure, you might even see the transmission housings cracked and gear oil leaking out.
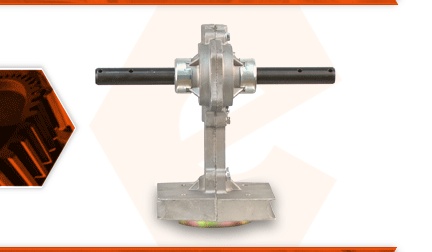
This article provides step-by-step instructions for removing and installing the transmission on a Powermate cultivator.
Let's get started.
 REMOVING THE TRANSMISSION [top]
1. Remove the tines.
REMOVING THE TRANSMISSION [top]
1. Remove the tines.
Apply penetrating oil to the tines (at the point-of-attachment on the tine shaft).

Remove the cotter pin from the end of the tine shaft.

Remove the (2) tines from the tine shaft.

Repeat this step to remove the tines on the opposite side.

In some instances, the tines may be stuck to the tine shaft. If so, a hammer and punch may be used to break the tines free.

2. Remove the shield assembly.
Remove the nut and bolt from the (right-hand) side of the shield assembly.

Loosen the nut and bolt on the (left-hand) side of the shield assembly.

Remove the (4) bolts securing the shield assembly to the transmission. Note that these bolts also secure the engine to the transmission; so be ready to support the engine as the final bolt is removed.

Allow the engine to rest against the handle assembly (or the floor).

Pivot the top half of the shield assembly away from the bottom half.

Remove the shield assembly from the unit.

3. Separate the handle from the transmission.
Remove the two bolts securing the transmission to the handle assembly.

Slide the transmission and wheel assembly away from the handle.

4. Remove the wheel assembly.
Remove the two bolts securing the wheel bracket to the transmission.

Remove the wheel assembly and bracket from the transmission.

INSTALLING THE NEW TRANSMISSION [top] 5. Install the wheel assembly.
Align the wheel assembly bracket with the mounting holes on the new transmission.

Secure the wheel assembly to the new transmission with the (2) bolts.

6. Connect the handle assembly.
Slide the handle assembly (and engine) onto the transmission and align the mounting holes.

Secure the handle assembly to the transmission with the (2) bolts.

REASSEMBLING THE UNIT [top] 7. Reinstall the shield assembly.
Partially install the shield assembly.

Pivot the shield assembly into the closed position.

Align the mounting holes on the (inner) shield assembly with the holes on the transmission housing. (The bolts will be installed in the next step).

8. Reinstall the engine.
Lift the engine assembly and align the clutch (on the engine) with the clutch drum (on the transmission).

Loosely install the four bolts (ensuring alignment of all three components).

Tighten the (4) bolts to secure the transmission to the engine.

Tighten the (2) outer bolts to secure the shield assembly.

9. Reinstall the tines.
Install the inner tines (the inner tines are bent in BOTH directions).

Install the outer tines (the outer tines are bent in one direction only; these bent ends should be facing the inner tines).

Secure the tines with the (2) cotter pins.


Do-it-yourself repairs like these are easier than you might think. From lawn machines to cordless drills - kitchen mixers - outdoor grills; our "how-to" articles and videos walk you through each repair from start to finish. So, doing-it-yourself means never having to do it alone.
