

How to Replace the Drive Shaft on a String Trimmer
Finish Nailer Repair - Replacing the Driver Guide (Ridgid Part # 79004001022)
A string trimmer drive shaft is one of those parts that simply wears out over time. If it becomes too worn or breaks, you will need to replace it. And this article will help you do just that.

We used an Echo trimmer for this repair, but the steps will be similar for most other trimmer models.
Remember to use our string trimmer parts finder to find the right flexible drive shaft for your trimmer.
Removing the Drive Shaft
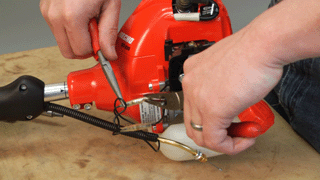
1. Loosen the shaft screws
Loosen the two screws that fasten the shaft assembly to the engine assembly.

2. Remove the air filter
Remove the air filter cover and the air filter.

3. Remove the throttle cable
With the filter assembly removed, you will have access to the throttle cable. Loosen the throttle cable tensioning nut.

Then remove the throttle cable from the trimmer body.
4. Remove the ignition wires
Carefully pull the ignition wires away from the unit. You can use a couple pair of pliers to disconnect them.
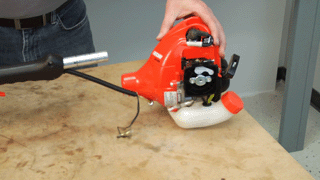
5. Remove the shaft housing
With everything disconnected you can remove the shaft assembly from the engine assembly.
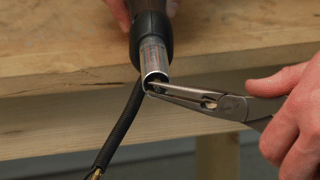
6. Remove the drive shaft
Then just use your needle-nose pliers to pull the flexible shaft from the housing.
Installing the New Drive Shaft
1. Lubricate the drive shaft
Use a small amount of grease to lubricate the flexible drive shaft.

2. Install the new drive shaft
Then slide it into the drive shaft housing. The flexible shaft needs to connect with a coupling inside the housing. Twist the flexible shaft around until it slides in and is flush with the metal housing.

3. Re-install the shaft housing
Slide the shaft assembly back into engine assembly and secure it with the two bolts.

4. Re-install the throttle cable and ignition wires
Connect the throttle, then tighten the throttle nut.

Reconnect the ignition wires.

5. Re-install the air filter assembly
Replace the air filter and secure the cover to finalize the repair.

Conclusion
And that's how you can replace the flexible drive shaft in a string trimmer. This simple repair will save you loads of money compared to a repair shop.
Remember to check out our lawn equipment parts page to find the right parts for your trimmer and other lawn equipment.