


Why Read This Article?
Finish Nailer Repair - Replacing the Driver Guide (Ridgid Part # 79004001022)
Article Breakdown
Finish Nailer Repair - Replacing the Driver Guide (Ridgid Part # 79004001022)
Video
Tools & Materials
- Pick
- Small flat-head screwdriver
Replacing the Chuck
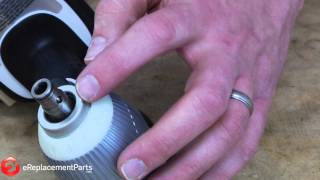
1. Remove the retaining ring
Use a pick and a small screwdriver to pry the retaining ring away from the driver. Focus on one side and once it is free of the anvil, pry up the rest of the ring.
2. Remove the chuck assembly
With the retaining ring out of the way, you can remove the flat washer, spring, and chuck collar from the driver. There are two ball bearings in the anvil, you can tap the driver on your work surface to release them.
If you have a bit broken off in the anvil, you can tap it out or use your pick to push it out of the anvil.
3. Install the chuck assembly
Set the bearings, chuck collar, spring, and flat washer back into place.
4. Install the retaining ring
Get one end of the retaining ring secured on the anvil. Then use a small screwdriver to help you slide the retaining ring around the anvil so it secures the chuck assembly.
[Back to Top] Conclusion And that's how you can replace the chuck on a Makita impact driver in about 10 minutes. Whether you need to replace the chuck or gain access to a broken bit, this repair will help you troubleshoot impact driver problems now and in the future. Remember to use our power tool parts finder to find replacement parts for all the tools on your workbench. [Back to Top] What We're About
