


Why Read This Article?
Finish Nailer Repair - Replacing the Driver Guide (Ridgid Part # 79004001022)
Article Breakdown
Finish Nailer Repair - Replacing the Driver Guide (Ridgid Part # 79004001022)
Video

Tools & Materials
- a flat head screwdriver
- a hammer (optional)
 Over time, the teeth on blender couplings wear down until they no longer engage properly on the blade assembly.
You may notice your blender making a grinding sound during use if its coupling is worn or damaged.
After the coupling completely fails, the blender's blades will no longer spin at all.
Over time, the teeth on blender couplings wear down until they no longer engage properly on the blade assembly.
You may notice your blender making a grinding sound during use if its coupling is worn or damaged.
After the coupling completely fails, the blender's blades will no longer spin at all.
 Replacing a blender coupling is very easy to do and only takes minutes.
Because it is the most common part to wear or break on blenders of all kinds, performing this repair at home is a smart way to get the most out of your appliance and avoid a repair shop bill.
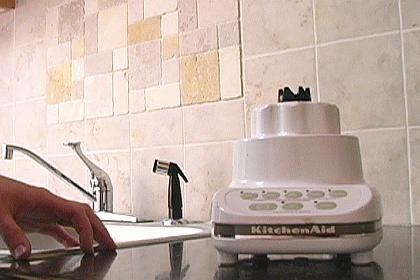
We demonstrate the steps to replace a KitchenAid blender coupling below.
Because blender coupling replacements are so straight-forward, the steps for this repair will be similar to coupling replacement steps on other blender makes and models.
Replacing a blender coupling is very easy to do and only takes minutes.
Because it is the most common part to wear or break on blenders of all kinds, performing this repair at home is a smart way to get the most out of your appliance and avoid a repair shop bill.
We demonstrate the steps to replace a KitchenAid blender coupling below.
Because blender coupling replacements are so straight-forward, the steps for this repair will be similar to coupling replacement steps on other blender makes and models.
Steps to Replace a KitchenAid Blender Coupling
Couplings are intentionally made of a softer metal (aluminum) than the steel motor spindles on which they attach.
This is so the coupling can act as a fail-safe against overloading the blender's motor, and to make it easier to remove the coupling from the machine.
Because of this design feature, the easiest way to remove a blender coupling is to simply strip its threads off of the motor spindle, completely destroying the coupling.
No worries, though; that old coupling is toast anyway. Get a new coupling for your blender by visiting our KitchenAid Blender Parts page.
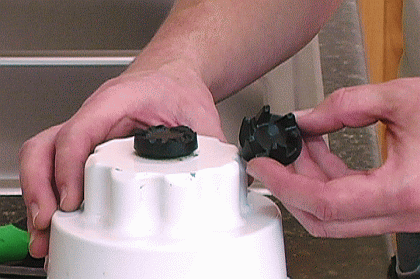
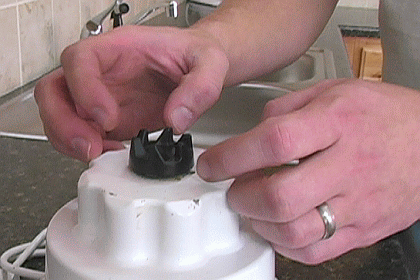
1. Pry the old coupling off of the motor spindle.
Use a flat head screwdriver to pry the old coupling off.
Slide the screwdriver between the underside of the coupling and the blender motor. Then, lift up while giving the screwdriver a turn.

Repeat this prying method several times, turning the coupling about a quarter turn each time. This will help to strip the threads around the entire circumference of the coupling.
The coupling will simply pop off of the blender after about 3-5 turns.
[Back to top]
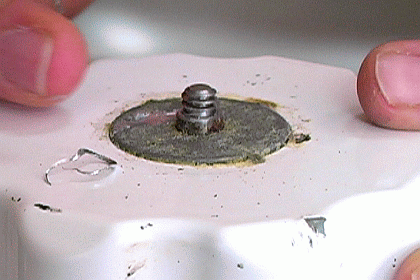
2. Clean up the blender motor spindle.
Prying the old coupling off like this will often leave some aluminum threads behind around the steel threads of the motor spindle.
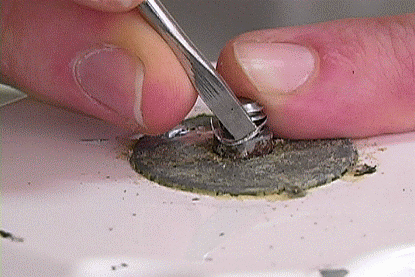
Carefully inspect the spindle, and remove any leftover threads with a screwdriver.
 [Back to top]
3. Install the new blender coupling.
There's nothing tricky about this part.
Simply thread the new coupling onto the motor spindle by hand. The coupling will tighten down the rest of the way the next time you use the blender.
The motor spindle is reverse threaded, so the coupling must be screwed on counter-clockwise.
 [Back to top]
With the new blender coupling installed, your KitchenAid blender is ready to get back to blending.
Another Method to Remove Blender Couplings We have an extra trick to demonstrate for removing blender couplings. This method is faster, but it requires more technique than the method explained above. If you're unsure, take it safe and simply pry the old coupling off with a screwdriver. The method below requires the use of both a screwdriver and a hammer. 1. Position a screwdriver against the coupling teeth.
If you've guessed that we're going to strike that coupling right off the blender, then you've guessed correctly.
The first step is positioning a flat head screwdriver against what is left of the old coupling's teeth.
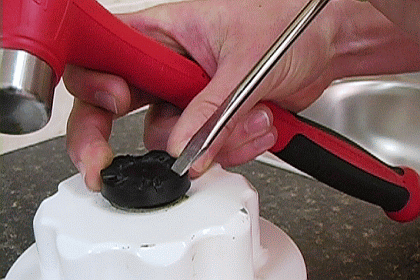
Remember that the coupling and spindle are reverse-threaded.
Make sure to position the screwdriver so that striking it will turn the coupling clockwise.
[Back to top]
2. Strike the screwdriver sharply with a hammer.
This is where the technique comes in. We're going to strike the coupling in the same direction that the motor spindle spins, so it must be struck very quickly and with considerable force.
The idea is to spin the coupling with enough speed and momentum that it spins faster than the motor spindle can keep up, releasing it from the spindle threads.
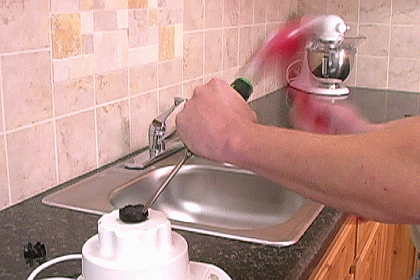
Sound a little "wax on, wax off"? Well, it sort of is.
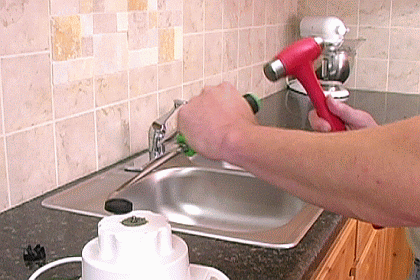
With a little concentration, a couple attempts at this should send that coupling flying.
[Back to top]
Conclusion
All it takes to replace a blender coupling is a new replacement coupling and a screwdriver, so there's no need to take your blender to the repair shop for such a simple repair.
Save money on your KitchenAid blender repairs by performing them at home. Visit our KitchenAid Blender Parts page to find parts for your KitchenAid blender model.
For blender parts belonging to other blender makes and models, enter your blender's model number in the search field at the top of this page.
[Back to top]
What we're about.
