


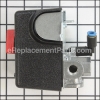
This is a genuine Campbell Hausfeld replacement part designed for use with air compressors. It is used to regulate the air pressure in the compressor tank. It is also used to regulate the air pressure of the air exiting the tank. In some instances you will need to lower or higher the air pressure of the tank and the air coming from the tank. It is made out of metal with a plastic knob. This regulator is sold individually.
To complete this repair you would need a set of wrenches.
Regulator RE206202AV
OEM part for: Campbell Hausfeld
Part Number: RE206202AV
$20.99
In Stock
Jump To:
Product Description ?
- Classification: Part
- Weight: 0.19 lbs.
- Shipping: Ships Worldwide
Frequently Purchased Together ?


Compatibility
This Regulator will fit the following 156 machines. Confirm this part works with your model, and view the detailed model diagrams and repair help we have to offer.
Campbell Hausfeld
Show More Compatible ModelsThis item works with the following types of products:
- Compressor Parts
This part replaces obsolete part #: RE300000AJ
Customer Part Reviews ?
Average Rating (out of 5):
Click to filter by ratings:
5 stars
34
4 stars
0
3 stars
0
2 stars
0
1 stars
0
< PREV
- 1
- 2
- 3
Worked
The right part the first time!
Guest -
April 5, 2024
Verified Purchase
Awesome.
Could'nt find part anywhere but here, only bad note was there was no sticker on the new one. Put it was easy to find and order and was here in a feew day. I highly recommend the site.
Guest -
March 27, 2024
Verified Purchase
Works Perfectly
My old, and I mean old, regulator had sprung a leak. Took it apart and tried to clean it and replace the O-rings in it. Didn't help. Ordered this and it works great. Only thing is I wish it had the directional placard on the top of the knob like the old one did.
Guest -
October 25, 2023
Verified Purchase
The right part the first time
Another company sent me the wrong part twice Ordered it from here and sent me the one I needed the first time and now my compressor is running great I would just like to say Thank you for a job well done
Darrin -
September 4, 2023
Verified Purchase
Just as expected!
Part was exact fit and eReplacement Parts is always a quick shipper
William -
June 20, 2023
Verified Purchase
exactly the right part
Fast shipping and the part was perfect
Guest -
April 15, 2023
Verified Purchase
Was an exact fit!
$25 repair or a $430 compressor replacement? Fix the regulator and it's good to go and save the $410!
Guest -
April 4, 2023
Verified Purchase
Received on time and was well packaged.
Quick instal and the compressor works perfectly. No air leaks.
Guest -
April 3, 2023
Verified Purchase
Easy repair
My Makita MACAIR 500 regulator cracked. Tried to find a Makita replacement and they were discontinued. Found this generic and it fit perfect. Looks just like the old one.
Guest -
January 31, 2023
Verified Purchase
Item returned
The item was returned and a refund was generated quickly.
Gary -
January 18, 2023
Verified Purchase
Questions & Answers ?
Our customer Service team is at the ready daily to answer your part and product questions.

Ask our Team
We have a dedicated staff with decades of collective experience in helping customers just like you purchase parts to repair their products.
Does this fit my product?Questions & Answers for Regulator
Is the RE300000AJ the correct replacement regulator for my unit?
Dale
for model number WL660001AJ
asked on 2023-03-17
Hi Dale,
Thank you for your question. Yes, this would be the correct regulator for your air compressor. If you would like to place an order for it, please call our customer service line and anyone will be happy to assist you. We look forward to hearing from you!
eReplacementParts Team March 17, 2023
My compressor works but the no air to the tank.
Roy
for model number MT360000AJ
asked on 2022-11-04
Hi Roy,
Thank you for your question. If no air is getting to the tank, the pump may be faulty, or there is an issue with the gasket between the low and high pressure compartments of the compressor. You will need to check these parts to see which one is causing the issue. If you have any questions, please let us know. We are open 7 days a week. We look forward to hearing from you!
eReplacementParts Team November 04, 2022
Will this replace my regulator WL651004AJ
C
for model number WL651004AJ
asked on 2022-08-16
Hi C,
Thank you for your question. Yes, this would be the correct regulator for your air compressor. If you need help placing an order for it, customer service is open 7 days a week and anyone will be happy to assist you. Please feel free to give us a call. We look forward to hearing from you!
eReplacementParts Team August 16, 2022
Will this pressure regulator work with Campbell Hausfield compressor ?
Mike
for model number WL506208AJ
asked on 2022-03-27
Hello Mike, thank you for writing. No, the part you had chosen is not compatible for your model. The correct part for your model number is called the Manifold Assembly WL021100AV-S. The manifold kit consists of the manifold, the regulator, two pressure gauges, two quick-disconnects, and the nipple that connects the entire assembly to the air tank. The manifold kit will solve any problems related to a cracked manifold assembly, as well as any problems with the regulator. If you need help placing an order, customer service is open 7 days a week. Please feel free to give us a call. We look forward to hearing from you.
eReplacementParts Team March 27, 2022
Customer Repair Instructions ?
All our customer repair instructions are solicited directly from other customers just like you who have purchased and replaced this exact part.
Leaky air compressor.
Ronald - April 16, 2018
👍 4 of 4 people found this instruction helpful
Tool Type
Compressor
Difficulty
Easy
Time
1-2 hours
Tools Used
Screwdriver, Socket set, Adjustable Wrench, MEGALOC thread sealant; MEGATAPE (3.5 mil)
1. Removed the shroud.
2. Applied soapy water (with small artists brush) on all fittings to determine where leaks existed.
3. Bubbles appeared in three locations: Pressure gauge fitting (the one attached to the regulator), check valve thread and nipple (that feeds the hose line fitting).
4. Oiled compressor motor bearings using a cotton cue tip with oil to get rid of squeaking that I noticed when moving the motor by hand. Squeaking is gone.
5. Removed air gauges, nipple, regulator, compressor head, check valve (and this requires removing the copper pipe that connects the air compressor to the check valve). When removing the copper pipe and head, they must be removed at the same time, in order to remove the pipe from the check valve.
6. Installed the new nipple (which was rusted). I used MEGALOC sealant when reinstalling. The sealant is rated at 2600 PIS for gas.
7. Installed the new regulator.
8. Reinstalled both pressure gauges using MEAGATAPE (3.5 MIL thick) as a sealant. The tape is rated at 300 psi max. I could have used the MAGALOC sealant but just wanted to try the tape, which worked great.
9. Reinstalled the copper tube, check valve and compressor head. It was not necessary to replace the head gaskets. Care must be taken to make note of the position of the gaskets when reinstalling. I used MEGALOC seal on the check valve. I also removed and reinstalled the nipple on the head that mates to the copper pipe using the MEGALOC sealant. I used the original ferrules on the copper pipe. Although I purchased new ferrule, I decided not to use them. The original ferrules worked.
10. Removed and reinstalled the fitting that connects to the hose. I used MAGTAPE for this.
11. All the fixes worked well. The compressor holds pressure (it's been two weeks since the fix and there is no loss of pressure).
Did you find this story helpful?
Thanks for voting and helping fellow customers!
Stop on the regulator knob broke needle valve went somewhere else.
Anthony - January 17, 2018
👍 3 of 3 people found this instruction helpful
Tool Type
Compressor
Difficulty
Easy
Time
30-60 minutes
Tools Used
Screwdriver, Adjustable Wrench, Soldering iron
Parts Used
1. Took off the cover 2 screws 6 plastic catches.
2. Unscrewed the regulator pressure gage.
3. Unscrewed the regulator and the quick disconnect.
4. Reassembled the new regulator, the quick disconnect and the pressure gage in reverse order with Teflon tape.
5. Used a soldering iron to cut the pressure gage hole in the cover to fit.
6. Replaced the cover, snapped it in and screwed down.
7. Drain valve screwed out Teflon tape on the new one and screw in tighten with a wrench.
Did you find this story helpful?
Thanks for voting and helping fellow customers!
Old regulator got busted.
Randall - January 2, 2016
👍 3 of 3 people found this instruction helpful
Tool Type
Compressor
Difficulty
Easy
Time
Less than 15 minutes
Tools Used
Wrench Set
Parts Used
Wrapped a little teflon tape around the stub-out on the compressor then threaded the new regulator on, being careful not to cross-thread or over-tighten. Then attached pressure gauge and hose to regulator, again careful not to use too much tape or over-tighten. Wasn't able to seat the threaded ends that attached to the stub-out or the hose as far down as I would have liked (concerned about busting them) but no problem so far.
Did you find this story helpful?
Thanks for voting and helping fellow customers!
Regulator leaking
Ronny - February 14, 2018
👍 2 of 2 people found this instruction helpful
Tool Type
Compressor
Difficulty
Easy
Time
Less than 15 minutes
Tools Used
Adjustable Wrench
Parts Used
Removed old regulator. Move gauge and nipple to new one and installed back.
Did you find this story helpful?
Thanks for voting and helping fellow customers!
Leaking air from air pressure valve
Eric - April 22, 2020
Tool Type
Compressor
Difficulty
Easy
Time
15-30 minutes
Tools Used
Screwdriver, Wrench Set, Adjustable Wrench
Parts Used
One screw in rear one but in front holding plastic housing top cover on. Then used small flat blade screwdriver to pop ~10-12 lips that held cover on. Then using crescent wrenches to remove hose connection from valve then valve from regulator and pressure gauge from valve. Used Teflon tape on all 3 connections. Install reverse of removal. One note the on/off switch should be set to on before removal of housing or it will snap. Unplugged from the beginning of course.
Did you find this story helpful?
Thanks for voting and helping fellow customers!
Regulator broke due to car backing into it
William - April 16, 2020
Tool Type
Compressor
Difficulty
Easy
Time
Less than 15 minutes
Tools Used
Wrench Set
Parts Used
Removed old regulator and put on the new one using a little teflon tape
Did you find this story helpful?
Thanks for voting and helping fellow customers!
regulator was broken
Shannon - March 7, 2020
Tool Type
Compressor
Difficulty
Easy
Time
15-30 minutes
Tools Used
Screwdriver, Adjustable Wrench
Parts Used
removed the quick connect
removed the compressor cover
removed the old regulator
replaced the with the new regulator and put it back together and its working fine
removed the compressor cover
removed the old regulator
replaced the with the new regulator and put it back together and its working fine
Did you find this story helpful?
Thanks for voting and helping fellow customers!
A oiece of lumber slid off the workbench and brofe theplastic regulator.
Bobby - January 29, 2020
Tool Type
Compressor
Difficulty
Easy
Time
15-30 minutes
Tools Used
Pliers, Wrench Set
Parts Used
Removed the broken regulator, then removed nipple, replaced plastic tape & reassemble
Did you find this story helpful?
Thanks for voting and helping fellow customers!
replace parts on compresser
jerry - November 14, 2019
Tool Type
Compressor
Difficulty
Easy
Time
30-60 minutes
Tools Used
Screwdriver, Socket set, Wrench Set
none
Did you find this story helpful?
Thanks for voting and helping fellow customers!
regulator leaking air
Leslie - November 1, 2019
Tool Type
Compressor
Difficulty
Hard
Time
30-60 minutes
Tools Used
Wrench Set, Adjustable Wrench, pipe wrench
Parts Used
removed old regulator - replaced with new. Kind of hard to get old one off because it was on pretty good.
Did you find this story helpful?
Thanks for voting and helping fellow customers!
Load More Install Stories
OEM stands for Original Equipment Manufacturer and means the part you’re buying is sourced directly from the manufacturer who made your product. At eReplacementParts, we sell only genuine OEM parts, guaranteeing the part you’re purchasing is of better design and of higher quality than aftermarket parts.
Our product descriptions are a combination of data sourced directly from the manufacturers who made your product as well as content researched and curated by our content & customer service teams. This content is edited and reviewed internally before being made public to customers.
Our customer service team are at the ready daily to answer your part and product questions. We have a dedicated staff with decades of collective experience in helping customers just like you purchase parts to repair their products.
All our part reviews are solicited directly from other customers who have purchased this exact part. While we moderate these reviews for profanity, offensive language or personally identifiable information, these reviews are posted exactly as submitted and no alterations are made by our team.
All our customer repair instructions are solicited directly from other customers just like you who have purchased and replaced this exact part. While we moderate these reviews for profanity, offensive language or personally identifiable information, these reviews are posted exactly as submitted and no alterations are made by our team.
Based on data from past customer purchasing behaviors, these parts are most commonly purchased together along with the part you are viewing. These parts may be necessary or helpful to replace to complete your current repair.
All our installation videos are created and produced in collaboration with our in-house repair technician, Mark Sodja, who has helped millions of eReplacementParts customers over the last 13 years repair their products. Mark has years of experience in selling and repairing both commercial and residential products with a specialty in gas-powered equipment.
This data is collected from customers who submitted a repair instruction after replacing this exact part. Customers can rate how easy the repair was to complete and how long it took. We aggregate this data to provide a repair rating that allows customers to quickly determine the difficulty and time needed to perform their own repair.