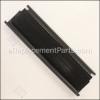
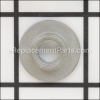
This is an authentic replacement part that is sourced from the original manufacturer and intended to be used with walk-behind lawnmowers from Toro. The plastic baffle attaches to the rear of the mower's deck and is used to restrict the flow of debris when mowing or water when washing out the inside of the deck. This item is sold individually.
Rear Baffle 120-5218
OEM part for: Toro
Part Number: 120-5218
$31.00
In Stock
Jump To:
Frequently Purchased Together ?


Compatibility
This Rear Baffle will fit the following 90 machines. Confirm this part works with your model, and view the detailed model diagrams and repair help we have to offer.
Displaying 20 of 90 matching models.
90 total model matches. Try the above search to narrow your results.
This is the official OEM part for the following brands:
- Toro
This item works with the following types of products:
- Lawn Mower
This part replaces obsolete part #: 115-1307
Repair Videos ?
Watch the Repair Video for
Rear Baffle

Customer Part Reviews ?
Average Rating (out of 5):
Click to filter by ratings:
5 stars
15
4 stars
1
3 stars
0
2 stars
0
1 stars
0
< PREV
- 1
- 2
Toro rear baffle
Great video detailing the rxr of this part.
Guest -
April 25, 2024
Verified Purchase
exact perfect part
perfect fit. easy to make lawnmower like new.
Guest -
November 29, 2022
Verified Purchase
Rear Baffle
Arrived quick and easily installed. Wish the baffle was made of metal instead of plastic. Great price too.
Guest -
July 12, 2022
Verified Purchase
Toro front wheel drive mower rear baffle
Looked on-line for a replacement part, found one described with parts picture layout included, easy to select, good price & fast delivery. Shipped & arrived on time, replaced part & mower is as good as new again. Will remember that for future for other equipment I have when I need parts.
Guest -
October 16, 2021
Verified Purchase
Not hard
It’s really not a hard part swap. Just don’t do it on the ground and in the dark like I did. Get it up on some saw horses and track all the washers and screws.
Anonymous -
October 9, 2021
Verified Purchase
Mower replacement part
Installed the replacement part and worked great. Good match.
Guest -
June 30, 2021
Verified Purchase
Fit perfect
The baffle on my lawnmower was broken in two with many chunks missing. About 30 minutes of work and my mower is like new.
Michael -
June 14, 2021
Verified Purchase
lawn mower
The part fit perfect thank, will use this site again when needed.
Guest -
June 7, 2021
Verified Purchase
A little difficult to install, but worth it!
I gambled this would work on my 10 year old (at least) Toro PH-XT675 mower. The difficulty was raising the mower with jack stands on a table and removing the rear wheel assembly to fit the new part. No more grass clumps and the bagger works again.
Ryan -
August 15, 2020
Verified Purchase
easy to repair
Very fast delivery,easy tp instal only 25 min
Guest -
June 8, 2020
Verified Purchase
Questions & Answers ?
Our customer Service team is at the ready daily to answer your part and product questions.

Ask our Team
We have a dedicated staff with decades of collective experience in helping customers just like you purchase parts to repair their products.
Does this fit my product?Questions & Answers for Rear Baffle
No questions have been asked yet
Customer Repair Instructions ?
All our customer repair instructions are solicited directly from other customers just like you who have purchased and replaced this exact part.
Bottom of mower deck structure destroyed by rocks, etc. Mower not mulching and throwing debris.
Paul - June 4, 2016
👍 15 of 20 people found this instruction helpful
Tool Type
Lawn Mower
Difficulty
Easy
Time
30-60 minutes
Tools Used
Socket set, Wrench Set
Much easier to repair if you work with the mower deck on a workbench up where you can more easily get at both top and bottom of deck. Remove rear wheels and handle assembly. Remove bolts holding rear baffle. Install new baffle and reassemble. Mower working like new!
Then remove the blade bolt, blade support and the old blade. Then install the new blade, the blade support and screw in the blade bolt.
Then remove the blade bolt, blade support and the old blade. Then install the new blade, the blade support and screw in the blade bolt.
Did you find this story helpful?
Thanks for voting and helping fellow customers!
Rear Baffle broken (missing)
Kevin - October 3, 2017
👍 8 of 8 people found this instruction helpful
Tool Type
Lawn Mower
Difficulty
Medium
Time
1-2 hours
Tools Used
Screwdriver, Pliers, Socket set, Adjustable Wrench
Parts Used
Note it took me longer than it should have taken. After completing the replacement I downloaded the various component part assembly diagrams. If I had done this first, it would have reduced the time to complete the repair to about half an hour.
1st - Detach the handle
2nd - Remove rear wheels and height adjuster
3rd - Remove bolts holding rear baffle
4th - Align rear baffle with rear deflector and then reverse the steps above. The nuts were a bit difficult to align with the bolts and hold to secure.
Overall, not a very difficult task
1st - Detach the handle
2nd - Remove rear wheels and height adjuster
3rd - Remove bolts holding rear baffle
4th - Align rear baffle with rear deflector and then reverse the steps above. The nuts were a bit difficult to align with the bolts and hold to secure.
Overall, not a very difficult task
Did you find this story helpful?
Thanks for voting and helping fellow customers!
Mangled baffle,
Robert - July 13, 2016
👍 7 of 9 people found this instruction helpful
Tool Type
Lawn Mower
Difficulty
Medium
Time
1-2 hours
Tools Used
Screwdriver, Pliers, Socket set, Nutdriver, Adjustable Wrench
Parts Used
To replace the underside baffle, I had to remove the rear wheels, and all the brackets that held the wheels and the adjustable mower-height features.
It took me an hour to figure out that the first thing you need to do is to take off the push bars. The rest of the repair went swiftly after that.
It took me an hour to figure out that the first thing you need to do is to take off the push bars. The rest of the repair went swiftly after that.
Did you find this story helpful?
Thanks for voting and helping fellow customers!
Rear baffle cracked in half and was digging into the lawn.
Karen - May 15, 2017
👍 6 of 8 people found this instruction helpful
Tool Type
Lawn Mower
Difficulty
Medium
Time
1-2 hours
Tools Used
Screwdriver, Socket set
Parts Used
Had to take the back wheels off, and it was hard getting the nuts back on with the new baffle because room is very limited to get your hands in there. Also the door came off when removing the wheels and getting the springs back on was difficult.
Did you find this story helpful?
Thanks for voting and helping fellow customers!
Had to change out worn rear baffle and trailing shield
Charles - November 12, 2015
👍 12 of 20 people found this instruction helpful
Tool Type
Lawn Mower
Difficulty
Medium
Time
30-60 minutes
Tools Used
Socket set, Wrench Set
Parts Used
Very easy repair. Remove the bolts remove worn parts, then install the new parts on
Did you find this story helpful?
Thanks for voting and helping fellow customers!
Replaced rear baffle
David - October 8, 2021
👍 1 of 1 people found this instruction helpful
Tool Type
Lawn Mower
Difficulty
Medium
Time
1-2 hours
Tools Used
Pliers, Socket set
Parts Used
1. Downloaded service and parts manuals from Toro website. Ordered replacement baffle
from eplacementparts.com
2. Drained gas from mower and disconnected spark plug wire.
3. Removed handle from rear wheel assembly but did not disconnect blade cable or drive
cable, set handle loosely to the side..
4. Turned mower on its front to get easy access to rear assemblies and stabilized with 2x4
plank.
5. Removed adjustable rear wheels and assemblies using 1/2” socket wrench and clamping
pliers.
6. Removed old baffle pieces using 7/16 socket.
7. Installed new baffle.
8. Reinstalled rear wheel assemblies, lowered mower, reinstalled handles and refilled tank.
Did you find this story helpful?
Thanks for voting and helping fellow customers!
A worn drive belt (part # 117-1018) and shattered plastic rear baffle(part # 1205218)
M - July 10, 2020
👍 1 of 1 people found this instruction helpful
Tool Type
Lawn Mower
Difficulty
Medium
Time
More than 2 hours
Tools Used
Screwdriver, Pliers, Socket set, Wrench Set
Parts Used
1. Removed spark plug wire from spark plug
2. Blocked and made cutting blade stationary.
3. Sketched connectors and fasteners associated with originally installed rear baffle
4. Unfastened connectors and fasteners holding old rear baffle in place
5. Replaced and installed replacement rear baffle
6. Checked installation for correct placement of baffle and associated fasteners, brackets,
cables, wheel height adjustment
7. Determined drive belt replacement could be deferred or replaced as required.
8. Sharpened blade
9. Unblocked cutting blade, checked blade (360 degree) movement
10.Connected spark plug cable and connector to spark plug, checked oil and gas
11.Started mower up, one pull
12.Mowed lawn (Performance was as good or better than when machine was new)
Did you find this story helpful?
Thanks for voting and helping fellow customers!
Rear trailing shield and rear baffle were destroyed from a couple of years of clearing tall grass around our property and encountering rocks even though we did look first.
Tim - May 29, 2023
Tool Type
Lawn Mower
Difficulty
Easy
Time
1-2 hours
Tools Used
Screwdriver, Socket set, Wrench Set
Parts Used
Put the mower in the back of my pickup on the tailgate, raised the rear enough to be able to access all the bolts. Removed rear wheels and all that was attached to them. I reinstalled the new parts, with a little difficulty because I didn't use my repair rule # 2. Always take pictures of how it is before disassembly. Oh, rule #1 is look up instructions. Ha ha. Would have made it real simple other wise. The parts fit excellent. Thank you!
Did you find this story helpful?
Thanks for voting and helping fellow customers!
Rear baffle that fills catcher bag broke in half
William - May 14, 2023
Tool Type
Lawn Mower
Difficulty
Medium
Time
30-60 minutes
Tools Used
Screwdriver, Pliers, Socket set, Wrench Set
Parts Used
Took handle off took level adjusters off took lower floppyplate off brokenpieces. Installed one adjuster and put new piece in on one side did the same on other side. Did not tighten down completely put cover and springs back in place adjusted springs so tension holdsdoor closed. Tightened the two bolts on adjuster plates. Installed wheels, installed handle let mower sit level to allow oil to go back in to the reservoir. Started mower so wife could mow.
Did you find this story helpful?
Thanks for voting and helping fellow customers!
Front baffle, rear baffle, and trailing shield
Roy - March 14, 2021
Tool Type
Lawn Mower
Difficulty
Easy
Time
1-2 hours
Tools Used
Screwdriver, Socket set, Wrench Set
1. Removed starter rope form handle.
2. Removed rear wheels, hight levers, and broken rear baffle.
3. Installed rear baffle, wheels and hight levers.
4. Installed trailing shield.
5. Removed front wheels, hight levers, and broken front baffle.
6. Installed front baffle, wheels, and hight levers.
2. Removed rear wheels, hight levers, and broken rear baffle.
3. Installed rear baffle, wheels and hight levers.
4. Installed trailing shield.
5. Removed front wheels, hight levers, and broken front baffle.
6. Installed front baffle, wheels, and hight levers.
Did you find this story helpful?
Thanks for voting and helping fellow customers!
Load More Install Stories
OEM stands for Original Equipment Manufacturer and means the part you’re buying is sourced directly from the manufacturer who made your product. At eReplacementParts, we sell only genuine OEM parts, guaranteeing the part you’re purchasing is of better design and of higher quality than aftermarket parts.
Learn MoreOur product descriptions are a combination of data sourced directly from the manufacturers who made your product as well as content researched and curated by our content & customer service teams. This content is edited and reviewed internally before being made public to customers.
Our customer service team are at the ready daily to answer your part and product questions. We have a dedicated staff with decades of collective experience in helping customers just like you purchase parts to repair their products.
All our part reviews are solicited directly from other customers who have purchased this exact part. While we moderate these reviews for profanity, offensive language or personally identifiable information, these reviews are posted exactly as submitted and no alterations are made by our team.
All our customer repair instructions are solicited directly from other customers just like you who have purchased and replaced this exact part. While we moderate these reviews for profanity, offensive language or personally identifiable information, these reviews are posted exactly as submitted and no alterations are made by our team.
Based on data from past customer purchasing behaviors, these parts are most commonly purchased together along with the part you are viewing. These parts may be necessary or helpful to replace to complete your current repair.
All our installation videos are created and produced in collaboration with our in-house repair technician, Mark Sodja, who has helped millions of eReplacementParts customers over the last 13 years repair their products. Mark has years of experience in selling and repairing both commercial and residential products with a specialty in gas-powered equipment.
This data is collected from customers who submitted a repair instruction after replacing this exact part. Customers can rate how easy the repair was to complete and how long it took. We aggregate this data to provide a repair rating that allows customers to quickly determine the difficulty and time needed to perform their own repair.