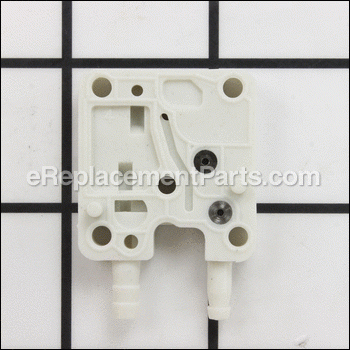
This is a Genuine Manufacturer Sourced replacement part designed for use with Handheld Lawn and Garden Equipment. This Purge Base is part of a Carburetor Assembly. It serves as the mounting location for the Primer Bulb as well as Fuel Lines. This part is made out of Plastic and it is Sold Individually.
Tools used for this repair/replacement:
• Receptacle for draining fuel
• Torx wrenches
• 10mm wrench (or adjustable)
• Phillip’s screwdriver
Purge Base Assembly P005001890
OEM part for: Echo
Part Number: P005001890
Jump To:
Product Description ?
- Classification: Part
- Weight: 0.01 lbs.
- Shipping: Ships Worldwide
Frequently Purchased Together ?
Compatibility
This Purge Base Assembly will fit the following 326 machines. Confirm this part works with your model, and view the detailed model diagrams and repair help we have to offer.
This item works with the following types of products:
- Blower Parts
- Edger Parts
Repair Videos ?
|
Filthy Filters? This article will show you how to install a filter kit on an Echo SRM-225 trimmer....
May 27, 2015
|
|
Step-by-step instructions for removing and installing the purge base on an Echo trimmer model SRM-225....
May 28, 2015
|
Customer Part Reviews ?
- 1
- 2
Questions & Answers ?
Our customer Service team is at the ready daily to answer your part and product questions.

Ask our Team
We have a dedicated staff with decades of collective experience in helping customers just like you purchase parts to repair their products.
Does this fit my product?Questions & Answers for Purge Base Assembly
Customer Repair Instructions ?
All our customer repair instructions are solicited directly from other customers just like you who have purchased and replaced this exact part.
Could not prime the carburetor.
Tool Type
Trimmer
Difficulty
Easy
Time
Less than 15 minutes
Tools Used
Screwdriver
Parts Used
Removed the purge bulb and retaining hardware.
Removed the screw which holds the purge base assembly in place.
Replaced old purge assembly with new replacement.
Reversed steps above to return trimmer to original configuration.
Weed trimmer would not start. Found the return line on the purge assembly broken.
Tool Type
Trimmer
Difficulty
Medium
Time
15-30 minutes
Tools Used
Screwdriver
Parts Used
Note:
1) While carburetor was off, I noticed several major ports were plugged with ethanol residue. This was the problem all along. I am using the pre-mixed fuel on all my blowers, weed trimmers, chain saws, etc.
2) The return nozzle on the new purge base assembly is very brittle. It broke while I was installing the return hose. I left it broken. When I purge my weed trimmer only a slight amount of fuel leaks out. I think there is a manufacturing flaw on base assembly.
Old gas tank had pin hole & purge base broke a nipple when removing gas lines
Tool Type
Trimmer
Difficulty
Easy
Time
30-60 minutes
Tools Used
Screwdriver, Pliers, Torx wrench
Parts Used
Piece was broken and gasoline leaking. Because this part has two ends and one was missing
Tool Type
Trimmer
Difficulty
Medium
Time
15-30 minutes
Tools Used
Screwdriver, Socket set, Gloves safety glasses
Parts Used
Broken nipple on purge base
Tool Type
Blower
Difficulty
Easy
Time
15-30 minutes
Tools Used
Screwdriver
Parts Used
Would not run smoothly. Leaking gasoline.
Tool Type
Blower
Difficulty
Easy
Time
15-30 minutes
Tools Used
Screwdriver
Purge block nozzle broke
Tool Type
Blower
Difficulty
Easy
Time
15-30 minutes
Tools Used
Screwdriver
Parts Used
2. Removed the purge block guard that protects the fuel intake and purge outlet hoses from
the purge block.
3. Removed the carburetor.
4. Removed the broken block and carefully removed the purge block gasket.
5. Reconnected hoses to new purge block.
6. Replaced the gasket.
7. Reversed steps 3,2,1
hose output broke on the purge base assembly
Tool Type
Blower
Difficulty
Easy
Time
Less than 15 minutes
Tools Used
Screwdriver
Parts Used
Engine would run but would bog down when giving it the gas.
Tool Type
Trimmer
Difficulty
Medium
Time
30-60 minutes
Tools Used
Screwdriver, Pliers, Socket set, Torx driver
I could easily tell the difference in the old and new parts. The new diaphragm and reed valve were much more supple.The repair was straight forward, especially after watching the video. After I got it all back together, primed it then attempted to start it, it would not start. Maybe I flooded it I don't know. After getting frustrated pulling on the cord I put it down for the night and came back the next morning. It started right up and ran great.
Thanks for the great video.
OEM stands for Original Equipment Manufacturer and means the part you’re buying is sourced directly from the manufacturer who made your product. At eReplacementParts, we sell only genuine OEM parts, guaranteeing the part you’re purchasing is of better design and of higher quality than aftermarket parts.
Our product descriptions are a combination of data sourced directly from the manufacturers who made your product as well as content researched and curated by our content & customer service teams. This content is edited and reviewed internally before being made public to customers.
Our customer service team are at the ready daily to answer your part and product questions. We have a dedicated staff with decades of collective experience in helping customers just like you purchase parts to repair their products.
All our part reviews are solicited directly from other customers who have purchased this exact part. While we moderate these reviews for profanity, offensive language or personally identifiable information, these reviews are posted exactly as submitted and no alterations are made by our team.
All our customer repair instructions are solicited directly from other customers just like you who have purchased and replaced this exact part. While we moderate these reviews for profanity, offensive language or personally identifiable information, these reviews are posted exactly as submitted and no alterations are made by our team.
Based on data from past customer purchasing behaviors, these parts are most commonly purchased together along with the part you are viewing. These parts may be necessary or helpful to replace to complete your current repair.
All our installation videos are created and produced in collaboration with our in-house repair technician, Mark Sodja, who has helped millions of eReplacementParts customers over the last 13 years repair their products. Mark has years of experience in selling and repairing both commercial and residential products with a specialty in gas-powered equipment.
This data is collected from customers who submitted a repair instruction after replacing this exact part. Customers can rate how easy the repair was to complete and how long it took. We aggregate this data to provide a repair rating that allows customers to quickly determine the difficulty and time needed to perform their own repair.


