


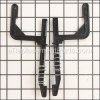
A genuine item which is supplied directly from the original equipment manufacturer for use with Bissell carpet cleaners. It is an identical replacement for a worn or missing pump belt which was originally installed on a new unit. Keep in mind this high-quality component is made of durable rubber material and is sold individually. Make sure to check the appropriate diagrams of your model for the correct location and application of this hardware.
Pump Belt BR-1020
OEM part for: Bissell
Part Number: BR-1020
$4.99
In Stock
Jump To:
Frequently Purchased Together ?


Compatibility
This Pump Belt will fit the following 18 machines. Confirm this part works with your model, and view the detailed model diagrams and repair help we have to offer.
Bissell
Show More Compatible ModelsThis item works with the following types of products:
Customer Part Reviews ?
Average Rating (out of 5):
Click to filter by ratings:
5 stars
1
4 stars
1
3 stars
0
2 stars
0
1 stars
0
< PREV
- 1
Perfect Fit... saved my rug cleaner from the dump.
Excellent, fast service. Easy fix and my machine works. I use eReplacement quite a bit because of the service AND I get parts views that help me understand the machine I'm fixing. I can save the cost of a new machine for just a little effort and cost. Thank You to the folks at eReplacement!
greg -
March 21, 2023
Verified Purchase
Arrived on time
The part arrived as promised and installed easily.
Guest -
September 15, 2021
Verified Purchase
Questions & Answers ?
Our customer Service team is at the ready daily to answer your part and product questions.

Ask our Team
We have a dedicated staff with decades of collective experience in helping customers just like you purchase parts to repair their products.
Does this fit my product?Questions & Answers for Pump Belt
No questions have been asked yet
Customer Repair Instructions ?
All our customer repair instructions are solicited directly from other customers just like you who have purchased and replaced this exact part.
Broken pump belt
Ardeth - September 23, 2022
Tool Type
Vacuum
Difficulty
Easy
Time
30-60 minutes
Tools Used
Screwdriver
Parts Used
1. Removed the brush roller screws and retainer.
2. Removed brush belt
3. Replaced pump belt
4. Replaced brush roller belt
5. Reinstalled brush roller retainer and screws.
2. Removed brush belt
3. Replaced pump belt
4. Replaced brush roller belt
5. Reinstalled brush roller retainer and screws.
Did you find this story helpful?
Thanks for voting and helping fellow customers!
Bissel Rug Shampooer
Teresa - March 14, 2021
Tool Type
Vacuum
Difficulty
Medium
Time
30-60 minutes
Tools Used
Screwdriver
The actuator arm of the diverter valve had broken off. The new diverter valve only took a few minutes to replace. There were six screws holding the top cover to the main body of the shampooer. After removing the screws and taking the cap off the water flow indicator the top cover lifted off the machine. The arm of the actuator valve fed through the hole in the top cover and snapped into the control knob. The old diverter valve gasket pulled out and the new one fit into the groove. I replaced the pump belt simply due to the age of the machine. The whole project to about 45 min. I'd have to say it was a medium difficulty project. After replacing the parts I simply placed the cover back on the base and put the six screws back in.
Did you find this story helpful?
Thanks for voting and helping fellow customers!
No Water was flowing out when trigger was being squeezed
George - May 8, 2020
Tool Type
Vacuum
Difficulty
Easy
Time
15-30 minutes
Tools Used
Screwdriver, Pliers
1. Removed the 6 screws holding the base together
2. Marked (color code) all the hose lines leading to the pump
3. Disconnected all hose lines on Pump
4. Removed 4 screws holding pump in place, and smooth belt.
5. Removed pump by tilting inward side up, this allowed toothed belt to become loose and came off gear.
6. Disconnected all plastic lines and cleaned. Checked all joints to insure flow through them then reassembled all lines.
7. Snapped out Autoload Receiver and replaced with new part
8. Reassembled entire base and screwed on new Flow Indicator.
Easy to do with Phillips Screwdriver, Pliers (Standard and Needle Nose).
Did you find this story helpful?
Thanks for voting and helping fellow customers!
Left side of cleaner top would not come all the way down
Cecil - April 6, 2016
👍 0 of 2 people found this instruction helpful
Tool Type
Vacuum
Difficulty
Medium
Time
1-2 hours
Tools Used
Screwdriver, Pliers, None
No problems installing new parts, went well. Only problem I had was with one of the hoses being on the wrong side of the water outlet, could not get left side to come all the way down. Corrected this problem the top went into place easily. Make sure this hose is on the inside if the water drain in bottom of sweeper tank area.
Did you find this story helpful?
Thanks for voting and helping fellow customers!
OEM stands for Original Equipment Manufacturer and means the part you’re buying is sourced directly from the manufacturer who made your product. At eReplacementParts, we sell only genuine OEM parts, guaranteeing the part you’re purchasing is of better design and of higher quality than aftermarket parts.
Our product descriptions are a combination of data sourced directly from the manufacturers who made your product as well as content researched and curated by our content & customer service teams. This content is edited and reviewed internally before being made public to customers.
Our customer service team are at the ready daily to answer your part and product questions. We have a dedicated staff with decades of collective experience in helping customers just like you purchase parts to repair their products.
All our part reviews are solicited directly from other customers who have purchased this exact part. While we moderate these reviews for profanity, offensive language or personally identifiable information, these reviews are posted exactly as submitted and no alterations are made by our team.
All our customer repair instructions are solicited directly from other customers just like you who have purchased and replaced this exact part. While we moderate these reviews for profanity, offensive language or personally identifiable information, these reviews are posted exactly as submitted and no alterations are made by our team.
Based on data from past customer purchasing behaviors, these parts are most commonly purchased together along with the part you are viewing. These parts may be necessary or helpful to replace to complete your current repair.
All our installation videos are created and produced in collaboration with our in-house repair technician, Mark Sodja, who has helped millions of eReplacementParts customers over the last 13 years repair their products. Mark has years of experience in selling and repairing both commercial and residential products with a specialty in gas-powered equipment.
This data is collected from customers who submitted a repair instruction after replacing this exact part. Customers can rate how easy the repair was to complete and how long it took. We aggregate this data to provide a repair rating that allows customers to quickly determine the difficulty and time needed to perform their own repair.