


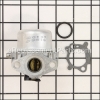
This item is an authentic OEM sourced part. The plastic air cleaner primer base is intended to be used with small engines from Briggs & Stratton and Toro. This item is used as the air filter base that links to the carburetor and it is used to circulate fuel through the carburetor when cold starting the engine. This item is priced as a single item.
Base-air Cleaner Prim 795259
OEM part for: Briggs and Stratton, Toro
Part Number: 795259
$35.30
In Stock
Jump To:
Frequently Purchased Together ?


Compatibility
This Base-air Cleaner Prim will fit the following 16397 machines. Confirm this part works with your model, and view the detailed model diagrams and repair help we have to offer.
This item works with the following types of products:
- Engine Parts
- Generator Parts
- Lawn Mower Parts
This part replaces obsolete part #: 224815, 691753, 792040, 496116
Repair Videos ?
Watch the Repair Video for
Base-air Cleaner Prim

Articles:
|
Replacing primer bulbs in small engines is one of the most common types of tool repairs, and this article explains profe...
June 25, 2010
|

Customer Part Reviews ?
Average Rating (out of 5):
Click to filter by ratings:
5 stars
5
4 stars
0
3 stars
0
2 stars
0
1 stars
1
< PREV
- 1
Easy repair
The part was the correct one. Once we replaced it, the mower started like a new one.
Guest -
May 24, 2020
Verified Purchase
Just what I needed
Mower was starting hard cold, I replaced the bulb and noticed that it still would not prime correctly, I cleaned and rebuilt the carb - still no priming. I replaced this part and it did the trick.
Gregory -
April 24, 2020
Verified Purchase
Easy to install and fixed the issue.
The issue with the brand new mower not starting was fixed by replacing this part. Easy to install and exact right part.
Guest -
November 20, 2019
Verified Purchase
SATISFIED Customer
Customer service easy to work with and talk to on the phone. Part arrived in excellent condition and will shop on their web site again.
Guest -
July 16, 2019
Verified Purchase
Nice!
Easy to order, fast shipping, quality part, nice to receive all three from an nk online store for a change.
Guest -
May 20, 2019
Verified Purchase
sent it all back
Everything I got was wrong, I got Briggs parts, I have a Honda motor.
Guest -
June 8, 2019
Verified Purchase
Questions & Answers ?
Our customer Service team is at the ready daily to answer your part and product questions.

Ask our Team
We have a dedicated staff with decades of collective experience in helping customers just like you purchase parts to repair their products.
Does this fit my product?Questions & Answers for Base-air Cleaner Prim
No questions have been asked yet
Customer Repair Instructions ?
All our customer repair instructions are solicited directly from other customers just like you who have purchased and replaced this exact part.
Engine would not prime or start (bad primer bulb and leak in gasket)
Arval - June 24, 2017
👍 21 of 21 people found this instruction helpful
Tool Type
Lawn Mower
Difficulty
Easy
Time
Less than 15 minutes
Tools Used
Screwdriver, Nutdriver, Putty Knife
Parts Used
1. Removed old cover and air filter using flat tip screwdriver
2.Remove the old Base by removing the 3 screws with a nutdriver.
3.Clean old gasket material from Carberator intake with puttyknife.
4 Reassemble by reversing order using new part and new Air Cleaner.
NOTE: I ordered a gasket to mount the A/C Primer base to the Carb, but found that one was included with the part itself which is a nice surprise.
Did you find this story helpful?
Thanks for voting and helping fellow customers!
Lawn mower wouldn't prime which made it impossible to start
Brady - September 21, 2017
👍 13 of 13 people found this instruction helpful
Tool Type
Lawn Mower
Difficulty
Easy
Time
Less than 15 minutes
Tools Used
Screwdriver, Nutdriver
Remove the existing air cleaner base, installed the new air cleaner base and gasket. I used the new gasket and placed it on top of the old gasket to double up. I did this so the air cleaner base would get a proper seal so the primer bulb would actually function properly. After doing this, I primed the engine about 4 pushes on the primer bulb. Pulled the starter rope 2 times and the engine fired right up on the 2nd pull.
Did you find this story helpful?
Thanks for voting and helping fellow customers!
Broken A/C base
Neal - July 25, 2017
👍 4 of 4 people found this instruction helpful
Tool Type
Lawn Mower
Difficulty
Easy
Time
Less than 15 minutes
Tools Used
Screwdriver, Socket set
Removed the old A/C base then cleaned gasket surface installed new gasket & A/C base
Did you find this story helpful?
Thanks for voting and helping fellow customers!
Primer base warped, needed replacement
michael - September 23, 2018
👍 2 of 2 people found this instruction helpful
Tool Type
Lawn Mower
Difficulty
Easy
Time
Less than 15 minutes
Tools Used
Screwdriver, Socket set
Parts Used
Removed old primer base, 1 screw, 3 bolts, installed new primer base
Did you find this story helpful?
Thanks for voting and helping fellow customers!
Carburetor float completely seized up
Peter - May 30, 2018
👍 1 of 1 people found this instruction helpful
Tool Type
Lawn Mower
Difficulty
Easy
Time
30-60 minutes
Tools Used
Screwdriver, Pliers, Socket set
Removed air filter cover (one flathead screw)
Removed air filter
Removed primer base (three hex-head screws)
Removed carburetor (one hose clamp, two bolts)
Removed round rubber gasket from manifold
Reverse order to install.
Removed air filter
Removed primer base (three hex-head screws)
Removed carburetor (one hose clamp, two bolts)
Removed round rubber gasket from manifold
Reverse order to install.
Did you find this story helpful?
Thanks for voting and helping fellow customers!
Lawn mower was hard to start after running and getting hot or would not start at all (like old cars used to get vapor locked) replaced primer and now stops and starts like new.
Ted - August 1, 2017
👍 1 of 1 people found this instruction helpful
Tool Type
Lawn Mower
Difficulty
Easy
Time
15-30 minutes
Tools Used
Screwdriver, Socket set
Parts Used
1. Removed old part
2. Cleaned all gasket surfaces
3. Cleaned all parts to be reused
4. Installed new part with new gasket supplied with new part.
5. Checked all connections
6. Filled fuel tank, checked oil and motor started with two pulls
2. Cleaned all gasket surfaces
3. Cleaned all parts to be reused
4. Installed new part with new gasket supplied with new part.
5. Checked all connections
6. Filled fuel tank, checked oil and motor started with two pulls
Did you find this story helpful?
Thanks for voting and helping fellow customers!
Carburetor throttle manifold broke and breather casing broke.
Eugene - February 5, 2017
👍 1 of 1 people found this instruction helpful
Tool Type
Engine
Difficulty
Easy
Time
30-60 minutes
Tools Used
Screwdriver, Pliers, Socket set, Wrench Set, Nutdriver
Pulled the rope cap and the top of the motor cover off. Then, replaced the throttle manifold, then cleaned the carburetor and put the new covers on.
Did you find this story helpful?
Thanks for voting and helping fellow customers!
Worn out primer bulb and base
Marshall - April 18, 2021
Tool Type
Lawn Mower
Difficulty
Easy
Time
Less than 15 minutes
Tools Used
Screwdriver, Nutdriver
Removed air filter
Blew everything clean with HP air
Removed throttle cable
Removed primer bulb base
Installed new primer bulb and base
Re installed throttle cable
Re installed air filter
Blew everything clean with HP air
Removed throttle cable
Removed primer bulb base
Installed new primer bulb and base
Re installed throttle cable
Re installed air filter
Did you find this story helpful?
Thanks for voting and helping fellow customers!
Hard to start
Rodger - June 20, 2020
Tool Type
Lawn Mower
Difficulty
Easy
Time
Less than 15 minutes
Tools Used
Socket set
Parts Used
Removed air cleaner, remove 2 screws holding primer base, replace primer base and install air cleaner, press primer bulb 3 times mower started right up with 1 pull
Did you find this story helpful?
Thanks for voting and helping fellow customers!
Prime button was cracked
Kevin - May 25, 2020
Tool Type
Lawn Mower
Difficulty
Easy
Time
15-30 minutes
Tools Used
Screwdriver, None
Parts Used
The primer button was cracked. I removed the plate and installed the new one.
Did you find this story helpful?
Thanks for voting and helping fellow customers!
Load More Install Stories
OEM stands for Original Equipment Manufacturer and means the part you’re buying is sourced directly from the manufacturer who made your product. At eReplacementParts, we sell only genuine OEM parts, guaranteeing the part you’re purchasing is of better design and of higher quality than aftermarket parts.
Our product descriptions are a combination of data sourced directly from the manufacturers who made your product as well as content researched and curated by our content & customer service teams. This content is edited and reviewed internally before being made public to customers.
Our customer service team are at the ready daily to answer your part and product questions. We have a dedicated staff with decades of collective experience in helping customers just like you purchase parts to repair their products.
All our part reviews are solicited directly from other customers who have purchased this exact part. While we moderate these reviews for profanity, offensive language or personally identifiable information, these reviews are posted exactly as submitted and no alterations are made by our team.
All our customer repair instructions are solicited directly from other customers just like you who have purchased and replaced this exact part. While we moderate these reviews for profanity, offensive language or personally identifiable information, these reviews are posted exactly as submitted and no alterations are made by our team.
Based on data from past customer purchasing behaviors, these parts are most commonly purchased together along with the part you are viewing. These parts may be necessary or helpful to replace to complete your current repair.
All our installation videos are created and produced in collaboration with our in-house repair technician, Mark Sodja, who has helped millions of eReplacementParts customers over the last 13 years repair their products. Mark has years of experience in selling and repairing both commercial and residential products with a specialty in gas-powered equipment.
This data is collected from customers who submitted a repair instruction after replacing this exact part. Customers can rate how easy the repair was to complete and how long it took. We aggregate this data to provide a repair rating that allows customers to quickly determine the difficulty and time needed to perform their own repair.