


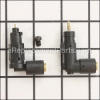
Authentic Campbell Hausfeld replacement part designed to work with Campbell Hausfeld Air Compressors. The pressure switch tells your compressor when to stop and when to start. There are multiple reasons a Pressure Switch could be leaking air. If it is leaking air the Pressure Switch should be replaced for a compressor to operate properly and safely.
Pressure Switch CW209300AV
OEM part for: Campbell Hausfeld
Part Number: CW209300AV
$82.80
In Stock
Jump To:
Frequently Purchased Together ?


Compatibility
This Pressure Switch will fit the following 52 machines. Confirm this part works with your model, and view the detailed model diagrams and repair help we have to offer.
Campbell Hausfeld
Show More Compatible ModelsThis item works with the following types of products:
- Compressor Parts
This part replaces obsolete part #: CW209300AJ
Customer Part Reviews ?
Average Rating (out of 5):
Click to filter by ratings:
5 stars
9
4 stars
1
3 stars
0
2 stars
0
1 stars
0
< PREV
- 1
Perfect match and easy repair.
The switch was a perfect match and installed quickly. Works great.
I work / teach at Woodcraft in Atlanta and recommend "Eparts" almost daily. 99% success in finding what we need.
Thanks !
Guest -
December 14, 2022
Verified Purchase
Great
Fast service, replacement was exactly what I needed.
Guest -
November 24, 2020
Verified Purchase
Problem fixed!
Easy repair!
William -
November 21, 2020
Verified Purchase
Pressure Switch
Excellent service in shipping, and quality of merchandise. Just went on line at eReplacement Parts and WOW, there was the part I needed for my compressor. Thank you for your promptness in shipping since the virus stuff is going on as caused delays in so many of my other orders from other companies.
Guest -
June 29, 2020
Verified Purchase
Replacement Pressure Switch for Husky Compressor
Easy to find on your web site, fast shipping, fair price.
Guest -
May 13, 2020
Verified Purchase
Easy to install.
The part was just what we needed to fix my husbands compressor that I broke. Easy to operate.
Guest -
February 12, 2020
Verified Purchase
Replaced Air Compressor Pressure Switch
The new pressure switch was easy to replace. I wire-brushed the fittings, put on new teflon tape and got the air compressor working again in under 1 hour. Very satisfied.
Guest -
July 31, 2019
Verified Purchase
Easy direct replacement
My compressor was 15 years old. Wouldn’t shut off then blow the pressure release valve. Diagnosed it to the switch. Ordered switch. Received in less then 7 days. Had updated part #. Fits perfect.
Guest -
July 2, 2019
Verified Purchase
good job
i have had great service w/ these guys,sometimes on older parts that i never
thought i would find,thank you
Guest -
June 3, 2019
Verified Purchase
Easy as pie
Brian -
August 15, 2022
Verified Purchase
Questions & Answers ?
Our customer Service team is at the ready daily to answer your part and product questions.

Ask our Team
We have a dedicated staff with decades of collective experience in helping customers just like you purchase parts to repair their products.
Does this fit my product?Questions & Answers for Pressure Switch
I need a pressure switch for this compressor do you have one and what is the part number
Tim
for model number VT627503AJ
asked on 2022-02-08
Hello Tim, Thank you for contacting us. We have researched the model you have provided and have found the part you are looking for is Part Number: CW209300AV. If you need help placing an order, customer service is open 7 days a week. Please feel free to give us a call. We look forward to hearing from you!
eReplacementParts Team February 08, 2022
Complete pressure switch for Camp Bell Hausfeld air pressure, about 15 - 20 years old
Jean
for model number WL610001AJ
asked on 2023-05-08
Hello Jean, thank you for asking. The correct Pressure Switch kit is CW212600SJ. We are pleased to have been able to help.
eReplacementParts Team May 08, 2023
I am trying to find a replacement switch for Campbell Hausfeld compressor model VT61950AJ, s/n L1/16/96-39077. Thanks
Ron
for model number VT619501AJ
asked on 2023-03-23
Hello Ron, Thank you for contacting us. We have researched the model you have provided and have found the part you are looking for is Part Number: CW212600SJ. Thank you for the inquiry, good luck with the repair!
eReplacementParts Team March 23, 2023
Need a new pressure switch, do you carry one, or have one that will transfer over from another model?
Robert
for model number vt627502aj
asked on 2022-12-08
Hello Robert, Thank you for contacting us. We have researched the model you have provided and have found the part you are looking for is Part Number: CW210500SJ. We hope this helps, good luck with this repair!
eReplacementParts Team December 08, 2022
Need a pressure switch, current one is part no. CW207589AV, do you have a replacement?
Mark
for model number WL650002AJ
asked on 2022-10-03
Hello Mark, Thank you for contacting us. We have researched the model you have provided and have found the part you are looking for is Part Number:CW209400AV. Thank you for your inquiry, good luck with this repair!
eReplacementParts Team October 03, 2022
Will this replace cw207579av
John
asked on 2022-08-15
Hello John, Thank you for the question. CW207579AV is not showing to be a valid number in our system. In order for us to locate the correct parts and repair information we will require the model number of the Compressor. Once you have located the model number please feel free to resubmit the question and we will be happy to help you. We are looking forward to hearing from you!
eReplacementParts Team August 15, 2022
I need a pressure switch for this compressor. Which one?
Wayne
for model number VT627505AJ(AGM03)
asked on 2022-07-17
Hello Wayne, thank you for your question. Yes, the Pressure Switch CW209300AV you had chosen is compatible with your model. If you need help placing an order, customer service is open 7 days a week. Please feel free to give us a call. We look forward to hearing from you.
eReplacementParts Team July 17, 2022
Need a replacement swich
Richard
for model number Cw208102av
asked on 2022-05-08
Hello Richard, Thank you for your inquiry. We show the replacement pressure switch for the part number you provided as CW301300SJ. We hope this helps and if you need help placing an order, customer service is open 7 days a week. Please feel free to give us a call. We look forward to hearing from you!
eReplacementParts Team May 08, 2022
Customer Repair Instructions ?
All our customer repair instructions are solicited directly from other customers just like you who have purchased and replaced this exact part.
Switch lost one leg of 220 volts-air compressor wouldn't turn on
Jerry - December 28, 2015
👍 14 of 18 people found this instruction helpful
Tool Type
Compressor
Difficulty
Medium
Time
15-30 minutes
Tools Used
Screwdriver, Pliers, Wrench Set
Parts Used
We had checked power to motor with a stick checker. Since it showed power, we thought it was the motor. When the motor checked ok, we checked power with a volt meter and saw that one leg of the 220 volts was not coming out of the switch. We replaced the switch and it worked fine. To remove pressure switch, take all of the parts off of the switch that are not included with the new switch. Thread the old switch off, then thread the new switch on. Install all of the parts that were on the old switch, onto the new switch.
Did you find this story helpful?
Thanks for voting and helping fellow customers!
Compressor would not shut off
rick - January 20, 2016
👍 9 of 11 people found this instruction helpful
Tool Type
Compressor
Difficulty
Easy
Time
30-60 minutes
Tools Used
Screwdriver, Pliers, Wrench Set, Nutdriver, vice
Parts Used
Remove gauge, pressure relief valve, wires and head pressure relief line.( cut line clean as close to rt. angle fitting as possible) this black plastic tube simply pushes into new rt. angle fitting.
Unscrew defective switch. Hold old part in vice and remove 1/4" pipe nipple.
Install in reverse order. Use teflon tape on all threads.
Unscrew defective switch. Hold old part in vice and remove 1/4" pipe nipple.
Install in reverse order. Use teflon tape on all threads.
Did you find this story helpful?
Thanks for voting and helping fellow customers!
Pressure switch was leaking air
Burl - August 17, 2017
👍 5 of 6 people found this instruction helpful
Tool Type
Compressor
Difficulty
Easy
Time
15-30 minutes
Tools Used
Screwdriver, Adjustable Wrench, Thread tape
Parts Used
Remove the old pressure switch that are not included with the old one.
Open the cover and removed the wires, you may want to make a wiring diagram
Remove the old switch and install the new one
Install the wires on the new switch
Connect all of the parts that were removed from the old switch
Open the cover and removed the wires, you may want to make a wiring diagram
Remove the old switch and install the new one
Install the wires on the new switch
Connect all of the parts that were removed from the old switch
Did you find this story helpful?
Thanks for voting and helping fellow customers!
Pressure switch broken
Nelson - May 19, 2016
👍 5 of 6 people found this instruction helpful
Tool Type
Compressor
Difficulty
Easy
Time
15-30 minutes
Tools Used
Screwdriver, Wrench Set
Parts Used
Drain the tank of air and unplug compressor. Remove the part on the existing pressure switch that are not included with the new one. Remove the cover on the switch and make a wiring diagram. Remove the wires, then remove the defective switch. Install the new switch, install the wires as per the diagram. Replace the parts that were on the old switch to the new switch.
Make sure everything is in place. Plug it in and will work like a new compressor.
Make sure everything is in place. Plug it in and will work like a new compressor.
Did you find this story helpful?
Thanks for voting and helping fellow customers!
Pressure switch leaked.
Ronald - November 2, 2017
👍 3 of 3 people found this instruction helpful
Tool Type
Compressor
Difficulty
Easy
Time
Less than 15 minutes
Tools Used
Wrench Set
Parts Used
Replaced the switch. Problem solved.
Did you find this story helpful?
Thanks for voting and helping fellow customers!
Pressure switch failed on compressor
Ronald - February 28, 2017
👍 3 of 3 people found this instruction helpful
Tool Type
Compressor
Difficulty
Easy
Time
15-30 minutes
Tools Used
Screwdriver, Pliers, Wrench Set, Nutdriver, Adjustable Wrench, Tubing bender and thread sealant
Parts Used
1. Shut off power to the unit.
2. Removed wiring.
3. Removed unloader airline from the switch.
4. Removed safety valve, pressure gauge and pipe plug from the switch.
5. Removed old switch with the crescent wrench.
6. Reversed above operations.
7. Added one additional operation. The original plastic air line to the unloader was replaced with a steel line.
Did you find this story helpful?
Thanks for voting and helping fellow customers!
100 to 135 setting and was supposed to be 90 to 120. It actually has a 45 psi off to on range as well.
Daniel - April 5, 2018
👍 1 of 1 people found this instruction helpful
Tool Type
Compressor
Difficulty
Hard
Time
More than 2 hours
Tools Used
Screwdriver, Pliers, Power Drill, Wrench Set, Nutdriver, Dremel with grinder bit, drill bits, Allen head wrenches
Removed the old setup. removed the allen plug from the old and installed in the new.
Clean and prepare all threads on gauges, tank etc.
identify and rill a 5/8" hole on the side plate. Expand the hole large enough to accept the cable clamp for the supply wiring.
Install the switch on the tank. install gauges and pressure release. reconnect the wiring to the motor. Install the wiring clamp in the new hole and install the supply wiring.
Install the cover on the switch and turn the position to on. manually stop the compressor at 125 psi. This is the maximum rating for the tank this switch was supposed to be for.
made several adjustments to the pressure setting so it eventually kicked on at 80 psi and 125 psi. This proved to be a long process due to having to remove the cover each time to make the adjustment and reinstall to turn the compressor back on with bleed steps in between.
Did you find this story helpful?
Thanks for voting and helping fellow customers!
Up loaded valve come apart and damaged it's location under pressure switch
William - September 13, 2021
Tool Type
Compressor
Difficulty
Medium
Time
1-2 hours
Tools Used
Screwdriver, Pliers, Socket set, Wrench Set, Teflon tape
Parts Used
Ordered new pressure switch, which had an up loader valve already installed. Took about a week to get it. Installed pressure switch. Works great! Installing the switch is straight forward after unplugging the sir compressor and emptying the tank to zero. Very important to remove the cover on the old pressure switch and take several close pictures of the wiring before removing old switch. Any mistakes on wiring will result in a ruined motor and switch.
Did you find this story helpful?
Thanks for voting and helping fellow customers!
Contacts sticking together on pressure for air compressor
Mike - March 5, 2021
Tool Type
Compressor
Difficulty
Easy
Time
15-30 minutes
Tools Used
Screwdriver, Pliers, Adjustable Wrench, None
Parts Used
1) Remove power / unplug
2) Release stored air pressure via pressure relief valve
3) Unwired pressure switch
4) Remove / pressure switch
5) Rewire new pressure switch
6) Ensure pressure switch is in off position
7) Return power / plug in
8) Turn pressure switch to auto position.
9) Check to see that pressure switch cuts off automarically at pre-ser correct pressure.
Did you find this story helpful?
Thanks for voting and helping fellow customers!
Broken pressure switch control knob.
GREG - June 26, 2020
Tool Type
Compressor
Difficulty
Easy
Time
Less than 15 minutes
Tools Used
Screwdriver
Parts Used
Changed cover. Old pressure switch was the same as the new one.
Did you find this story helpful?
Thanks for voting and helping fellow customers!
Load More Install Stories
OEM stands for Original Equipment Manufacturer and means the part you’re buying is sourced directly from the manufacturer who made your product. At eReplacementParts, we sell only genuine OEM parts, guaranteeing the part you’re purchasing is of better design and of higher quality than aftermarket parts.
Our product descriptions are a combination of data sourced directly from the manufacturers who made your product as well as content researched and curated by our content & customer service teams. This content is edited and reviewed internally before being made public to customers.
Our customer service team are at the ready daily to answer your part and product questions. We have a dedicated staff with decades of collective experience in helping customers just like you purchase parts to repair their products.
All our part reviews are solicited directly from other customers who have purchased this exact part. While we moderate these reviews for profanity, offensive language or personally identifiable information, these reviews are posted exactly as submitted and no alterations are made by our team.
All our customer repair instructions are solicited directly from other customers just like you who have purchased and replaced this exact part. While we moderate these reviews for profanity, offensive language or personally identifiable information, these reviews are posted exactly as submitted and no alterations are made by our team.
Based on data from past customer purchasing behaviors, these parts are most commonly purchased together along with the part you are viewing. These parts may be necessary or helpful to replace to complete your current repair.
All our installation videos are created and produced in collaboration with our in-house repair technician, Mark Sodja, who has helped millions of eReplacementParts customers over the last 13 years repair their products. Mark has years of experience in selling and repairing both commercial and residential products with a specialty in gas-powered equipment.
This data is collected from customers who submitted a repair instruction after replacing this exact part. Customers can rate how easy the repair was to complete and how long it took. We aggregate this data to provide a repair rating that allows customers to quickly determine the difficulty and time needed to perform their own repair.