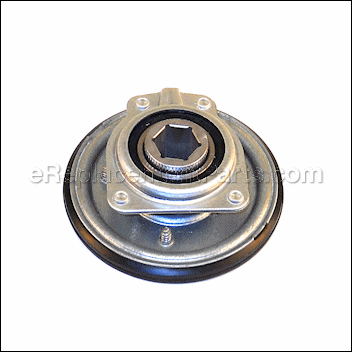
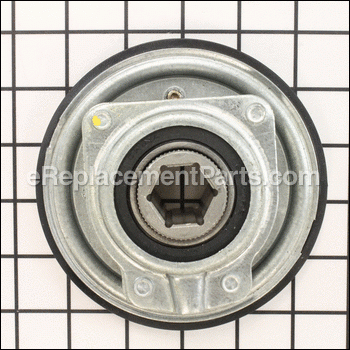
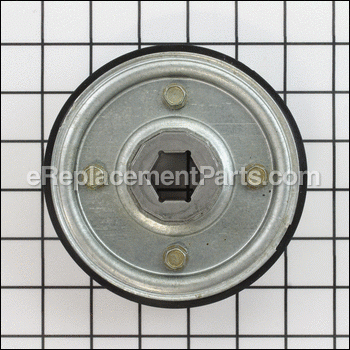

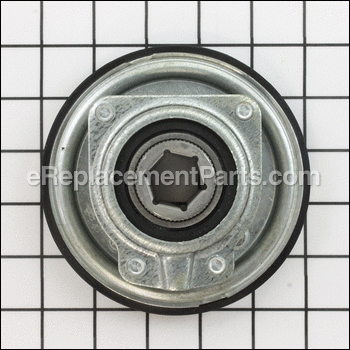


It is a genuine item that is supplied directly from the original manufacturer for use with snowthrowers. The friction disc is an important component of the drive mechanism that helps to propel the equipment forward. Unfortunately, over time it may wear out or get damaged eventually requiring a replacement. If the friction disc is worn or damaged, the snowblower will move slowly, erratically or not move at all. Please make sure to check the diagrams of your model for the correct location and application of this part. Keep in mind this high-quality assembly is made of durable metal and is sold individually.
Wheel Assy Frictio 984-0042C
OEM part for: MTD, Ryobi
Part Number: 984-0042C
$140.13
In Stock
Compatibility
This Wheel Assy Frictio will fit the following 2801 machines. Confirm this part works with your model, and view the detailed model diagrams and repair help we have to offer.
This item works with the following types of products:
- Snowblower Parts
- Chipper / Shredder Parts
This part replaces obsolete part #: 684-0042C, 684-0042, 618-0064, 984-0042B, 790-00011, 718-0301A, 784-5617, 784-5617A, 684-0042A, 684-0042B
Customer Part Reviews ?
Average Rating (out of 5):
Click to filter by ratings:
5 stars
3
4 stars
0
3 stars
0
2 stars
1
1 stars
0
< PREV
- 1
worked great
very easy to install
Guest -
February 1, 2022
Verified Purchase
Quick and easy repair!
The Friction wheel was in pristine condition when it arrived. A very quick and easy disassemble and reassemble while apart I was able to tweak other adjustments, Now my snowblower runs a lot better than I first got it
Guest -
January 4, 2021
Verified Purchase
Same as original part
My 25 year old snow blower lives again. After the local lawn and garden shop told me it couldn’t be repaired I watched a couple YouTube videos and decided I could do it myself. The replacement part matched perfectly. I was up and running in about 1.5 hours.
Guest -
August 1, 2019
Verified Purchase
Work as should
Part took 11 days longer than what I paid for but worked as it should.
Guest -
January 13, 2022
Verified Purchase
Questions & Answers ?
Our customer Service team is at the ready daily to answer your part and product questions.

Ask our Team
We have a dedicated staff with decades of collective experience in helping customers just like you purchase parts to repair their products.
Does this fit my product?Questions & Answers for Wheel Assy Frictio
No questions have been asked yet
Customer Repair Instructions ?
All our customer repair instructions are solicited directly from other customers just like you who have purchased and replaced this exact part.
The rubber on the friction wheel was worn off
Paul - January 16, 2017
👍 3 of 3 people found this instruction helpful
Tool Type
Snowblower
Difficulty
Easy
Time
15-30 minutes
Tools Used
Screwdriver, Wrench Set, Nutdriver
Parts Used
Took the back plate off, drained the gas from the tank, tipped the snow blower on its front, removed the wheels pulled the axle removed the old part replaced it with the new part and reassembled.
Did you find this story helpful?
Thanks for voting and helping fellow customers!
Correct parts
Guy - March 2, 2017
👍 1 of 1 people found this instruction helpful
Tool Type
Snowblower
Difficulty
Easy
Time
30-60 minutes
Tools Used
Screwdriver, Wrench Set
Removed worn parts and reinstalled new parts. It took about 1 hour including readjustment of cable actuating friction wheel. The compartment where the friction Disc assembly is contained is very tight requiring the plate be inserted at an angle before inserting pivot pins in their proper holes. Reinstalling the friction wheel was simple with the bearings removed, after the friction wheel was in place the reinstalling the bearings was easy.
Did you find this story helpful?
Thanks for voting and helping fellow customers!
Friction wheel was 30 years old and needed replacing
Brian - January 6, 2021
Tool Type
Snowblower
Difficulty
Easy
Time
30-60 minutes
Tools Used
Socket set, Wrench Set, Snap ring pliers
Parts Used
Removed skid plate by removing four 3/8 hex head screws
Remove 1/2” bolt in the ends of the drive shaft
Using snap ring pliers remove or slide to the center of the driveshaft the retainer ring for the chain drive
Slide driveshaft towards the chain drive pulley and out of the barring .
You should have enough room to remove old friction wheel off the opposite end of the driveshaft. If you need more room to remove the actuator remove the cotter pin and separate amateur.
At this point your Removal is done.
Install new friction wheel make sure to insert the actuator and slide the driveshaft into the barring and in stall the bolt. Now slide the chain drive pulley back over to where it belongs. Slide snap ring over to retain the chain pulley in its place. Put the other bolt in the end of the driveshaft. Make sure the actuator is working properly before reconnecting the amateur with the cotter pin. Make sure snap ring is in the retaining grove. If all is operating correctly replace skid plate. Tighten all bolts.... now wait for the next snowstorm
Did you find this story helpful?
Thanks for voting and helping fellow customers!
OEM stands for Original Equipment Manufacturer and means the part you’re buying is sourced directly from the manufacturer who made your product. At eReplacementParts, we sell only genuine OEM parts, guaranteeing the part you’re purchasing is of better design and of higher quality than aftermarket parts.
Our product descriptions are a combination of data sourced directly from the manufacturers who made your product as well as content researched and curated by our content & customer service teams. This content is edited and reviewed internally before being made public to customers.
Our customer service team are at the ready daily to answer your part and product questions. We have a dedicated staff with decades of collective experience in helping customers just like you purchase parts to repair their products.
All our part reviews are solicited directly from other customers who have purchased this exact part. While we moderate these reviews for profanity, offensive language or personally identifiable information, these reviews are posted exactly as submitted and no alterations are made by our team.
All our customer repair instructions are solicited directly from other customers just like you who have purchased and replaced this exact part. While we moderate these reviews for profanity, offensive language or personally identifiable information, these reviews are posted exactly as submitted and no alterations are made by our team.
Based on data from past customer purchasing behaviors, these parts are most commonly purchased together along with the part you are viewing. These parts may be necessary or helpful to replace to complete your current repair.
All our installation videos are created and produced in collaboration with our in-house repair technician, Mark Sodja, who has helped millions of eReplacementParts customers over the last 13 years repair their products. Mark has years of experience in selling and repairing both commercial and residential products with a specialty in gas-powered equipment.
This data is collected from customers who submitted a repair instruction after replacing this exact part. Customers can rate how easy the repair was to complete and how long it took. We aggregate this data to provide a repair rating that allows customers to quickly determine the difficulty and time needed to perform their own repair.