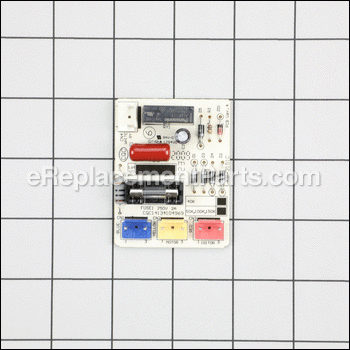
This is a genuine OEM sourced part which is specially designed for use in the air heaters. It provides an identical replacement for a missing or a faulty PCB module that was installed on a new unit. This is the electronic component that helps to control the units operations. Please make sure to check the owners manual and the appropriate diagrams for the correct location and application of this component. Keep in mind this high-quality PCB is made of durable materials and is sold individually.
Pcb 22-521-0002
OEM part for: Pro Temp, Heat Stream, Heat Hog
Part Number: 22-521-0002
Jump To:
Frequently Purchased Together ?
Compatibility
This Pcb will fit the following 16 machines. Confirm this part works with your model, and view the detailed model diagrams and repair help we have to offer.
This item works with the following types of products:
- Heater Parts
Questions & Answers ?
Our customer Service team is at the ready daily to answer your part and product questions.

Ask our Team
We have a dedicated staff with decades of collective experience in helping customers just like you purchase parts to repair their products.
Does this fit my product?Questions & Answers for Pcb
Customer Repair Instructions ?
All our customer repair instructions are solicited directly from other customers just like you who have purchased and replaced this exact part.
Master propane salamander style heater would ignite but wouldn't stay lit when control button was turned from "pilot" to "on".
Tool Type
Heater
Difficulty
Easy
Time
Less than 15 minutes
Tools Used
Screwdriver
Parts Used
1. Remove the cover under the heater base. (2 screws)
2. Unplug all PCB connections
3. Wedge a pocket sized straight slot screwdriver between the PCB edge and the edge retaining lip, then pry the PCB out of its retainer.
4. Place one edge of the new PCB under one retainer lip and carefully snap the opposing edge under the opposing lip.
5. Plug in PCB connectors and refasten the heater base cover.
Would not stay lit after 1 minute without holding in the knob
Tool Type
Heater
Difficulty
Easy
Time
15-30 minutes
Tools Used
Screwdriver
Igniter control board had power wires pushed off the PCB
Tool Type
Heater
Difficulty
Easy
Time
Less than 15 minutes
Tools Used
Screwdriver
Parts Used
would not stay lite
Tool Type
Heater
Difficulty
Easy
Time
Less than 15 minutes
Tools Used
Screwdriver
Parts Used
My heater wouldn't stay lit. I thought it was the thermal switch, but also purchased the PCB, as many suggested might also be the problem. I'm glad I did because I ended up needing it.
Tool Type
Heater
Difficulty
Easy
Time
15-30 minutes
Tools Used
Screwdriver
Parts Used
2. remove old parts
3. install new parts
4. Screw everything back
5. Enjoy heat
Pilot wouldn't stay lit no matter how long you held the knob in. It stopped every time the knob was released.
Tool Type
Heater
Difficulty
Easy
Time
15-30 minutes
Tools Used
Screwdriver
Parts Used
2. Removed the two screws holding the bottom cover in place and removed cover.
3. Removed PCB board.
4. Disconnected connectors from old PCB.
5. Installed connectors on new board.
6. Put board in holder.
7. Installed bottom cover.
8. Hooked up propane and plugged it in.
9. Works like a charm every time.
[CB bad
Tool Type
Heater
Difficulty
Easy
Time
15-30 minutes
Tools Used
Screwdriver
Parts Used
Master forced air propane heater would not stay lit after releasing pilot knob.
Tool Type
Heater
Difficulty
Easy
Time
30-60 minutes
Tools Used
Screwdriver, small screwdriver to pry
Parts Used
2. Remove 1 Phillips screw from old pcb board: match it to new pcb board to insure correct replacement part.
3. Pry wiring harness off old pcb board with small screwdriver.
4. Pry old pcb board out of plastic retaining clips with small screwdriver.
5. Install new pcb board and bottom plastic cover in reverse order.
NOTE: The new pcb board fixed the problem, and thus the new "multi bracket assembly" (thermocoupling) was not needed or used; but I kept it as a back-up for possible future need/use while parts for this heater are still available.
The heater stayed lit after releasing the pilot knob after installing this pcb board.
OEM stands for Original Equipment Manufacturer and means the part you’re buying is sourced directly from the manufacturer who made your product. At eReplacementParts, we sell only genuine OEM parts, guaranteeing the part you’re purchasing is of better design and of higher quality than aftermarket parts.
Our product descriptions are a combination of data sourced directly from the manufacturers who made your product as well as content researched and curated by our content & customer service teams. This content is edited and reviewed internally before being made public to customers.
Our customer service team are at the ready daily to answer your part and product questions. We have a dedicated staff with decades of collective experience in helping customers just like you purchase parts to repair their products.
All our part reviews are solicited directly from other customers who have purchased this exact part. While we moderate these reviews for profanity, offensive language or personally identifiable information, these reviews are posted exactly as submitted and no alterations are made by our team.
All our customer repair instructions are solicited directly from other customers just like you who have purchased and replaced this exact part. While we moderate these reviews for profanity, offensive language or personally identifiable information, these reviews are posted exactly as submitted and no alterations are made by our team.
Based on data from past customer purchasing behaviors, these parts are most commonly purchased together along with the part you are viewing. These parts may be necessary or helpful to replace to complete your current repair.
All our installation videos are created and produced in collaboration with our in-house repair technician, Mark Sodja, who has helped millions of eReplacementParts customers over the last 13 years repair their products. Mark has years of experience in selling and repairing both commercial and residential products with a specialty in gas-powered equipment.
This data is collected from customers who submitted a repair instruction after replacing this exact part. Customers can rate how easy the repair was to complete and how long it took. We aggregate this data to provide a repair rating that allows customers to quickly determine the difficulty and time needed to perform their own repair.


