


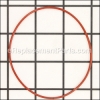
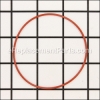
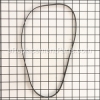
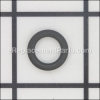
O-rings are made to contain thousands of PSI pressure by creating a seal between two or more parts. O-ring measurements are defined by the inside diameter and the thickness.
rnrnThere are many causes for O-Ring failure. The most common among power tools are:
• Extrusion and Nibbling – The O-ring has ragged, tattered edges. These are commonly caused by pressure spikes which shear off tiny “bites” from the o-ring, or caused by clearance gaps.
• Abrasion – One or both sides of the o-ring appear rough and slightly flattened. Commonly caused by a contact surface that it too rough, contains grit or is too smooth to allow lubrication.
• Over Compression – The O-ring is flattened on both sides and may have a “ring” split along its length. Commonly caused by excessive pressure or heat.
• Heat Hardening – The O-ring has a pitted or cracked surface, and is often flattened on both sides. Caused by temperature exceeding o-ring capacity.
• Weather/Ozone Cracking – The O-ring is covered in small surface cracks. Caused by exposure to ozone, UV rays and air pollution. Excessive seal stretching (greater that 5%) causes similar cracking.
O-ring ACG-45
OEM part for: Porter Cable
Part Number: ACG-45
Jump To:
Product Description ?
- Classification: Part
- Weight: 0.01 lbs.
- Shipping: Ships Worldwide
Frequently Purchased Together ?

Compatibility
This O-ring will fit the following 314 machines. Confirm this part works with your model, and view the detailed model diagrams and repair help we have to offer.
Porter Cable
Show More Compatible ModelsThis item works with the following types of products:
- Compressor Parts
Repair Videos ?

Customer Part Reviews ?
- 1
Questions & Answers ?
Our customer Service team is at the ready daily to answer your part and product questions.

Ask our Team
We have a dedicated staff with decades of collective experience in helping customers just like you purchase parts to repair their products.
Does this fit my product?Questions & Answers for O-ring
Customer Repair Instructions ?
All our customer repair instructions are solicited directly from other customers just like you who have purchased and replaced this exact part.
Dewalt 200 PSI compressor would not build up pressure. After removing cover noted one of the four head bolts was broken and the o-ring was protruding a bit.
Tool Type
Compressor
Difficulty
Easy
Time
30-60 minutes
Tools Used
Power Drill, Socket set, Torx drivers for cover, cobalt drill bits
Parts Used
2. Removed head cover by removing the 3 remaining bolts.
3. Drilled out broken bolt.
4. Replaced the two internal o-rings on either side of head cover.
5. Installed head cover using 4 bolts (used loctite to keep bolts from backing out during operation).
6. Re-installed cover.
7. Restarted compressor. No problems.
Compressor head bolt failure
Tool Type
Compressor
Difficulty
Medium
Time
1-2 hours
Tools Used
Screwdriver, Power Drill, Socket set, Adjustable Wrench, Tap and Die
Parts Used
Drill broken bolts.
Tap aluminum casting to restore threads.
Replace o-rings.
Reassemble.
Test.
Head bolt for compressor broke.
Tool Type
Compressor
Difficulty
Easy
Time
More than 2 hours
Tools Used
Power Drill, Socket set, Nutdriver, Adjustable Wrench
2. Drill out broke head bolt
3. Replaced valve body with new one and new gaskets
4. Reassembled compressor head using new head bolt
The compressor gasket broke
Tool Type
Compressor
Difficulty
Easy
Time
15-30 minutes
Tools Used
Nutdriver, Torque Wrench
Used a vise grip to unscrew the broken bolts.
Replaced both gaskets and reassembled with new bolts.
Gasket pinched wouldn’t get up to proper pressure
Tool Type
Compressor
Difficulty
Easy
Time
30-60 minutes
Tools Used
Pliers, Power Drill, Socket set, Wrench Set, Nutdriver, None
Parts Used
Removed casing torque screws
Removed 4 bolts holding compressor body- had to easy out broken bolt
Replaced both gaskets
Put back together and tested pressure
Works like new-$15 with postage saved me buying a new $400 compressor
moisture had rusted reed valves(intake) on valve plate
Tool Type
Compressor
Difficulty
Easy
Time
15-30 minutes
Tools Used
Pliers, Power Drill, Socket set, Adjustable Wrench
Head Bolts Broken off
Tool Type
Compressor
Difficulty
Hard
Time
1-2 hours
Tools Used
Screwdriver, Pliers, Power Drill, Socket set, Drill Bits
Air leaking from the head
Tool Type
Compressor
Difficulty
Easy
Time
15-30 minutes
Tools Used
Socket set
Parts Used
OEM stands for Original Equipment Manufacturer and means the part you’re buying is sourced directly from the manufacturer who made your product. At eReplacementParts, we sell only genuine OEM parts, guaranteeing the part you’re purchasing is of better design and of higher quality than aftermarket parts.
Our product descriptions are a combination of data sourced directly from the manufacturers who made your product as well as content researched and curated by our content & customer service teams. This content is edited and reviewed internally before being made public to customers.
Our customer service team are at the ready daily to answer your part and product questions. We have a dedicated staff with decades of collective experience in helping customers just like you purchase parts to repair their products.
All our part reviews are solicited directly from other customers who have purchased this exact part. While we moderate these reviews for profanity, offensive language or personally identifiable information, these reviews are posted exactly as submitted and no alterations are made by our team.
All our customer repair instructions are solicited directly from other customers just like you who have purchased and replaced this exact part. While we moderate these reviews for profanity, offensive language or personally identifiable information, these reviews are posted exactly as submitted and no alterations are made by our team.
Based on data from past customer purchasing behaviors, these parts are most commonly purchased together along with the part you are viewing. These parts may be necessary or helpful to replace to complete your current repair.
All our installation videos are created and produced in collaboration with our in-house repair technician, Mark Sodja, who has helped millions of eReplacementParts customers over the last 13 years repair their products. Mark has years of experience in selling and repairing both commercial and residential products with a specialty in gas-powered equipment.
This data is collected from customers who submitted a repair instruction after replacing this exact part. Customers can rate how easy the repair was to complete and how long it took. We aggregate this data to provide a repair rating that allows customers to quickly determine the difficulty and time needed to perform their own repair.