


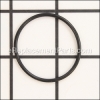
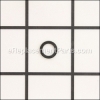
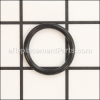
This is a Genuine Manufacturer Sourced replacement part designed for Nailers/Staplers. This O-Ring provides an Air-Tight Seal for the Valve Piston. Over time this O-Ring will shrink, become brittle and crack allowing for air leaks. At that time it should be replaced. It is made out of Rubber and it is Sold Individually.
Replacing this item you would need Hex Key/Allen Wrench and Pliers to replace this item.
O-ring S06P001500
OEM part for: Bostitch, Porter Cable
Part Number: S06P001500
$5.19
In Stock
Jump To:
Product Description ?
- Classification: Part
- Weight: 0.01 lbs.
- Shipping: Ships Worldwide
Frequently Purchased Together ?
Compatibility
This O-ring will fit the following 23 machines. Confirm this part works with your model, and view the detailed model diagrams and repair help we have to offer.
This item works with the following types of products:
- Stapler Parts
- Nailer Parts
This part replaces obsolete part #: 1FP0015
Customer Part Reviews ?
Average Rating (out of 5):
Click to filter by ratings:
5 stars
4
4 stars
1
3 stars
0
2 stars
0
1 stars
0
< PREV
- 1
Great customer service!
I called to check on my order and the lady who helped me was very courteous and professional-wish all customer service departments were like that. Thanks
Guest -
May 29, 2020
Verified Purchase
It worked!!
I was minutes away from paying a company way too much to do what I did is several minutes and under $10. I am super happy that I found this site and purchased the parts from here. I had no idea what the problem was but the recommended parts were exactly what I needed.
Guest -
February 10, 2020
Verified Purchase
Fast response
Parts work perfectly
Guest -
January 11, 2020
Verified Purchase
The braid nailer would not fire.
The recommended part fixed the problem. Works like new again.
Guest -
December 16, 2019
Verified Purchase
Good experience
Every thing went well just the shipping took a while
Guest -
June 16, 2020
Verified Purchase
Questions & Answers ?
Our customer Service team is at the ready daily to answer your part and product questions.

Ask our Team
We have a dedicated staff with decades of collective experience in helping customers just like you purchase parts to repair their products.
Does this fit my product?Questions & Answers for O-ring
No questions have been asked yet
Customer Repair Instructions ?
All our customer repair instructions are solicited directly from other customers just like you who have purchased and replaced this exact part.
Head valve had broken into many pieces.
Joe - November 21, 2015
👍 1 of 1 people found this instruction helpful
Tool Type
Nailer
Difficulty
Easy
Time
30-60 minutes
Tools Used
Screwdriver, Pliers, Hex wrench set
Parts Used
Had to remove the head valve cover using a hex wrench, then clean out the plastic bits from the broken head valve. Washed the cylinder and piston top with brake cleaner, re-lubed the cylinder, replaced the head valve and associated O rings and re-assembled. It did not work. So I took it apart again, moved the piston to near the top of the cylinder, and re-assembled the tool, connected it to the air hose and it worked fine. I wasn't able to locate a repair manual for this particular Bostitch tool so it was a trial and error job. Job took about an hour. actually about a 30 minute fix if done correctly the first time. LOL
Ereplacementparts.com had everything i needed to do the repair. Fast shipping by them as well. A good vendor from my experience
Ereplacementparts.com had everything i needed to do the repair. Fast shipping by them as well. A good vendor from my experience
Did you find this story helpful?
Thanks for voting and helping fellow customers!
Nailer Head Valve Body broke
Randy - May 21, 2022
Tool Type
Nailer
Difficulty
Easy
Time
Less than 15 minutes
Tools Used
, allen wrench
Parts Used
Although your website shows the Nailer Head Valve Body for my Bostitch SB-125BN nailer as being discontinued by the manufacturer, and with your quick shipping of the gasket and o-ring I was able to fix my nailer like it was brand new in under 15 minutes. Glad I pulled it back out of the trash and pulled that string! Thank you guys for the many parts you've helped me with over the years.
Did you find this story helpful?
Thanks for voting and helping fellow customers!
Stapler would not fire
Gilbert - August 22, 2018
Tool Type
Stapler
Difficulty
Easy
Time
15-30 minutes
Tools Used
Pliers, Allen Wrench
1. Removed end cover
2. Located broken head valve
3. Removed broken head valve
4. Cleaned and lubricated internal cylinder wall
5. Installed new o-rings onto new head valve and applied lube
6. Reassembled head valve into cylinder
7. Installed new top packing (gasket)
8. Installed end cover and tightened screws.
9. Attached air hose and test fired the stapler.
Did you find this story helpful?
Thanks for voting and helping fellow customers!
Nailer failed to fire when trigger was pulled.
Bob - June 13, 2018
Tool Type
Nailer
Difficulty
Easy
Time
15-30 minutes
Tools Used
, Allen wrench
1. Remove four allen screws in top head cap.
2. Remove worn or damaged head value.
3. Replace old head value with new head value along with new O-rings just to be sure.
4. Remove old packing gasket and install new packing.
5. Place head cap on new packing gasket and re-install four allen screws.
6. Test fire and nailer now works like new.
2. Remove worn or damaged head value.
3. Replace old head value with new head value along with new O-rings just to be sure.
4. Remove old packing gasket and install new packing.
5. Place head cap on new packing gasket and re-install four allen screws.
6. Test fire and nailer now works like new.
Did you find this story helpful?
Thanks for voting and helping fellow customers!
Head valve broken
Archie - May 18, 2018
Tool Type
Nailer
Difficulty
Easy
Time
15-30 minutes
Tools Used
, Allen wrench
Removed top of nailer replaced head valve and all of the broken pieces, then the o rings, then replaced the top.
Did you find this story helpful?
Thanks for voting and helping fellow customers!
Head valve disintegrated.
Guy - April 2, 2018
Tool Type
Nailer
Difficulty
Easy
Time
15-30 minutes
Tools Used
Screwdriver, Pliers, Wrench Set
Parts Used
1. Disassembled the nailer.
2. Removed the damaged parts.
3. Installed the new parts and reassembled.
Used parts diagram supplied with nail as repair instructions.
2. Removed the damaged parts.
3. Installed the new parts and reassembled.
Used parts diagram supplied with nail as repair instructions.
Did you find this story helpful?
Thanks for voting and helping fellow customers!
Would not fire nails just expelled air
Riley - February 17, 2018
Tool Type
Stapler
Difficulty
Easy
Time
Less than 15 minutes
Tools Used
, Metric Allen Wrench
Removed the head and replaced the old piston valve with new piston valve and o rings.
Did you find this story helpful?
Thanks for voting and helping fellow customers!
Head valve o-ring
James - December 23, 2017
Tool Type
Nailer
Difficulty
Easy
Time
15-30 minutes
Tools Used
, Allen wrench
Removed the top cover and replaced parts, oiled o-rings and piston prior to install
Did you find this story helpful?
Thanks for voting and helping fellow customers!
Failure to feed brads-Hyd. Valve piston broke-OEM part was plastic
Victor - December 17, 2017
Tool Type
Stapler
Difficulty
Easy
Time
15-30 minutes
Tools Used
Screwdriver, torx driver
Disassembled head-Removed broken hyd. valve piston parts-Cleaned & applied light coat of oil to new parts/o-ring-Reassembled-Worked great driving 1.25 in. 18ga. brads into trim.
Did you find this story helpful?
Thanks for voting and helping fellow customers!
HDValve Piston crumbled brokeapart
joe - November 11, 2017
Tool Type
Nailer
Difficulty
Easy
Time
15-30 minutes
Tools Used
Screwdriver, Pliers, Allen wrenches
Removed 4 allen screws in top of air cylinder removed broken piston, cleaned the chamber, oiled o-rings and piston replaced in top cap and replaced exhaust cover on top of cap replaced top cap on air cylinder easy fix, works like new
Did you find this story helpful?
Thanks for voting and helping fellow customers!
Load More Install Stories
OEM stands for Original Equipment Manufacturer and means the part you’re buying is sourced directly from the manufacturer who made your product. At eReplacementParts, we sell only genuine OEM parts, guaranteeing the part you’re purchasing is of better design and of higher quality than aftermarket parts.
Our product descriptions are a combination of data sourced directly from the manufacturers who made your product as well as content researched and curated by our content & customer service teams. This content is edited and reviewed internally before being made public to customers.
Our customer service team are at the ready daily to answer your part and product questions. We have a dedicated staff with decades of collective experience in helping customers just like you purchase parts to repair their products.
All our part reviews are solicited directly from other customers who have purchased this exact part. While we moderate these reviews for profanity, offensive language or personally identifiable information, these reviews are posted exactly as submitted and no alterations are made by our team.
All our customer repair instructions are solicited directly from other customers just like you who have purchased and replaced this exact part. While we moderate these reviews for profanity, offensive language or personally identifiable information, these reviews are posted exactly as submitted and no alterations are made by our team.
Based on data from past customer purchasing behaviors, these parts are most commonly purchased together along with the part you are viewing. These parts may be necessary or helpful to replace to complete your current repair.
All our installation videos are created and produced in collaboration with our in-house repair technician, Mark Sodja, who has helped millions of eReplacementParts customers over the last 13 years repair their products. Mark has years of experience in selling and repairing both commercial and residential products with a specialty in gas-powered equipment.
This data is collected from customers who submitted a repair instruction after replacing this exact part. Customers can rate how easy the repair was to complete and how long it took. We aggregate this data to provide a repair rating that allows customers to quickly determine the difficulty and time needed to perform their own repair.