

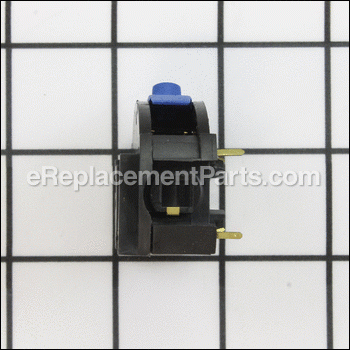
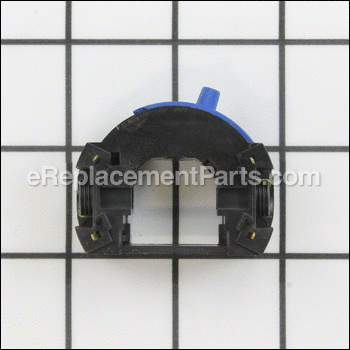
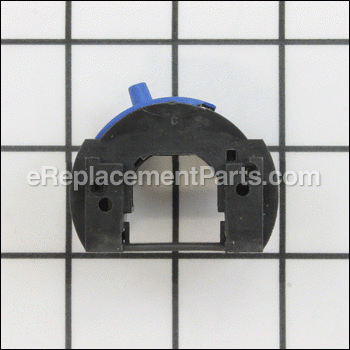


This is a genuine Dremel replacement part that has been sourced from the original manufacturer to be used with multi-tools. The switch assembly is used to relay electricity from the power cord to the motor. This item may require a screwdriver, small pick, small nose pliers, and a utility knife to install. The switch is sold individually.
On-off Switch 2610925722
OEM part for: Dremel, Bosch
Part Number: 2610925722
$21.98
In Stock
Jump To:
Frequently Purchased Together ?
Compatibility
This On-off Switch will fit the following 4 machines. Confirm this part works with your model, and view the detailed model diagrams and repair help we have to offer.
Dremel
This item works with the following types of products:
- Multi-Tool Parts
Customer Part Reviews ?
Average Rating (out of 5):
Click to filter by ratings:
5 stars
6
4 stars
0
3 stars
0
2 stars
0
1 stars
0
< PREV
- 1
Switch ... on !
Perfect replacement for a defective switch for the Dremel model 300, it now works like brand new. Easy to install, plenty of Utube videos to guide you.
Guest -
May 5, 2023
Verified Purchase
First Class Service!
All of the parts I ordered were received as expected. They were well packed and in excellent shape. These folks do what they say they will and send quality parts at a reasonable price. Thanks!
Guest -
November 26, 2022
Verified Purchase
Worked perfectly
I had tested my on off switch and discovered that it was malfunctioning. Came to ereplacementparts, looked up my parts, ordered and waited. I paid for the 3-5 day delivery, it didn't make it on time, called customer service and they reimbursed my shipping.
Very pleased with the entire process with ereplacementparts and will continue to use them in the future.
Ryan -
December 21, 2021
Verified Purchase
Great customer service company!!
I was surprised at how quickly I received the switch I ordered, especially considering the current circumstances.
Although it was due to my mistake as I ordered the wrong part, the company has been super about allowing me to return it and has made the return very simple for me! Thanks!!
Guest -
June 2, 2020
Verified Purchase
Fast shipping.
Parts were a perfect fit, would order from them again. Part was easy to find.
Guest -
September 4, 2019
Verified Purchase
Easy repair and lot of supporting infomation was available. Before the repair I was unable to change the speeds on my Dremel. It only operated at one speed.
Once the speed Controller part was replaced I was able to change the speeds of the Dremel.
Guest -
September 3, 2019
Verified Purchase
Questions & Answers ?
Our customer Service team is at the ready daily to answer your part and product questions.

Ask our Team
We have a dedicated staff with decades of collective experience in helping customers just like you purchase parts to repair their products.
Does this fit my product?Questions & Answers for On-off Switch
No questions have been asked yet
Customer Repair Instructions ?
All our customer repair instructions are solicited directly from other customers just like you who have purchased and replaced this exact part.
On-Off switch - Is a slide speed control - apparently wears until - loss of contact -NO Power
Leroy - March 29, 2017
👍 9 of 9 people found this instruction helpful
Tool Type
MultiTool
Difficulty
Easy
Time
30-60 minutes
Tools Used
Screwdriver, Nutdriver, star type allen
Parts Used
The tool is a Dremel Model 300 (NOTE: Each of the models 100,200,&300 have different housing (frame) and different switch assemblies ( on-off switch)
This speed control is a plug in module into the back of the motor field assembly
1. Remove 4 frame screws using special star tool
2. Unscrew housing cap at front end & remove brush caps and brush /springs
3 Save brushes and cap in a parts cup & lay assembly in tool holder or cradle
4. Open cover and set aside - collect lock assembly -( button & collet spring from front)
5. Lift out motor assembly, remove rear Isolator off of the rear bearing
6. Unplug speed control (on-off) module from the motor field assembly and mark top position
Note: Parts held for reassembly - 4 screws, housing cap, brush caps and brush pcs, lock assembly, rear isolator (remember position) and the basic assembly.
Reassembly in reverse order - watch orientation of parts - assemble and hand press cover in place before installing screws - check position power cord gasket is correct
DO NOT FORCE PARTS - If you pay attention and note part positions when disassembly
then they will go together easily - Note: the rear bearing isolator is actually a soft bearing seat or collar providing vibration dampening, if it is hard it should be replaced.
Did you find this story helpful?
Thanks for voting and helping fellow customers!
Switch not working, brushes worn
Gerald - August 25, 2017
👍 2 of 2 people found this instruction helpful
Tool Type
MultiTool
Difficulty
Easy
Time
15-30 minutes
Tools Used
Screwdriver
Parts Used
Removed the screws and the brush caps and brushes from the housing and separated the housings
Unplugged the old switch and plugged the new one in
Screwed the housings together
Installed the new brushes and brush caps
Unplugged the old switch and plugged the new one in
Screwed the housings together
Installed the new brushes and brush caps
Did you find this story helpful?
Thanks for voting and helping fellow customers!
Switch was bad.
Billy - February 7, 2018
👍 1 of 1 people found this instruction helpful
Tool Type
MultiTool
Difficulty
Medium
Time
30-60 minutes
Tools Used
Screwdriver, Special screwdriver bit on case screws
Parts Used
1. Took out the case screws and removed the top side (opposite the switch control). [special screwdriver bit]
2. Then removed the armature housing and the armature.
3. Slipped the rubber coating off the bearing on the end of the armature shaft.
4. Slipped the old switch out and the new switch in place - reassembled the tool.
5. Tried the tool but it did not work well - took apart and reassembled 2-3 times -- still no good.
6. Disassembled, turned the armature housing 180 degrees in the bottom half of the case - then reassembled.
7. It worked fine. Apparently, I had rotated the armature housing. It is still working fine and I have used it several times since the repair.
Did you find this story helpful?
Thanks for voting and helping fellow customers!
Tool would not turn on
Kenneth - November 27, 2017
👍 1 of 1 people found this instruction helpful
Tool Type
MultiTool
Difficulty
Easy
Time
15-30 minutes
Tools Used
Screwdriver
Parts Used
Disassemble (4 screws). Unplug old switch and replace with new. Carbon brushes are replaced without disassembly.
Did you find this story helpful?
Thanks for voting and helping fellow customers!
Stopped running
Gary - September 24, 2020
Tool Type
MultiTool
Difficulty
Easy
Time
15-30 minutes
Tools Used
Screwdriver
Parts Used
Disassembled, removed switch, installed new switch, reassembled.
Did you find this story helpful?
Thanks for voting and helping fellow customers!
Bad switch
Chris - May 19, 2020
Tool Type
MultiTool
Difficulty
Easy
Time
Less than 15 minutes
Tools Used
Screwdriver, Power Drill
Parts Used
Took Deremel apart
replaced switch
Reasembled Dremel. Easy
Watch You tube video for instructions
replaced switch
Reasembled Dremel. Easy
Watch You tube video for instructions
Did you find this story helpful?
Thanks for voting and helping fellow customers!
Brushes needed replaced and on and off switch
Gene - January 29, 2018
Tool Type
MultiTool
Difficulty
Medium
Time
15-30 minutes
Tools Used
Screwdriver
Parts Used
Brushes just remove and replace
Switch: A little harder only goes one way so check it before you take it apart
Switch: A little harder only goes one way so check it before you take it apart
Did you find this story helpful?
Thanks for voting and helping fellow customers!
On/Off switch stopped working
Scott - July 7, 2017
Tool Type
MultiTool
Difficulty
Easy
Time
Less than 15 minutes
Tools Used
Screwdriver
Parts Used
1. Opened the Dremel up
2. Removed old on/off switch from motor and disconnected power wires. (write down black/white configuration beforehand. I don't think it matters during reassembly but better safe than sorry!)
3.Snapped new on/off switch into the four ports of the motor.
4. Reattach white and black power cords. They snap into the unit very easily.
5. Closed the unit.
6. I replaced the carbon brushes to, because they were a bit worn out. This is easy but must be done at the very end so the motor sits correctly.
7. Turned it on and enjoyed my Dremel again. This repair saved me about $40-50 dollars from having to buy a new Dremel. I like this place!
Did you find this story helpful?
Thanks for voting and helping fellow customers!
Needed new switch and brushes
melvin - March 17, 2017
Tool Type
MultiTool
Difficulty
Easy
Time
15-30 minutes
Tools Used
Screwdriver
Parts Used
Remove the front cover
Remove the screws from the housing and separate
Pull the old switch out and the new switch in
Place housing together
Replace the brushes
Remove the screws from the housing and separate
Pull the old switch out and the new switch in
Place housing together
Replace the brushes
Did you find this story helpful?
Thanks for voting and helping fellow customers!
OEM stands for Original Equipment Manufacturer and means the part you’re buying is sourced directly from the manufacturer who made your product. At eReplacementParts, we sell only genuine OEM parts, guaranteeing the part you’re purchasing is of better design and of higher quality than aftermarket parts.
Our product descriptions are a combination of data sourced directly from the manufacturers who made your product as well as content researched and curated by our content & customer service teams. This content is edited and reviewed internally before being made public to customers.
Our customer service team are at the ready daily to answer your part and product questions. We have a dedicated staff with decades of collective experience in helping customers just like you purchase parts to repair their products.
All our part reviews are solicited directly from other customers who have purchased this exact part. While we moderate these reviews for profanity, offensive language or personally identifiable information, these reviews are posted exactly as submitted and no alterations are made by our team.
All our customer repair instructions are solicited directly from other customers just like you who have purchased and replaced this exact part. While we moderate these reviews for profanity, offensive language or personally identifiable information, these reviews are posted exactly as submitted and no alterations are made by our team.
Based on data from past customer purchasing behaviors, these parts are most commonly purchased together along with the part you are viewing. These parts may be necessary or helpful to replace to complete your current repair.
All our installation videos are created and produced in collaboration with our in-house repair technician, Mark Sodja, who has helped millions of eReplacementParts customers over the last 13 years repair their products. Mark has years of experience in selling and repairing both commercial and residential products with a specialty in gas-powered equipment.
This data is collected from customers who submitted a repair instruction after replacing this exact part. Customers can rate how easy the repair was to complete and how long it took. We aggregate this data to provide a repair rating that allows customers to quickly determine the difficulty and time needed to perform their own repair.