


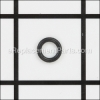
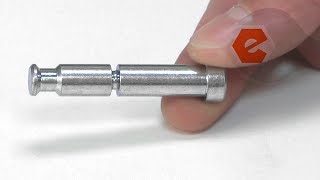
Authentic Manufacturer Approved replacement part designed for some Compound Miter Saws. The purpose of this part is to lock the saw arm in the down position. This item is made out of Metal and it is Sold Individually.
Locking Pin 387130-00
OEM part for: DeWALT
Part Number: 387130-00
$5.19
In Stock
Jump To:
Frequently Purchased Together ?


Compatibility
This Locking Pin will fit the following 198 machines. Confirm this part works with your model, and view the detailed model diagrams and repair help we have to offer.
DeWALT
Show More Compatible ModelsThis item works with the following types of products:
- Miter Saw Parts
- Saw Parts
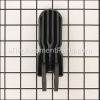
Repair Videos ?
Watch the Repair Video for
Locking Pin
Articles:
|
Step-by-step instructions for removing and installing the locking pin on your DeWALT miter saw....
September 25, 2017
|

Customer Part Reviews ?
Average Rating (out of 5):
Click to filter by ratings:
5 stars
5
4 stars
0
3 stars
2
2 stars
0
1 stars
0
< PREV
- 1
worked great
Very Happy, with how easy it was to find the exact part and it got to me in a matter of days.
Guest -
March 9, 2022
Verified Purchase
Thanks
🙂
Mark -
January 27, 2021
Verified Purchase
Dewalt Locking Pin fit perfectly
This pin and the related o-ring fit my DW715 perfectly. The accompanying how-to video was immensely helpful.
Ben -
November 19, 2019
Verified Purchase
Easy Repair
The part arrived in a couple of days and was easy to install.
Saw now works like new.
Donald -
September 13, 2019
Verified Purchase
Does not get much better than that – thank you
They did what they said they would do, when they said they would do it, and for the price that they said they would do it for. Does not get much better than that – thank you
Guest -
August 8, 2019
Verified Purchase
Pin worked
The pin worked fine once I purchased the o-ring that I feel should have been included with the pin
Kenneth -
October 18, 2021
Verified Purchase
Needs better quality control
This is the 2nd time I had to purchase this replacement. The 1st broke within 3 months of light use.
Jonathan -
May 29, 2020
Verified Purchase
Questions & Answers ?
Our customer Service team is at the ready daily to answer your part and product questions.

Ask our Team
We have a dedicated staff with decades of collective experience in helping customers just like you purchase parts to repair their products.
Does this fit my product?Questions & Answers for Locking Pin
No questions have been asked yet
Customer Repair Instructions ?
All our customer repair instructions are solicited directly from other customers just like you who have purchased and replaced this exact part.
12" Dewalt Compound Miter Saw Lock Pin was broken
Howard - December 15, 2021
Tool Type
Miter Saw
Difficulty
Easy
Time
Less than 15 minutes
Tools Used
Screwdriver
Parts Used
1. Removed Blade cover retraction arm.
2. Removed blade up position stop bolt.
3. Lift Blade up to clear lock pin.
4. Push broken Lock Pin out on Blade side.
5. Slip new o-ring onto lock pin.
6. Slide new lock pin and o-ring into position.
7. Push Blade down and re-install stop bolt.
8. Re-install Blade cover retraction arm.
2. Removed blade up position stop bolt.
3. Lift Blade up to clear lock pin.
4. Push broken Lock Pin out on Blade side.
5. Slip new o-ring onto lock pin.
6. Slide new lock pin and o-ring into position.
7. Push Blade down and re-install stop bolt.
8. Re-install Blade cover retraction arm.
Did you find this story helpful?
Thanks for voting and helping fellow customers!
Aquired a well-used miter saw at a garage sale that had a broken locking pin and broken dust duct assembly that needed replacing.
Kevin - February 25, 2021
Tool Type
Miter Saw
Difficulty
Easy
Time
15-30 minutes
Tools Used
Screwdriver
Used logic to remove appropriate parts to enable installation of replacement parts.
Did you find this story helpful?
Thanks for voting and helping fellow customers!
Miter saw locking pin was broken making locking/unlocking for storage/usage difficult.
HENRY - May 23, 2020
Tool Type
Miter Saw
Difficulty
Easy
Time
Less than 15 minutes
Tools Used
Screwdriver
Parts Used
1. Unplugged saw was placed on workbench.
2. With safety glasses on a philips head screwdriver was used to remove (at the rear of the saw) the shouldered screw that mounts the upper stop roller and the (flat with elongated slot) safety shroud link.
3. Disengage (move to the right) the link from the mounting stud. This allows the throw of the saw to be extended to the rear.
4. Loosen the large 3-pronged (at rear of saw) bevel adjustment screw enough to clear the saw as the saw is extended to the rear.
5. Extend the saw to provide just enough clearance to remove (push out to the left) the remaining broken portion of the stop pin from its mounting hole.
6. Install new pin (small end first) into mounting hole and reassemble saw in reverse order.
6.
Did you find this story helpful?
Thanks for voting and helping fellow customers!
Lock pin to hold saw closed sheared off
Douglas - January 16, 2020
Tool Type
Miter Saw
Difficulty
Easy
Time
Less than 15 minutes
Tools Used
Screwdriver, Adjustable Wrench, Torx bits
Parts Used
1 Remove stop nut on back of saw, this is the one that has the bar attached to open and close the blade guard.
2 Open saw (motor head fully) to access pin.
3 Use screw driver or punch to push out pin towards the blade.
4 Install O-ring onto new lock pin.
5 install new pin into slot.
6 Close saw engage lock pin and attach stop nut.
2 Open saw (motor head fully) to access pin.
3 Use screw driver or punch to push out pin towards the blade.
4 Install O-ring onto new lock pin.
5 install new pin into slot.
6 Close saw engage lock pin and attach stop nut.
Did you find this story helpful?
Thanks for voting and helping fellow customers!
Locking pin broke
CHUCK - October 12, 2018
Tool Type
Miter Saw
Difficulty
Medium
Time
Less than 15 minutes
Tools Used
, On board blade changing tool is all you need
Parts Used
Loosen the blade guard to swing it out of the way to remove the broken pin and installed the new one with a new O ring (lost the O ring so had to get a new one). The blade removal wrench is right with the saw so no addition tools are needed :o)
This is the third time I have had to replace the locking pin so it gets easier and faster each time
This is the third time I have had to replace the locking pin so it gets easier and faster each time
Did you find this story helpful?
Thanks for voting and helping fellow customers!
Handle broke. Saw rolled of a stack of lumber.
William - November 27, 2016
Tool Type
Miter Saw
Difficulty
Easy
Time
15-30 minutes
Tools Used
Screwdriver
Parts Used
Remove broken handle and replace.
Did you find this story helpful?
Thanks for voting and helping fellow customers!
No wrong. Everything works good. Easy to replace.
Roberto - August 12, 2016
Tool Type
Miter Saw
Difficulty
Easy
Time
Less than 15 minutes
Tools Used
Screwdriver
Parts Used
I did like was in the manual. Very easy
Did you find this story helpful?
Thanks for voting and helping fellow customers!
The pin that holds down the saw head broke.
Bruce - January 27, 2019
👍 0 of 1 people found this instruction helpful
Tool Type
Miter Saw
Difficulty
Easy
Time
Less than 15 minutes
Tools Used
Screwdriver, Adjustable Wrench
Parts Used
Remove the blade guard and depth stop, slide the broken piece out and the new pin in.
Did you find this story helpful?
Thanks for voting and helping fellow customers!
locking pin broke
Jack - December 19, 2018
👍 0 of 1 people found this instruction helpful
Tool Type
Miter Saw
Difficulty
Easy
Time
Less than 15 minutes
Tools Used
Screwdriver, Pliers
Parts Used
loosened screw on the stop so saw could move all the way back. pushed pin out pushed new one in, I had to use pliers to get it in. then moved saw back into place and tightened locking screw.
Did you find this story helpful?
Thanks for voting and helping fellow customers!
Lock pin broke off.
John - September 24, 2017
👍 1 of 3 people found this instruction helpful
Tool Type
Miter Saw
Difficulty
Easy
Time
Less than 15 minutes
Tools Used
Screwdriver
Parts Used
1. Removed two guards.
2. Removed the broken pin.
3. Installed the new pin and the O-ring.
4. Reinstalled the guards.
2. Removed the broken pin.
3. Installed the new pin and the O-ring.
4. Reinstalled the guards.
Did you find this story helpful?
Thanks for voting and helping fellow customers!
OEM stands for Original Equipment Manufacturer and means the part you’re buying is sourced directly from the manufacturer who made your product. At eReplacementParts, we sell only genuine OEM parts, guaranteeing the part you’re purchasing is of better design and of higher quality than aftermarket parts.
Our product descriptions are a combination of data sourced directly from the manufacturers who made your product as well as content researched and curated by our content & customer service teams. This content is edited and reviewed internally before being made public to customers.
Our customer service team are at the ready daily to answer your part and product questions. We have a dedicated staff with decades of collective experience in helping customers just like you purchase parts to repair their products.
All our part reviews are solicited directly from other customers who have purchased this exact part. While we moderate these reviews for profanity, offensive language or personally identifiable information, these reviews are posted exactly as submitted and no alterations are made by our team.
All our customer repair instructions are solicited directly from other customers just like you who have purchased and replaced this exact part. While we moderate these reviews for profanity, offensive language or personally identifiable information, these reviews are posted exactly as submitted and no alterations are made by our team.
Based on data from past customer purchasing behaviors, these parts are most commonly purchased together along with the part you are viewing. These parts may be necessary or helpful to replace to complete your current repair.
All our installation videos are created and produced in collaboration with our in-house repair technician, Mark Sodja, who has helped millions of eReplacementParts customers over the last 13 years repair their products. Mark has years of experience in selling and repairing both commercial and residential products with a specialty in gas-powered equipment.
This data is collected from customers who submitted a repair instruction after replacing this exact part. Customers can rate how easy the repair was to complete and how long it took. We aggregate this data to provide a repair rating that allows customers to quickly determine the difficulty and time needed to perform their own repair.