


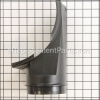
This is an authentic OEM sourced component which is specially designed for use with Poulan and Husqvarna snowblowers. The impeller is the component that will shovel the snow. It provides an identical replacement for a missing or a faulty impeller assembly was installed on a new unit. Please make sure to refer to the owners manual and the appropriate diagrams of your model for the correct location and application of this component. Keep in mind this high-quality assembly is made of durable metal and is sold individually.
Impeller Assembly 531167901
OEM part for: Husqvarna
Part Number: 531167901
$54.78
In Stock
Jump To:
Frequently Purchased Together ?

Compatibility
This Impeller Assembly will fit the following 380 machines. Confirm this part works with your model, and view the detailed model diagrams and repair help we have to offer.
Husqvarna
Show More Compatible ModelsThis item works with the following types of products:
- Snowblower Parts
This part replaces obsolete part #: 175321X479, 532175321, 5321841-05, 584460901, 532184105, 532435775, 175321X431
Customer Part Reviews ?
Average Rating (out of 5):
Click to filter by ratings:
5 stars
1
4 stars
0
3 stars
0
2 stars
0
1 stars
0
< PREV
- 1
Craftsman snowblower replacement impeller
Fast shipping. Easy ordering process.
Guest -
February 13, 2023
Verified Purchase
Questions & Answers ?
Our customer Service team is at the ready daily to answer your part and product questions.

Ask our Team
We have a dedicated staff with decades of collective experience in helping customers just like you purchase parts to repair their products.
Does this fit my product?Questions & Answers for Impeller Assembly
will this fitthis model polan pro 81/2-27 snow blower
Evans
for model number polan pro pr8527es
asked on 2023-03-22
Hello Evans, Thank you for your inquiry. We have researched the model you have provided and do not show this part as compatible. The compatible part number is 531167901. We hope this helps you.
eReplacementParts Team March 22, 2023
Customer Repair Instructions ?
All our customer repair instructions are solicited directly from other customers just like you who have purchased and replaced this exact part.
Impeller blade bent by stone caught in housing. Housing cracked.
Robert - January 17, 2018
👍 4 of 4 people found this instruction helpful
Tool Type
Snowblower
Difficulty
Medium
Time
More than 2 hours
Tools Used
Socket set, Wrench Set
1. Put support under rear of frame.
2. Remove chute and belt cover. You can leave chute cables connected,
3. Free auger drive belt from top and bottom pulleys. Leave it loose in place.
4. Remove bolts holding auger/impeller housing to frame.
5. Tilt auger/impeller assembly forward from rear and lift clear of supporting bar on frame.
6. Remove impeller/auger drive pulley from the housing and auger drive shaft.
7. Remove shear bolts from impeller.
8. Remove auger bearings and retainers from each side of auger housing.
9. Pull auger/impeller assembly forward out of housing, freeing the drive shaft.
10. (I took the housing to a machine shop to weld the crack in the impeller housing.)
11. Mount the new impeller on the shaft and tighten shear bolts.
12. Put auger bearing retainers back on the ends of the auger shaft.
12. Move the auger into the housing, running the drive shaft back through the rear bearing.
13. Re-attach the bearings to the auger shaft and bolt through the housing to the retainers.
14. Re-attach the drive pulley on the outside back of the housing.
15. Re-hang the auger/impeller housing on motor frame crossbar.
16. Re-attach bolts holding auger/impeller housing to the motor frame.
17. Re-attach the auger/impeller drive belt over pulleys and inside the idler. Check that the auger/impeller control tightens the auger/impeller belt properly.
18. Re-attach the belt cover and corner discharge bracket.
19. Re-attach the chute.
20. Blow some snow.
Note: You may need to remove and re-attach the impeller/auger drive shaft bearings at the rear of the housing to ease auger/impeller re-assembly to the housing. That wasn't necessary for me.
Did you find this story helpful?
Thanks for voting and helping fellow customers!
Impeller was damaged (bent blades).
Todd - January 12, 2017
👍 3 of 3 people found this instruction helpful
Tool Type
Snowblower
Difficulty
Medium
Time
1-2 hours
Tools Used
Screwdriver, Pliers, Power Drill, Socket set, Wrench Set, Nutdriver, Bearing puller
Removed the auger bolts.
Removed the impeller bolts.
Separated the auger assembly from the power head, 2 bolts and one belt.
Removed the auger drive wheel
Removed the bearing using a puller, made the bearing slide off the impeller shaft
++this took a while
Cleaned bearing and impeller shaft for easier re-assembly
Replaced impeller drive wheel
Connected auger assembly to power head, put belt on
Reconnected auger
Changed out L and R skids
Did you find this story helpful?
Thanks for voting and helping fellow customers!
Impeller bent from a rock
AJ - January 17, 2017
👍 3 of 4 people found this instruction helpful
Tool Type
Snowblower
Difficulty
Medium
Time
30-60 minutes
Tools Used
Screwdriver, Socket set, Wrench Set
Parts Used
1. Removed the snow blower assembly.
2. Removed the auger pulley.
3. Unbolted the auger from the side bearings.
4. Removed the side bearings.
5. Removed the auger assembly.
6. Unbolted the impeller from the auger assembly.
7. Removed the impeller.
8. Put new impeller on and reverse of the previous steps.
2. Removed the auger pulley.
3. Unbolted the auger from the side bearings.
4. Removed the side bearings.
5. Removed the auger assembly.
6. Unbolted the impeller from the auger assembly.
7. Removed the impeller.
8. Put new impeller on and reverse of the previous steps.
Did you find this story helpful?
Thanks for voting and helping fellow customers!
Impeller on snowblower was bent
Alan - January 4, 2016
👍 4 of 9 people found this instruction helpful
Tool Type
Snowblower
Difficulty
Medium
Time
30-60 minutes
Tools Used
Socket set, Wrench Set
Parts Used
Remove auger shaft replace new impeller and tighten up.
Did you find this story helpful?
Thanks for voting and helping fellow customers!
OEM stands for Original Equipment Manufacturer and means the part you’re buying is sourced directly from the manufacturer who made your product. At eReplacementParts, we sell only genuine OEM parts, guaranteeing the part you’re purchasing is of better design and of higher quality than aftermarket parts.
Our product descriptions are a combination of data sourced directly from the manufacturers who made your product as well as content researched and curated by our content & customer service teams. This content is edited and reviewed internally before being made public to customers.
Our customer service team are at the ready daily to answer your part and product questions. We have a dedicated staff with decades of collective experience in helping customers just like you purchase parts to repair their products.
All our part reviews are solicited directly from other customers who have purchased this exact part. While we moderate these reviews for profanity, offensive language or personally identifiable information, these reviews are posted exactly as submitted and no alterations are made by our team.
All our customer repair instructions are solicited directly from other customers just like you who have purchased and replaced this exact part. While we moderate these reviews for profanity, offensive language or personally identifiable information, these reviews are posted exactly as submitted and no alterations are made by our team.
Based on data from past customer purchasing behaviors, these parts are most commonly purchased together along with the part you are viewing. These parts may be necessary or helpful to replace to complete your current repair.
All our installation videos are created and produced in collaboration with our in-house repair technician, Mark Sodja, who has helped millions of eReplacementParts customers over the last 13 years repair their products. Mark has years of experience in selling and repairing both commercial and residential products with a specialty in gas-powered equipment.
This data is collected from customers who submitted a repair instruction after replacing this exact part. Customers can rate how easy the repair was to complete and how long it took. We aggregate this data to provide a repair rating that allows customers to quickly determine the difficulty and time needed to perform their own repair.