


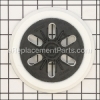
This part includes one hex-socket-head cap screw. This screw gets fastened into the centre of the backing pad (sold separately) of your orbital sander. It is mostly commonly replaced because it has worn out or gets lost. This part is sourced right from the original manufacturer, ensuring the perfect fit and functionality.
Hex-socket-head Cap Screw 1600A015G7
OEM part for: Bosch
Part Number: 1600A015G7
$4.99
In Stock
Jump To:
Frequently Purchased Together ?
Compatibility
This Hex-socket-head Cap Screw will fit the following 20 machines. Confirm this part works with your model, and view the detailed model diagrams and repair help we have to offer.
This item works with the following types of products:
- Sander Parts
This part replaces obsolete part #: 2910130244
Customer Part Reviews ?
Average Rating (out of 5):
Click to filter by ratings:
5 stars
1
4 stars
0
3 stars
0
2 stars
0
1 stars
0
< PREV
- 1
Bosch orbital sander repair
I received this screw and the driver to repair my sander. They were perfect fit and arrived in a couple of days. Sander is up and running. Thanks for the quick service and the very generous salesperson who took care of my order.
Guest -
April 8, 2022
Verified Purchase
Questions & Answers ?
Our customer Service team is at the ready daily to answer your part and product questions.

Ask our Team
We have a dedicated staff with decades of collective experience in helping customers just like you purchase parts to repair their products.
Does this fit my product?Questions & Answers for Hex-socket-head Cap Screw
No questions have been asked yet
Customer Repair Instructions ?
All our customer repair instructions are solicited directly from other customers just like you who have purchased and replaced this exact part.
Sander pad missing, friction ring damaged, hex-socket head-cap screw broken off in driver
Phillip - May 26, 2023
Tool Type
Sander
Difficulty
Medium
Time
More than 2 hours
Tools Used
Screwdriver, Power Drill, Wrench Set, small star-drive bits needed
1. The hard part was drilling out the broken hex-socket head-cap screw. I did that with a metal-compatible drill bit to start a hole, using lubricant, followed by a left-hand screw extractor bit. It takes patience to do this; this is a blind bolt, with no access to the inside end.
2. The entire tool can be easily disassembled with small star-drive bits (I used an iFixit electronics repair kit--the basic one); and a Philips screwdriver. I took it apart both for repair access and to clean it. If you're just replacing the sander pad you will not need to do any disassembly. You may be able to replace a friction ring without taking off the piece to which it attaches--not sure on that, but if you have to remove it, it's just three or four small Philips screws. The friction ring just fits over a flange on the black plastic piece.
3. My sander was caked with epoxy dust so I thoroughly cleaned all of it with an old toothbrush, toothpick, and shopvac.
4. Be aware that if you pull out the armature, you won't be able to get it back in past the motor brushes without removing the top housing of the tool and temporarily unscrewing the brush housings to pull back the brushes. This is easy. It also allows you to check the condition of the brushes and clean any dust off them and the armature, which could accelerate wear.
5. It's easy to re-assemble the tool using the exploded-parts diagram as a guide. Make sure to do it in order or you'll have to take it back apart if you forget a step.
6. The new hex-socket head-cap screw will need to be tightened quite firmly or it will back itself out quickly on high speed, especially if you have lubricated the threads.
Did you find this story helpful?
Thanks for voting and helping fellow customers!
OEM stands for Original Equipment Manufacturer and means the part you’re buying is sourced directly from the manufacturer who made your product. At eReplacementParts, we sell only genuine OEM parts, guaranteeing the part you’re purchasing is of better design and of higher quality than aftermarket parts.
Our product descriptions are a combination of data sourced directly from the manufacturers who made your product as well as content researched and curated by our content & customer service teams. This content is edited and reviewed internally before being made public to customers.
Our customer service team are at the ready daily to answer your part and product questions. We have a dedicated staff with decades of collective experience in helping customers just like you purchase parts to repair their products.
All our part reviews are solicited directly from other customers who have purchased this exact part. While we moderate these reviews for profanity, offensive language or personally identifiable information, these reviews are posted exactly as submitted and no alterations are made by our team.
All our customer repair instructions are solicited directly from other customers just like you who have purchased and replaced this exact part. While we moderate these reviews for profanity, offensive language or personally identifiable information, these reviews are posted exactly as submitted and no alterations are made by our team.
Based on data from past customer purchasing behaviors, these parts are most commonly purchased together along with the part you are viewing. These parts may be necessary or helpful to replace to complete your current repair.
All our installation videos are created and produced in collaboration with our in-house repair technician, Mark Sodja, who has helped millions of eReplacementParts customers over the last 13 years repair their products. Mark has years of experience in selling and repairing both commercial and residential products with a specialty in gas-powered equipment.
This data is collected from customers who submitted a repair instruction after replacing this exact part. Customers can rate how easy the repair was to complete and how long it took. We aggregate this data to provide a repair rating that allows customers to quickly determine the difficulty and time needed to perform their own repair.