


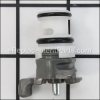
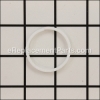
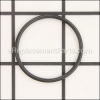
This special grommet is an original part which is specially designed for use with DeWALT and Porter Cable staplers and nailers. It is utilized to secure the pin that holds the adjuster. This is a high-quality replacement for a damaged or a missing grommet that was installed on a new unit. To ensure the correct location and application of this part, refer to the appropriate diagrams of your model. It is made of durable rubber and is sold individually. You may need pliers to remove and secure the grommet with the pin.
Grommet 391814-00
OEM part for: DeWALT
Part Number: 391814-00
$4.99
In Stock
Jump To:
Frequently Purchased Together ?

Compatibility
This Grommet will fit the following 138 machines. Confirm this part works with your model, and view the detailed model diagrams and repair help we have to offer.
DeWALT
Show More Compatible ModelsThis item works with the following types of products:
- Nailer Parts
This part replaces obsolete part #: 391814-C3D1
Repair Videos ?
Watch the Repair Video for
Grommet

Customer Part Reviews ?
Average Rating (out of 5):
Click to filter by ratings:
5 stars
13
4 stars
0
3 stars
0
2 stars
0
1 stars
0
< PREV
- 1
- 2
Great original Part! Just as expected.
Great original Part! Just as expected.
Eleasit -
December 1, 2022
Verified Purchase
Potter Cable Nailer Repair
I ordered this part as well as several others to repair an air leak on my PG nailer. The parts identification was simple, ordering and deliver went well and the parts fit and solved my problem. I have ordered several times from EReplacementparts.com because it is so easy to identify the parts and they help you identify the cause of your problem.
Guest -
November 29, 2022
Verified Purchase
:)
.
Guest -
August 10, 2022
Verified Purchase
Perfect fit, my nail gun works like new!
My Porter Cable nail gun wouldn’t fire at all. I just heard air leaking around the trigger. I purchased a replacement trigger assembly, and after watching a couple YouTube videos, I was able to replace the trigger with ease. The gun still didn’t work properly after I replaced the trigger. It would fire but the piston wouldn’t come back up. I took the piston apart, cleaned it good, put it all back together, and it worked like a charm.
Guest -
May 21, 2022
Verified Purchase
Perfect fit, as expected from eReplacement!
Fits perfect, exactly as needed!
Guest -
July 8, 2020
Verified Purchase
Worked as needed
New
Darryl -
July 6, 2020
Verified Purchase
Easy fix.
Quick delivery.
Guest -
May 30, 2020
Verified Purchase
nail gun trigger
it was exactly what I needed to hold the pin in on my nail gun trigger.
Guest -
November 11, 2019
Verified Purchase
Its a small part but is so so needed to properly hold the trigger pin and worked great and installed easily
ordered this grommet with the trigger valve assy. as suggested by the trouble shooting guide on your web page. my nail gun was not firing and it took ten minutes to replace the trigger assy and the pin that uses this grommet. gun works like new. Thanks Replacement Parts for your services and speedy delivery!
Guest -
August 31, 2019
Verified Purchase
Easy repair
Fit perfect
Guest -
August 8, 2019
Verified Purchase
Questions & Answers ?
Our customer Service team is at the ready daily to answer your part and product questions.

Ask our Team
We have a dedicated staff with decades of collective experience in helping customers just like you purchase parts to repair their products.
Does this fit my product?Questions & Answers for Grommet
Doesn't shoot nail every time pull trigger
Brian
for model number DCN650
asked on 2023-03-18
Hi Brian,
Thank you for your question. If your nail gun is not firing, the air pressure in the nail gun may not be set high enough and it will need to be adjusted. If you are not using the correct nails, it can also prevent the nail gun from firing. If something is blocking the feed, this can also prevent the nail gun from firing. We would also recommend checking the piston head valve,the o-rings, the seals, the driver, the bumper, the trigger valve, and the piston valve. We have included a link from our website that you may reference on how to check these parts, https://www.ereplacementparts.com/repair-center/power-tool/nailer/won't-fire/. Once you have determined the part you need, please call customer service. We look forward to hearing from you!
eReplacementParts Team March 18, 2023
The driver keeps getting stuck when nailing. I'm not sure what's wrong with it.
Andre
for model number DCN650B type1
asked on 2022-11-29
Hello Andre, Thank you for the question. We suggest checking the Grommet and Clip for wear or damage. We also suggest checking the Driver Assembly for damage. Thank you for your inquiry, good luck with this repair!
eReplacementParts Team November 29, 2022
Customer Repair Instructions ?
All our customer repair instructions are solicited directly from other customers just like you who have purchased and replaced this exact part.
Wouldn't fire just a slight pop of air from trigger.
Paul - April 15, 2016
👍 8 of 11 people found this instruction helpful
Tool Type
Nailer
Difficulty
Easy
Time
15-30 minutes
Tools Used
, Small hammer, punch, air, QTips, tool oil.
Punch the trigger pin using small punch through grommet this will save grommet for reuse.
Remove trigger and punch the two pins for the trigger assembly out from either side the the shorter pin is on the bottom.
Remove trigger assembly by applying light air to hose fitting and the assembly will pop out quickly. Use a hook to pull out remaining housing of assembly that will be left behind. Hook air hose to gun to remove any trash inside gun housing then remove air hose and clean trigger assembly housing with a QTip to remove excess oil or trash. Lubricate trigger assembly O Rings with gun oil or Vaseline and press assembly in with fingers until seated. Install the two roll pins using the punch with short pin on bottom long pin on top. Finally install the trigger back into place using the punch to help line up for the pin to be inserted correctly on the first or second try. Slip the tiny grommet onto pin on the round grooved side of pin hole. Lightly oil gun and works like new again. This took maybe 20 minutes at most from getting the tools to putting them back up. 28$ worth of parts saved from spending 160$ on a new nail gun.
Did you find this story helpful?
Thanks for voting and helping fellow customers!
No fire when trigger pulled
Curtis - March 15, 2016
👍 4 of 5 people found this instruction helpful
Tool Type
Nailer
Difficulty
Easy
Time
Less than 15 minutes
Tools Used
, Pin punch
Ordered a trigger valve after reading reviews of similar complaints. Swapped the trigger valve out in a few minutes with a small pin punch. Worked perfect. Great website for the do it yourself or professional person.
Did you find this story helpful?
Thanks for voting and helping fellow customers!
Nomar pad was gone and the heat in Florida rotted the grommets. One if the pins then fell out.
Brian - August 23, 2023
Tool Type
Nailer
Difficulty
Easy
Time
Less than 15 minutes
Tools Used
, None. This repair was so simple. I only needed my hands.
Replaced the Nomar pad. Put the new pin in and then replaced the grommets.
Did you find this story helpful?
Thanks for voting and helping fellow customers!
Grommets split
Gene - July 12, 2023
Tool Type
Nailer
Difficulty
Easy
Time
Less than 15 minutes
Tools Used
, Punch
Parts Used
1. Push out pin.
2. Remove old grommet.
3. push pin back in.
4. install grommet over pin.
2. Remove old grommet.
3. push pin back in.
4. install grommet over pin.
Did you find this story helpful?
Thanks for voting and helping fellow customers!
Would not fire nails
Robert - February 7, 2023
Tool Type
Nailer
Difficulty
Easy
Time
Less than 15 minutes
Tools Used
Screwdriver, Nutdriver, allen wrench
Parts Used
Install the new parts and put back together. Simple
Did you find this story helpful?
Thanks for voting and helping fellow customers!
trigger fell out
Shaun - August 4, 2021
Tool Type
Nailer
Difficulty
Easy
Time
Less than 15 minutes
Tools Used
, hands
positioned trigger and pined in
Did you find this story helpful?
Thanks for voting and helping fellow customers!
Dewalt coil nailer would not feed nails
Thomas - March 25, 2019
Tool Type
Nailer
Difficulty
Easy
Time
15-30 minutes
Tools Used
Screwdriver, Allen wrenches
Removed nail holder and slide piston assy. Cleaned well, and installed new piston and o-rings/gaskets . Works like a new gun again!
Did you find this story helpful?
Thanks for voting and helping fellow customers!
Nailgun would not fire, air leaked
Anthony - November 18, 2017
Tool Type
Nailer
Difficulty
Medium
Time
30-60 minutes
Tools Used
Screwdriver, Pliers, Punch, hammer
1. Printed schematic to show parts orientation and location
2.Used punch to remove trigger pin and 2 spring pins holding valve in place.
3. Old trigger came right out, but had to use needle nose pliers to pull out valve. Came out in 2 parts, inner valve spring also popped out to my surprise.
4. Fitting new in took a few tries, schematic helped to show orientation.
5. Back together no problem.
6. To do O rings, opened back of gun and plunger came right out. O ring change there just off-on.
7. Used 2x4 as stop to bang gun body hard to release inner workings.
8. First O ring was easy to access and find on schematic, but ring was VERY gummy, more gum than solid, scrapped off and easy replacement. But what grease to use??? None included with 2 O rings purchased, recommended grease listed for $63 for 3 oz.!!??!! Use silicone instead, but could not find any assistance on this!!!
9 Second O ring much harder to access. Had to remove spring and retainer, spring stop and slide back part. This O ring also all gum and noted 3rd O ring also gum. Had to order 3rd and now waiting for delivery. Job not done, but did reassemble, just not tighten screws.
Did you find this story helpful?
Thanks for voting and helping fellow customers!
Porter Cable Brad Nailer
Russell - October 27, 2017
Tool Type
Nailer
Difficulty
Easy
Time
15-30 minutes
Tools Used
Pliers, Punch
1. Nailer would not fire and air escaped at the trigger when the trigger was actuate.
2. It was very helpful to read the probable causes of the tool symptom which persuaded me to purchase the trigger valve assembly.
3. I removed the 3 pins that hold the trigger assembly and removed the assembly. The bottom plastic seat had separated from the main assembly so I removed that with a very small screw driver.
4. Slid the new assembly in and pinned. Take your time to ensure the pin holes are lined up when replacing.
5. Replaced the grommet. This was the hardest part of the job. They are very hard and tight. Had to put a drop of oil to get it to slide into place.
6. Gun worked like new.
Did you find this story helpful?
Thanks for voting and helping fellow customers!
Air blowing by trigger
Louis - September 24, 2017
Tool Type
Nailer
Difficulty
Easy
Time
15-30 minutes
Tools Used
, Hammer, punch and a dental pick
I tapped out the 2 roll pins with the hammer and a long shank punch, I think it might have been a 1/8 or just a tad bit smaller, used the dental pick to pry the grommet off the trigger pivot pin. Removed the pivot pin and the trigger then pulled out one part of the trigger valve, it had separated and part of it was still down inside. I used the pick to remove it, all the pieces came out pretty easy. Placed the new trigger valve in, started to insert the roll pins but the valve assembly wasn't seated far enough, it kind of snapped into place when I applied a little more pressure. Replaced the roll pins and the trigger pivot pin, this was a little tricky at first, then I realized I needed to depress the trigger plunger to get the thin wire safety spring back into place, popped on the grommet and it was done.
Did you find this story helpful?
Thanks for voting and helping fellow customers!
Load More Install Stories
OEM stands for Original Equipment Manufacturer and means the part you’re buying is sourced directly from the manufacturer who made your product. At eReplacementParts, we sell only genuine OEM parts, guaranteeing the part you’re purchasing is of better design and of higher quality than aftermarket parts.
Our product descriptions are a combination of data sourced directly from the manufacturers who made your product as well as content researched and curated by our content & customer service teams. This content is edited and reviewed internally before being made public to customers.
Our customer service team are at the ready daily to answer your part and product questions. We have a dedicated staff with decades of collective experience in helping customers just like you purchase parts to repair their products.
All our part reviews are solicited directly from other customers who have purchased this exact part. While we moderate these reviews for profanity, offensive language or personally identifiable information, these reviews are posted exactly as submitted and no alterations are made by our team.
All our customer repair instructions are solicited directly from other customers just like you who have purchased and replaced this exact part. While we moderate these reviews for profanity, offensive language or personally identifiable information, these reviews are posted exactly as submitted and no alterations are made by our team.
Based on data from past customer purchasing behaviors, these parts are most commonly purchased together along with the part you are viewing. These parts may be necessary or helpful to replace to complete your current repair.
All our installation videos are created and produced in collaboration with our in-house repair technician, Mark Sodja, who has helped millions of eReplacementParts customers over the last 13 years repair their products. Mark has years of experience in selling and repairing both commercial and residential products with a specialty in gas-powered equipment.
This data is collected from customers who submitted a repair instruction after replacing this exact part. Customers can rate how easy the repair was to complete and how long it took. We aggregate this data to provide a repair rating that allows customers to quickly determine the difficulty and time needed to perform their own repair.