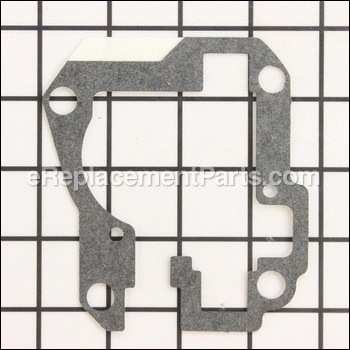

This is an original KitchenAid part that comes directly from the manufacture. This gasket is used in all six and some 5 quart bowl lift mixers. The gasket seals the Transmission Housing, part number 8212396, to the lower gearcasing. This seal helps to contain the grease that lubricates the gears. This seal should be replaced if torn or it becomes saturated with oil. This part comes with an adhesive backing allowing it to adhere to the Transmission Housing. Once installed onto the housing the gasket should be primed with Planetary Grease #4176597. Only a screw driver is needed to replace this part.
Gasket WP9709511
OEM part for: KitchenAid
Part Number: WP9709511
$12.96
In Stock
Jump To:
Frequently Purchased Together ?


Compatibility
This Gasket will fit the following 159 machines. Confirm this part works with your model, and view the detailed model diagrams and repair help we have to offer.
KitchenAid
Show More Compatible ModelsThis item works with the following types of products:
- Mixer Parts
This part replaces obsolete part #: , 9709511
Questions & Answers ?
Our customer Service team is at the ready daily to answer your part and product questions.

Ask our Team
We have a dedicated staff with decades of collective experience in helping customers just like you purchase parts to repair their products.
Does this fit my product?Questions & Answers for Gasket
No questions have been asked yet
Customer Repair Instructions ?
All our customer repair instructions are solicited directly from other customers just like you who have purchased and replaced this exact part.
Bevel Gear broke - mixer quit turning.
John - May 29, 2017
👍 1 of 1 people found this instruction helpful
Tool Type
Mixer
Difficulty
Medium
Time
1-2 hours
Tools Used
Screwdriver, Pliers
Followed the instructions given in your you tube video for taking the mixer apart, cleaning out the old grease, adding the new part with new grease, and re-assembly. The video was well made and easy to understand.
Did you find this story helpful?
Thanks for voting and helping fellow customers!
Gears stripped
Scott - April 23, 2018
Tool Type
Mixer
Difficulty
Hard
Time
1-2 hours
Tools Used
Screwdriver, Pliers, Small snap ring pliers.
1.Removed cover
2.Removed Transmission cover
3.Removed all gears starting with vertical set.
4. Snap ring pliers were required to continue disassembly of vertical set of gears.
5. After taking vertical and horizontal gears out they were cleaned. Paper towels and q-tips worked well
6.Next cleaned transmission cover and housing.
7. Reassembled packing gears and trans housing with fresh food grade grease.
8. I replaced motor next. Marked where two wires from motor attach to control board.
9.Reassembled covers using a fresh gasket for trans cover. It is important to season gasket with a thin coat of food grade grease.
10. Tested and put to work.
Did you find this story helpful?
Thanks for voting and helping fellow customers!
Mixer beater bar would slip under pressure
DAVID - March 13, 2018
Tool Type
Mixer
Difficulty
Easy
Time
1-2 hours
Tools Used
Screwdriver, Tool to snap ring loose
It is very easy repair. first you take off the cover then take off the gear box cover. After you remove snap ring the gears slide off. The hardest part is cleaning off all the old grease so you don't have slivers of metal from bad parts ruining the new parts. Just put together in reverse order. If you use the mixer a lot, and mix dough or things heavy you'll be doing this more than once. To make it last longer use on low speed, maybe #2.
Did you find this story helpful?
Thanks for voting and helping fellow customers!
Stripped gears
Michael - March 9, 2018
Tool Type
Mixer
Difficulty
Easy
Time
15-30 minutes
Tools Used
Screwdriver, Pliers, Putty knife for install glob of grease. And a acid brush
Removed top cover. Removed all the gears and old grease. Installed new gears and bearings, and packed full of grease. Installed new gasket and reassembled. Works like a charm. Watched the video https://www.youtube.com/watch?v=lsbgUHAGWX4
Did you find this story helpful?
Thanks for voting and helping fellow customers!
Teath missing from Worm Gear
Scott - April 28, 2017
Tool Type
Mixer
Difficulty
Medium
Time
15-30 minutes
Tools Used
Screwdriver, Hobart Grease, small wood spatula
I got my can of grease that I bought when the original plastic transmission cover broke and was replaced with the new cast metal cover 4 years ago. When the mixer didn't turn the beater shaft, I took the cover off, using a #2 Philips screwdriver, and then the transmission cover using the same tool. When I had it open, I discovered that 2 of the teeth on the Worm Gear had been broken. I didn't see this on the original repair and unless the gear stopped exactly at that spot, the machine ran fine.
I then removed the Transmission cover gasket, and the Worm Gear with the Front, Rear, and Thrust Bearings. I repacked the case with grease and greased the Worm Gear teeth and shaft, then installed the new Thrust Bearing and Front and Rear Bearings. I placed the assembled Worm Gear in it's proper position and set the gasket and Transmission Cover in place and reset the screws and tightened them down. I then plugged the machine in and tested it. Upon being satisfied that it was in proper running order, I replaced the cover.
I then removed the Transmission cover gasket, and the Worm Gear with the Front, Rear, and Thrust Bearings. I repacked the case with grease and greased the Worm Gear teeth and shaft, then installed the new Thrust Bearing and Front and Rear Bearings. I placed the assembled Worm Gear in it's proper position and set the gasket and Transmission Cover in place and reset the screws and tightened them down. I then plugged the machine in and tested it. Upon being satisfied that it was in proper running order, I replaced the cover.
Did you find this story helpful?
Thanks for voting and helping fellow customers!
Worm follower gear was stripped
Joseph - April 16, 2017
Tool Type
Mixer
Difficulty
Medium
Time
15-30 minutes
Tools Used
Screwdriver, Pliers
Replaced worm follower gear, cleaned all of the old grease from gears and housing and replaced with new grease. Re-assembled and mixer works fine. There is a video on u-tube explaining and showing how to dis-assemble and assemble the mixer and what could be wrong. Step by step instructions, very helpful. ( kitchen aid 600 pro mixer repair).
Did you find this story helpful?
Thanks for voting and helping fellow customers!
It would stop running
Imad - January 5, 2017
Tool Type
Mixer
Difficulty
Easy
Time
30-60 minutes
Tools Used
Screwdriver, Pliers
After I watched your video everything was easy to do I removed the transmission housing to get to all the gears I changed all of them and the gasket greased all the gears put it together thanks to your video it worked like new
Did you find this story helpful?
Thanks for voting and helping fellow customers!
Kitchen aid pro 550HD blender started making grinding sounds then quit turning
Joel - September 21, 2016
Tool Type
Mixer
Difficulty
Medium
Time
15-30 minutes
Tools Used
Screwdriver, Snap ring pliers
1. Watched your How-To repair video on YouTube
2. Took Kitchen aid and transmission cover off
3. Ordered the parts on line at your website.
4. Took a week for the parts to arrive. (slow shipping-parts could have been here faster)
5. Re-watched the video - your videos are excellent, great views, excellent explanations, great tips and you cover everything.
6. Followed instructions and completed the repair. It works like it was new.
Did you find this story helpful?
Thanks for voting and helping fellow customers!
OEM stands for Original Equipment Manufacturer and means the part you’re buying is sourced directly from the manufacturer who made your product. At eReplacementParts, we sell only genuine OEM parts, guaranteeing the part you’re purchasing is of better design and of higher quality than aftermarket parts.
Our product descriptions are a combination of data sourced directly from the manufacturers who made your product as well as content researched and curated by our content & customer service teams. This content is edited and reviewed internally before being made public to customers.
Our customer service team are at the ready daily to answer your part and product questions. We have a dedicated staff with decades of collective experience in helping customers just like you purchase parts to repair their products.
All our part reviews are solicited directly from other customers who have purchased this exact part. While we moderate these reviews for profanity, offensive language or personally identifiable information, these reviews are posted exactly as submitted and no alterations are made by our team.
All our customer repair instructions are solicited directly from other customers just like you who have purchased and replaced this exact part. While we moderate these reviews for profanity, offensive language or personally identifiable information, these reviews are posted exactly as submitted and no alterations are made by our team.
Based on data from past customer purchasing behaviors, these parts are most commonly purchased together along with the part you are viewing. These parts may be necessary or helpful to replace to complete your current repair.
All our installation videos are created and produced in collaboration with our in-house repair technician, Mark Sodja, who has helped millions of eReplacementParts customers over the last 13 years repair their products. Mark has years of experience in selling and repairing both commercial and residential products with a specialty in gas-powered equipment.
This data is collected from customers who submitted a repair instruction after replacing this exact part. Customers can rate how easy the repair was to complete and how long it took. We aggregate this data to provide a repair rating that allows customers to quickly determine the difficulty and time needed to perform their own repair.