


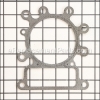
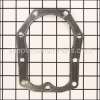
This is a genuine OEM replacement part used with many lawn mower tractor engines. The crankcase gasket (.015 thick) is made of cardboard composite, and is fitted in the engine sump, providing protection from friction and leakage. A screwdriver and a socket set are required for the proper installation. The crankcase gasket is sold individually.
Gasket-crkcse/015 692226
OEM part for: Briggs and Stratton, Toro
Part Number: 692226
$7.19
In Stock
Jump To:
Frequently Purchased Together ?


Compatibility
This Gasket-crkcse/015 will fit the following 1720 machines. Confirm this part works with your model, and view the detailed model diagrams and repair help we have to offer.
This item works with the following types of products:
- Lawn Tractor Parts
- Lawn Mower Parts
This part replaces obsolete part #: 4163, 271916
Customer Part Reviews ?
Average Rating (out of 5):
Click to filter by ratings:
5 stars
1
4 stars
0
3 stars
0
2 stars
0
1 stars
0
< PREV
- 1
Part fit exactly and was easy to find
Cheap prices, quick shipping got me mowing my yard again in No time, Thanks!
Guest -
July 10, 2019
Verified Purchase
Questions & Answers ?
Our customer Service team is at the ready daily to answer your part and product questions.

Ask our Team
We have a dedicated staff with decades of collective experience in helping customers just like you purchase parts to repair their products.
Does this fit my product?Questions & Answers for Gasket-crkcse/015
No questions have been asked yet
Customer Repair Instructions ?
All our customer repair instructions are solicited directly from other customers just like you who have purchased and replaced this exact part.
Oil leak
Richard - January 4, 2017
👍 2 of 2 people found this instruction helpful
Tool Type
Lawn Tractor
Difficulty
Easy
Time
1-2 hours
Tools Used
Socket set
Removed engine from tractor drained oil from sump removed bottom pan removed seal cleaned old gasket replaced gasket and seal. Reassemble installed new oil and dipstick seal. Moved engine to tractor, installed and started up. No oil leak
Did you find this story helpful?
Thanks for voting and helping fellow customers!
Lower seal on motor leaked
David - December 1, 2018
Tool Type
Lawn Tractor
Difficulty
Easy
Time
More than 2 hours
Tools Used
Screwdriver, Pliers, Socket set, Wrench Set
1. Disconnect starter wires, carburator cable and gas hose drain oil
2. Remove drive belt pulley and belt
3. Unbolt motor and lift off frame
4. Turn motor upside down unbolt sump pan
6. Remove seal from pan, clean and install new seal and sump gasket
7. Reverse steps, refill oil make all connections
8. Start and check for any leaks
2. Remove drive belt pulley and belt
3. Unbolt motor and lift off frame
4. Turn motor upside down unbolt sump pan
6. Remove seal from pan, clean and install new seal and sump gasket
7. Reverse steps, refill oil make all connections
8. Start and check for any leaks
Did you find this story helpful?
Thanks for voting and helping fellow customers!
Seized, oil leak, no compression
Dylan - August 6, 2018
Tool Type
Lawn Tractor
Difficulty
Medium
Time
1-2 hours
Tools Used
Socket set, Ring compressor, rubber mallet
1. Took off most parts (carb, starter, exhaust,ext)
2. Found socket to fit the flywheel nut and a breaker bar and worked to unseize it
3. Once I unseized it I found no compression from bad rings
4. I found the manual for my model engine to find the part number and bought the parts
5. Took the crank case cover off and took the piston out
6. Put the new pistons rings on and clocked them
7. Oiled the piston and ring compressor, squeezed the rings and made sure the compressor was flush with the head and tapped the piston in
8. Scrapped the old gaskets off and replaced them
9. Put the other parts back on, put new oil in and changed the battery
Did you find this story helpful?
Thanks for voting and helping fellow customers!
The engine seized
Dennis - June 24, 2016
Tool Type
Lawn Tractor
Difficulty
Medium
Time
More than 2 hours
Tools Used
Screwdriver, Pliers, Socket set, Wrench Set, Nutdriver, Impact wrench.
I disassembled the engine. I discovered that the rod had seized to the crank, but I had shut it down before the rod broke. I soaked the aluminum off from the crank using oven cleaner and then polished the crank in a lathe. I marked all the parts and found the engine to be in spec, so I installed the rings, slid the piston home, torqued the rod to spec and turned the engine over to check for binding. It was fine, so I torqued the rest of the crankcase and head to spec. After reinstalling the engine to the tractor I added oil and fuel and it fired it up. I let it run for a couple minutes keeping an eye on things. It seemed fine so I took it out mowing. I like to break an engine in under load with out abusing it, so I put it under a varying load at various throttle settings. After about an hour of this, it had quit smoking and was running nicely.
One additional thing I did that doesn't pertain to the original problem is bring the valves to spec. On this engine, the stems have to be ground a bit at a time. I also tapped the valves to the seats. I consider the project a success. The parts come with any unusual techniques or specs needed to do this.
One additional thing I did that doesn't pertain to the original problem is bring the valves to spec. On this engine, the stems have to be ground a bit at a time. I also tapped the valves to the seats. I consider the project a success. The parts come with any unusual techniques or specs needed to do this.
Did you find this story helpful?
Thanks for voting and helping fellow customers!
The Crankcase gasket was blown, because of a bad assembly at the company.
Nora - March 15, 2016
Tool Type
Lawn Tractor
Difficulty
Easy
Time
More than 2 hours
Tools Used
Screwdriver, Socket set
Parts Used
Pull motor, take crankcase pan off off crankcase, replace gasket and reassemble.
Did you find this story helpful?
Thanks for voting and helping fellow customers!
OEM stands for Original Equipment Manufacturer and means the part you’re buying is sourced directly from the manufacturer who made your product. At eReplacementParts, we sell only genuine OEM parts, guaranteeing the part you’re purchasing is of better design and of higher quality than aftermarket parts.
Our product descriptions are a combination of data sourced directly from the manufacturers who made your product as well as content researched and curated by our content & customer service teams. This content is edited and reviewed internally before being made public to customers.
Our customer service team are at the ready daily to answer your part and product questions. We have a dedicated staff with decades of collective experience in helping customers just like you purchase parts to repair their products.
All our part reviews are solicited directly from other customers who have purchased this exact part. While we moderate these reviews for profanity, offensive language or personally identifiable information, these reviews are posted exactly as submitted and no alterations are made by our team.
All our customer repair instructions are solicited directly from other customers just like you who have purchased and replaced this exact part. While we moderate these reviews for profanity, offensive language or personally identifiable information, these reviews are posted exactly as submitted and no alterations are made by our team.
Based on data from past customer purchasing behaviors, these parts are most commonly purchased together along with the part you are viewing. These parts may be necessary or helpful to replace to complete your current repair.
All our installation videos are created and produced in collaboration with our in-house repair technician, Mark Sodja, who has helped millions of eReplacementParts customers over the last 13 years repair their products. Mark has years of experience in selling and repairing both commercial and residential products with a specialty in gas-powered equipment.
This data is collected from customers who submitted a repair instruction after replacing this exact part. Customers can rate how easy the repair was to complete and how long it took. We aggregate this data to provide a repair rating that allows customers to quickly determine the difficulty and time needed to perform their own repair.