


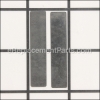
This authentic manufacturer-sourced gasket kit is made for use with Craftsman air compressors. The parts in this kit are utilized to ensure a tight fit between the pump's components allowing it to build up the pressure. Over time gaskets may wear out and begin to crack eventually requiring replacements. For the exact locations and the correct installation of the new components, please refer to the appropriate diagrams of your model. This high-quality kit includes five durable parts. You will need a wrench set to take the pump apart and reassemble it.
Gasket Kit E100959
OEM part for: Craftsman
Part Number: E100959
$19.03
In Stock
Jump To:
Frequently Purchased Together ?


Compatibility
This Gasket Kit will fit the following 9 machines. Confirm this part works with your model, and view the detailed model diagrams and repair help we have to offer.
Craftsman
Show More Compatible ModelsThis item works with the following types of products:
- Compressor Parts
Customer Part Reviews ?
Average Rating (out of 5):
Click to filter by ratings:
5 stars
38
4 stars
4
3 stars
1
2 stars
1
1 stars
0
< PREV
- 1
- 2
- 3
Fast and Easy Repair of Air Compressor
Repair parts were very easy to find and order, and arrived quickly in fine condition. Videos showed me how to troubleshoot my problem, what to order, and how to install the repair parts. Repair took all of about 20 minutes, and the compressor is working like new again. Thank you!
Guest -
28 days ago
Verified Purchase
craftsman compressor gasket kit
Arrived very fast. was a perfect fit for a compressor that wouldn't build pressure. a common
problem i guess. head gasket leaks not allowing it to build pressure. Worked very well, took
about 20 min. to replace old gaskets. Back in business. Thank you.
Guest -
July 13, 2024
Verified Purchase
Everything was great ,tech was very helpful,however freight was crazy 7 dollars on a 4 dollar part sent by the U.S. Mail!!
Part was perfect
Dick -
August 28, 2023
Verified Purchase
Great part
Gasket set arrived quickly and fit perfectly!
Geoffrey -
June 24, 2023
Verified Purchase
Parts fit perfectly, easy to repair
The gasket set arrived on time in great condition, air compressor running perfect!
Guest -
June 13, 2023
Verified Purchase
Compressor parts.
All went well. Shipped fast and the correct part arrived. Compressor works like new!
Guest -
January 19, 2023
Verified Purchase
Piece of cake
Parts delivery was timely. Repair took only moments.
Anonymous -
May 5, 2022
Verified Purchase
Great Part
The gasket kit was just what I needed to get my Sears air compressor up and running again.
Guest -
March 8, 2022
Verified Purchase
Air compressor gasket
Easy to order parts, normal delivery time, part was perfect fit,
Guest -
January 5, 2022
Verified Purchase
Just what I needed worked great
Once I figured out my model number finding the correct parts was easy as was the ordering process. Email response from your website was what I needed without being overrun with ads. Thanks for being available to us tinkerers'
Guest -
December 16, 2021
Verified Purchase
Questions & Answers ?
Our customer Service team is at the ready daily to answer your part and product questions.

Ask our Team
We have a dedicated staff with decades of collective experience in helping customers just like you purchase parts to repair their products.
Does this fit my product?Questions & Answers for Gasket Kit
Air coming out of filter. and will not build pressure.
ed
for model number craftsman 921.166400
asked on 2023-03-08
Hi Ed,
Thank you for your question. If your air compressor will not build pressure, there are some parts that you will need to check to see which one is causing the issue. We recommend checking the gaskets, the valve reed, the filter and the intake filter. Once you have determined the part you need, please call customer service. We look forward to hearing from you!
eReplacementParts Team March 08, 2023
Why can't I order these gaskets
Michael
for model number 921153101
asked on 2022-11-02
Hello Michael, Thank you for writing. You can add the parts to the cart and proceed with the check out. If you need help placing an order, customer service is open 7 days a week. Please feel free to give us a call. We hope this helps!
eReplacementParts Team November 02, 2022
Customer Repair Instructions ?
All our customer repair instructions are solicited directly from other customers just like you who have purchased and replaced this exact part.
Compressor would build to 20 psi and no more. Top most head gasket had blown through.
David - February 2, 2016
👍 27 of 28 people found this instruction helpful
Tool Type
Compressor
Difficulty
Easy
Time
15-30 minutes
Tools Used
, Allen wrench and small scraper
Parts Used
Remove the four allen bolts and pay close attention to how each part comes off; the order of arrangement. Clean old gasket material with a small straight edge to prepare surfaces for new gaskets. Replace each part with new gasket in reverse order of how it was removed. Replace the head bolts and HAND tighten very firmly. I would not advise a ratchet or torque wrench. Just use firm, even hand pressure in a cross pattern Use a small amount of Vaseline petro. jelly to hold reeds in place. I used NO gasket glue for reassembly. Compressor runs like a new one.
Did you find this story helpful?
Thanks for voting and helping fellow customers!
Compressor had blowed the head gasket.
Randy - May 21, 2016
👍 11 of 11 people found this instruction helpful
Tool Type
Compressor
Difficulty
Medium
Time
15-30 minutes
Tools Used
Pliers, Socket set, Nutdriver, Adjustable Wrench, Cordless impact
Parts Used
The gasket kit that ereplacement stocked saved me from having to spend $400.00 on a new compressor. The kit was complete and it took about 30 minutes to install after replacing the gaskets and turning on the compressor it came up to full pressure. The kit was very good quality and shipping was fast.
Simply remove the cylinder head, then line up the gaskets how the go on the compressor, and place them on. Then replace the cylinder head.
Simply remove the cylinder head, then line up the gaskets how the go on the compressor, and place them on. Then replace the cylinder head.
Did you find this story helpful?
Thanks for voting and helping fellow customers!
Blown head gasket
Dennis - April 13, 2017
👍 6 of 6 people found this instruction helpful
Tool Type
Compressor
Difficulty
Easy
Time
30-60 minutes
Tools Used
Socket set, Belt sander, knife, file
Parts Used
1. Removed cover over compressor cylinder head
2. Removed the cylinder head.
3. Inspected the head parts to determine reason for failure to build pressure
4. Found the head gasket to be blown
5. Cleaned the old gaskets from the cylinder and head
6. Hand lapped the head on my belt sander to insure a flat sealing surface
7. Used a file lightly on the cylinder to insure the mating surface was flat and clean
8. Replaced the gaskets and head, torqued screws to insure they were tightened properly
9. Replaced cylinder head cover
10. Test ran compressor -- tested ok.
Did you find this story helpful?
Thanks for voting and helping fellow customers!
Head gasket replacement
Dan - October 11, 2018
👍 4 of 4 people found this instruction helpful
Tool Type
Compressor
Difficulty
Easy
Time
15-30 minutes
Tools Used
Wrench Set
Parts Used
Removed compressor head
Removed gasket and cleaned surfaces
Installed new gaskets
Replaced compressor head
Tightened everything down
Tested compressor and looked for any leaks
All was good.
Removed gasket and cleaned surfaces
Installed new gaskets
Replaced compressor head
Tightened everything down
Tested compressor and looked for any leaks
All was good.
Did you find this story helpful?
Thanks for voting and helping fellow customers!
gasket blown leaking air
David - January 12, 2019
👍 1 of 1 people found this instruction helpful
Tool Type
Compressor
Difficulty
Medium
Time
15-30 minutes
Tools Used
Screwdriver, Socket set, Wrench Set
Parts Used
1 removed head from cylinder
2. removed old gasket
3.installed new gasket kit everything fit
4. run compressor no more leak.
2. removed old gasket
3.installed new gasket kit everything fit
4. run compressor no more leak.
Did you find this story helpful?
Thanks for voting and helping fellow customers!
Compressor would only make 20 lbs of pressure.
Frank - April 7, 2018
👍 1 of 1 people found this instruction helpful
Tool Type
Compressor
Difficulty
Easy
Time
15-30 minutes
Tools Used
, Allen wrenches
Parts Used
1. Removed the compressor head.
2. Removed the reed seat.
3. Removed the old gaskets.
4. Installed the new gaskets and the reeds.
5. Torqued the head bolts.
Ran compressor 120 lbs, works great.
2. Removed the reed seat.
3. Removed the old gaskets.
4. Installed the new gaskets and the reeds.
5. Torqued the head bolts.
Ran compressor 120 lbs, works great.
Did you find this story helpful?
Thanks for voting and helping fellow customers!
Compressor would only build 50psi
Patrick - March 15, 2018
👍 1 of 1 people found this instruction helpful
Tool Type
Compressor
Difficulty
Easy
Time
30-60 minutes
Tools Used
Socket set, Allen wrench
Parts Used
Remove shroud cover, loosen air fittings, remove cylinder and head, clean all surfaces to remove old gaskets, replace in same order as removed. Tighten allen screws tight, but not too tight. It is a gasket after all. I would have torqued it if I had the right allen socket...
Did you find this story helpful?
Thanks for voting and helping fellow customers!
Air Compressor would not build air beyond 40 pounds
Michael - February 1, 2019
👍 1 of 2 people found this instruction helpful
Tool Type
Compressor
Difficulty
Easy
Time
30-60 minutes
Tools Used
Wrench Set, Nutdriver, scraper for gasket removal
Parts Used
Actually I changed the gasket and reeds but the problem still exist. I have to read more because I am not sure where to go next.
Did you find this story helpful?
Thanks for voting and helping fellow customers!
Wouldn't build air pressure. Gaskets blew out
Josh - January 8, 2019
Tool Type
Compressor
Difficulty
Medium
Time
15-30 minutes
Tools Used
Socket set, Wrench Set, Gasket scraper, Allen wrenches
Parts Used
Removed the plastic cover over the compressor un bolted the air intake/exhaust off the cylinder jug. Replaced removed old gaskets. Then installed the new ones. Compressor builds air pressure great.
Did you find this story helpful?
Thanks for voting and helping fellow customers!
Compressor Leaking Air from Seal
Ed - May 30, 2018
Tool Type
Compressor
Difficulty
Medium
Time
30-60 minutes
Tools Used
Wrench Set, Nutdriver, Scraper
Parts Used
Disconnected the power cord from the wall
Removed the compressor cover using the socket set and the nut driver
Used the hex wrenches to remove the compressor head cover
Carefully removed the reeds and then used the scraper to remove the old leaking gasket
Opened the seal kit and removed the contents
Replaced the reeds and carefully Installed the new gaskets
Installed the hex head retaining screws on the compressor head cover
Reinstalled the compressor cover using the nut driver and socket sat
Plugged the power cord and turned on the compressor to check for proper operation and checked for leaks.
Compressor retained air pressure
Unit worked fine
Did you find this story helpful?
Thanks for voting and helping fellow customers!
Load More Install Stories
OEM stands for Original Equipment Manufacturer and means the part you’re buying is sourced directly from the manufacturer who made your product. At eReplacementParts, we sell only genuine OEM parts, guaranteeing the part you’re purchasing is of better design and of higher quality than aftermarket parts.
Our product descriptions are a combination of data sourced directly from the manufacturers who made your product as well as content researched and curated by our content & customer service teams. This content is edited and reviewed internally before being made public to customers.
Our customer service team are at the ready daily to answer your part and product questions. We have a dedicated staff with decades of collective experience in helping customers just like you purchase parts to repair their products.
All our part reviews are solicited directly from other customers who have purchased this exact part. While we moderate these reviews for profanity, offensive language or personally identifiable information, these reviews are posted exactly as submitted and no alterations are made by our team.
All our customer repair instructions are solicited directly from other customers just like you who have purchased and replaced this exact part. While we moderate these reviews for profanity, offensive language or personally identifiable information, these reviews are posted exactly as submitted and no alterations are made by our team.
Based on data from past customer purchasing behaviors, these parts are most commonly purchased together along with the part you are viewing. These parts may be necessary or helpful to replace to complete your current repair.
All our installation videos are created and produced in collaboration with our in-house repair technician, Mark Sodja, who has helped millions of eReplacementParts customers over the last 13 years repair their products. Mark has years of experience in selling and repairing both commercial and residential products with a specialty in gas-powered equipment.
This data is collected from customers who submitted a repair instruction after replacing this exact part. Customers can rate how easy the repair was to complete and how long it took. We aggregate this data to provide a repair rating that allows customers to quickly determine the difficulty and time needed to perform their own repair.