


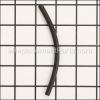
This is a genuine manufacturer approved replacement part specially designed for Echo trimmers/brush cutters. Its purpose is to return the excess fuel back into the fuel tank, after the primer bulb has been pressed and has primed the carburetor to start. After time the fuel line will become brittle and crack and will need to be replaced. This pipe is made out of rubber material and it is sold individually.
Fuel Pipe 13201052031
OEM part for: Echo
Part Number: 13201052031
$4.99
In Stock
Jump To:
Frequently Purchased Together ?


Compatibility
This Fuel Pipe will fit the following 207 machines. Confirm this part works with your model, and view the detailed model diagrams and repair help we have to offer.
This item works with the following types of products:
- Edger Parts
This part replaces obsolete part #: 13201052030
Repair Videos ?
Articles:
|
Filthy Filters? This article will show you how to install a filter kit on an Echo SRM-225 trimmer....
May 27, 2015
|

Customer Part Reviews ?
Average Rating (out of 5):
Click to filter by ratings:
5 stars
3
4 stars
0
3 stars
0
2 stars
0
1 stars
1
< PREV
- 1
Worked as planned
Replaced the part and worked like it should, thanks
Greg -
May 26, 2020
Verified Purchase
Leaking fuel
Parts were top quality
Guest -
March 30, 2020
Verified Purchase
Perfect fit for all my parts!,
The parts were shipped promptly and they all fit without any mods!! I would definitely recommend purchasing items from this company
Guest -
August 19, 2019
Verified Purchase
Disappointed, fuel lines too short.
Parts, fuel filter line, vent line and fuel return line were too short. Grommet was okay. I could not complete the repair with the parts specified for my trimmer model. I had to purchase the lines elsewhere.
Guest -
February 19, 2020
Verified Purchase
Questions & Answers ?
Our customer Service team is at the ready daily to answer your part and product questions.

Ask our Team
We have a dedicated staff with decades of collective experience in helping customers just like you purchase parts to repair their products.
Does this fit my product?Questions & Answers for Fuel Pipe
No questions have been asked yet
Customer Repair Instructions ?
All our customer repair instructions are solicited directly from other customers just like you who have purchased and replaced this exact part.
Leaking plug with fuel lines in Echo weed trimmer
Donald - March 31, 2020
Tool Type
Trimmer
Difficulty
Easy
Time
15-30 minutes
Tools Used
Screwdriver
1-Removed plug with screw driver that has fuel lines running through it.
2-Placed new fuel lines in new plug, just like old plug and lines were.
3-Reinstall new plug with new fuel lines back in gas tank.
4-Job completed in about 15 minutes.
2-Placed new fuel lines in new plug, just like old plug and lines were.
3-Reinstall new plug with new fuel lines back in gas tank.
4-Job completed in about 15 minutes.
Did you find this story helpful?
Thanks for voting and helping fellow customers!
Fuel was leaking past the fuel line grommet.
Larry - September 27, 2018
Tool Type
Edger
Difficulty
Easy
Time
15-30 minutes
Tools Used
Screwdriver, Pliers, Socket set, Allen head wrench.
Removed fuel tank. Removed all fuel and return lines from carb and tank. Used all new fuel lines as old lines were swollen from age and would have been a real problem getting them into new fuel line grommet. As it was I needed wd40 and a small flat blade screwdriver to get new grommet back into the tank and wd40 to get lines into the grommet. Describing it makes it sound like more work than it was. Simple and straight forward.
Did you find this story helpful?
Thanks for voting and helping fellow customers!
Gas leaking from fuel line grommet where the three hoses went into tank.
Robert - May 27, 2018
Tool Type
Trimmer
Difficulty
Easy
Time
Less than 15 minutes
Tools Used
Pliers
1. Took out old grommet and fuel lines.
2. Inserted new hoses into new grommet and put fuel filter on the one hose.
3. Inserted new grommet and fuel lines into fuel tank.
4. Hooked up the three different hoses.
5. Started right up, no leakage whatsoever, tight as a drum.
2. Inserted new hoses into new grommet and put fuel filter on the one hose.
3. Inserted new grommet and fuel lines into fuel tank.
4. Hooked up the three different hoses.
5. Started right up, no leakage whatsoever, tight as a drum.
Did you find this story helpful?
Thanks for voting and helping fellow customers!
Fuel leak
James - April 11, 2018
Tool Type
Edger
Difficulty
Easy
Time
30-60 minutes
Tools Used
Screwdriver, Pliers, Allen wrench
Drained the tank, removed tank guard and tank. Pulled fuel tubes off carb. Removed grommet. Installed new bulb. Threaded fuel lines through grommet. Attached new fuel filter. Installed grommet into tank. Attached fuel lines to carb. Secured tank and guard. Installed new air filter.
Did you find this story helpful?
Thanks for voting and helping fellow customers!
Repair Trigger
larry - August 27, 2017
Tool Type
Blower
Difficulty
Easy
Time
More than 2 hours
Tools Used
, all the above
Followed repair instructions.
Did you find this story helpful?
Thanks for voting and helping fellow customers!
Tune up, and leaking gas out of carburetor and fuel tank grommet.
David - May 27, 2017
Tool Type
Trimmer
Difficulty
Medium
Time
30-60 minutes
Tools Used
Screwdriver, Pliers, Socket set, Allen Wrench set
Parts Used
- Intake Gasket - 13001013410
- Purge Bulb - P005003120
- Fuel Return Tube - 13201056330
- Fuel Line Grommet - 13211555931
- Spark Plug - 15901019830
- Gasket-intake - 13001055930
- Gasket And Diaphragm Kit - P005000550
- Pipe Vent - V471000111
- Fuel Pipe - 13201052031
- Fuel Filter Assy. - A369000460
- Air Filter - A226001410
1. Removed the old spark plug, gap new one, and installed.
2. Removed throttle cable from carb., and disconnected both kill wires from the pull-a-part connector.
3. Removed air filter cover, threw out the old air filter, removed two screws holding air filter base.
4. Removed fuel and return lines from the carburetor, and removed the carburetor from the trimmer.
5. Removed 4 screws holding primer bulb, threw the old bulb out. Removed single screw from plastic primer spacer, and discarded gaskets underneath. Removed both screws underneath carburetor the for fuel pump, cleaned and blew out carburetor thoroughly with carb. cleaner, and compressed air. Installed new gaskets from kit, installing everything in reverse order. During cleaning, made sure to clean mini screen of all contaminants. installed new primer bulb.
6. Removed 3 screws holding fuel tank protector, and 2 screws holding fuel tank on. Fully drained fuel tank. Removed rubber grommet, and used it as a template for new fuel lines and grommet. Trimmed fuel lines to original lengths, reinstalled breather to new pipe, installed new fuel filter, and carefully installed new fuel lines in new grommet. Then carefully installing grommet into fuel tank. Installed tank in reverse order, followed by installing carburetor in reverse order, with new air filter installed.
7. Filled fuel tank with fresh fuel, primed carburetor, and started trimmer.
8. Runs excellent, like new, with no more fuel leaks!! Ready to take my Echo SRM-230, and trim up some weeds!! It's been about 5 years or more, and I couldn't be anymore pleased to see it running like new.
Did you find this story helpful?
Thanks for voting and helping fellow customers!
Fuel hoses hardened and fuel began to leak from gromet
Steve - May 2, 2017
Tool Type
Edger
Difficulty
Medium
Time
30-60 minutes
Tools Used
Screwdriver, Pliers, none
1. Removed fuel tank guard.
2. Removed fuel tank and hoses.
3. Removed fuel lines from carburetor.
4. Removed rubber grommet from fuel tank.
5. Cleaned tank and guard.
6. Inserted new hoses in new grommet with a little grease.
7. Inserted grommet into tank with the help of a screw driver to push grommet through.
8. Attached new hoses to carburetor.
9. Re-installed tank and guard.
Did you find this story helpful?
Thanks for voting and helping fellow customers!
Was leaking gas
Gregory - May 1, 2017
Tool Type
Edger
Difficulty
Medium
Time
30-60 minutes
Tools Used
Screwdriver, metric allen wrench
Removed the cover over the gas tank.
Disconnected the fuel lines from the carburetor.
Removed the gas tank from the edger and was able to see the gas tank was OK.
My problem was the fuel return tube. The tube is vinyl and was loose in the grommet.
The new grommet has metal sleeves that the old grommet doesn't. Because of the metal sleeves, the hoses were hard to install. Finally on the last hose, I put some light grease on it and the last hose went in a whole lot easier. I wish I had thought of that sooner. Actually, I should have used some of the oil you mix with the gas. I'm not a full time mechanic.
I installed the grommet in the new tank (might as well use the new tank) and reinstalled the tank.
I reconnected the fuel lines to the carburetor.
I reinstalled the cover.
I filled the tank with gas and the edger started right up and I no longer have a gas leak.
If you experience a gas leak, try sliding all 3 hoses up and down. They shouldn't move. If they do, you might have an old grommet like I did without the metal sleeves. My vinyl fuel return hose was also deformed were it went thru the grommet causing my gas leak and the edger harder to start.
I hope some of this is helpful to somebody else. I'm not an author either.
Did you find this story helpful?
Thanks for voting and helping fellow customers!
Fuel leak
Alexander - August 4, 2016
Tool Type
Trimmer
Difficulty
Medium
Time
30-60 minutes
Tools Used
Screwdriver
Rebuilt carburetor. Replaced: fuel vent line and vent; fuel supply line; fuel return line; fuel tank grommet; inlet gasket; primer. Procedure wasn't difficult due in large part to the availability of the training videos on this website and youtube. The only issue I had was that I tried to put the fuel jet hold down bracket on upside down. I reviewed the video and caught my error. It was fun for me as I had never (successfully) rebuilt this type of carb before.
Did you find this story helpful?
Thanks for voting and helping fellow customers!
Fuel was leaking while operating trimmer
Brent - July 21, 2016
Tool Type
Trimmer
Difficulty
Medium
Time
15-30 minutes
Tools Used
Screwdriver, Pliers, Allen Wrench
1. Pour remaining premixed fuel out of fuel tank back into a fuel can
2. Remove cover over fuel tank using allen wrench.
3. Removed fuel tank. While this wasn't absolutely necessary it made things easier and allowed all of the oil and dirt to be cleaned from the area.
4. Pull or pry the old grommet out of the tank. Make sure the area around the opening is cleaned of crud so it doesn't fall into the tank.
5. Remove a tube to be replaced from the old grommet and install a new one. They're a tight fit so lubricating the tube with a bit of oil or dishwashing detergent makes it easier to slide through the grommet. There was a small wire band over the tubing at the fuel filter. Slide it up the old tube using needle nose pliers to remove the filter then install the wire band onto the new tube. Do the reverse when installing the filter onto new tube.
6. Make certain that enough tubing extends into the tank to allow the filter / clunk to reach all areas of the tank as the unit is rotated into different positions. This ensures that all of the fuel will be emptied during operation.
7. Install the grommet with new tubing into the tank and reassemble all parts in reverse order to complete the repair.
Did you find this story helpful?
Thanks for voting and helping fellow customers!
OEM stands for Original Equipment Manufacturer and means the part you’re buying is sourced directly from the manufacturer who made your product. At eReplacementParts, we sell only genuine OEM parts, guaranteeing the part you’re purchasing is of better design and of higher quality than aftermarket parts.
Our product descriptions are a combination of data sourced directly from the manufacturers who made your product as well as content researched and curated by our content & customer service teams. This content is edited and reviewed internally before being made public to customers.
Our customer service team are at the ready daily to answer your part and product questions. We have a dedicated staff with decades of collective experience in helping customers just like you purchase parts to repair their products.
All our part reviews are solicited directly from other customers who have purchased this exact part. While we moderate these reviews for profanity, offensive language or personally identifiable information, these reviews are posted exactly as submitted and no alterations are made by our team.
All our customer repair instructions are solicited directly from other customers just like you who have purchased and replaced this exact part. While we moderate these reviews for profanity, offensive language or personally identifiable information, these reviews are posted exactly as submitted and no alterations are made by our team.
Based on data from past customer purchasing behaviors, these parts are most commonly purchased together along with the part you are viewing. These parts may be necessary or helpful to replace to complete your current repair.
All our installation videos are created and produced in collaboration with our in-house repair technician, Mark Sodja, who has helped millions of eReplacementParts customers over the last 13 years repair their products. Mark has years of experience in selling and repairing both commercial and residential products with a specialty in gas-powered equipment.
This data is collected from customers who submitted a repair instruction after replacing this exact part. Customers can rate how easy the repair was to complete and how long it took. We aggregate this data to provide a repair rating that allows customers to quickly determine the difficulty and time needed to perform their own repair.