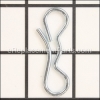
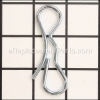
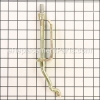
This is a genuine item that is supplied directly from the original equipment manufacturer for use with Craftsman riding lawn mowers and garden tractors. The lift link attaches to the front of the mower deck and to the bracket under the front axle. The purpose of it is to assist in leveling the deck up and down. It is an identical replacement for a missing or a damaged front lift link that was originally installed on a new unit. Please make sure to check the appropriate diagrams of your model for the correct location and application of this part. This high-quality item is made of durable metal and is sold individually, keep in mind the hardware to secure it is sold separately.
Front Mower Lift Link Suspensi 581506903
OEM part for: Husqvarna
Part Number: 581506903
$9.96
In Stock
Jump To:
Frequently Purchased Together ?


Compatibility
This Front Mower Lift Link Suspensi will fit the following 972 machines. Confirm this part works with your model, and view the detailed model diagrams and repair help we have to offer.
Displaying 20 of 972 matching models.
Husqvarna
Show More Compatible Models972 total model matches. Try the above search to narrow your results.
This is the official OEM part for the following brands:
- Craftsman
- Husqvarna
- Jonsered
- Poulan
- Weed Eater
This item works with the following types of products:
- Lawn Mower
- Lawn Tractor
- Trimmer
This part replaces obsolete part #: 5321952-70, 195270, 532195270
Customer Part Reviews ?
Average Rating (out of 5):
Click to filter by ratings:
5 stars
30
4 stars
1
3 stars
0
2 stars
0
1 stars
1
< PREV
- 1
- 2
- 3
Dependable Service
Great service and product availability.
Joyce -
April 20, 2024
Verified Purchase
Very helpful in finding the part I needed.
The exact part I needed for my Husqvarna lawnmower. The woman who helped me was awesome.
Guest -
September 29, 2023
Verified Purchase
Easy repair
Works as it should
glenn -
September 8, 2022
Verified Purchase
fast
fast
Guest -
August 9, 2022
Verified Purchase
Great response
Received my order, parts received as ordered, easy installation and priced competitively extremely happy will continue to use your service
James -
June 23, 2022
Verified Purchase
Mower Lift Link
Exact part, good price with fast shipping. My customer rep. was engaged, pleasant, and could be understood! One of the best customer experiences I have ever had! I wish they were all this successful! Thanks, David
Guest -
June 2, 2022
Verified Purchase
DEPENDABLE
The part was exactly as ordered and arrived in a timely fashion. Thanks for such great service.
Guest -
August 25, 2021
Verified Purchase
Easy to find, and a perfect fit!
Easy replacement of a broken component. Should have come here before Amazon! Fit perfectly.
Guest -
July 13, 2021
Verified Purchase
Lift link
This was great! Installed in 30 seconds and away we go. No need to remove lock nut, just slide shaft through front mount and clip 90 degree bend into mower deck, install washer and clip and your done.
Guest -
July 10, 2021
Verified Purchase
Super easy
The part was perfect. Matched in every way.
Guest -
July 5, 2021
Verified Purchase
Questions & Answers ?
Our customer Service team is at the ready daily to answer your part and product questions.

Ask our Team
We have a dedicated staff with decades of collective experience in helping customers just like you purchase parts to repair their products.
Does this fit my product?Questions & Answers for Front Mower Lift Link Suspensi
No questions have been asked yet
Customer Repair Instructions ?
All our customer repair instructions are solicited directly from other customers just like you who have purchased and replaced this exact part.
I lost a nut for the front mower lift link suspension
Gary - September 30, 2018
👍 10 of 10 people found this instruction helpful
Tool Type
Lawn Tractor
Difficulty
Easy
Time
15-30 minutes
Tools Used
Wrench Set
Parts Used
My problem was my "front mower lift link suspension" needed replacement. From my previous
experience with "ereplacementparts.com." / I typed in the model # and a diagram of my lawn mower presented itself. Discovered the correct diagram and from here looked to identify the correct part.
The new parts were mailed and I received them in a timely fashion. Installing the new parts was quick. There is a 90 degree bend at the one end of this rod. This goes to the mower deck. This secured with a washer and a clip. The other end,( this end has threads) goes through a hole in front of the deck. From here you place a nut on the shaft to secure it to the lawn mower. The time to do the repairs was approximately 30 minutes. In closing, working with staff via the telephone was very efficient. I have discovered ereplacementparts is a great company to work with. On a scale of 1-10, ten being high, I would give them a "10!"
Did you find this story helpful?
Thanks for voting and helping fellow customers!
Front mower lift link bent
Stephen - May 8, 2018
👍 6 of 8 people found this instruction helpful
Tool Type
Lawn Tractor
Difficulty
Easy
Time
15-30 minutes
Tools Used
Pliers
Dropped mower deck & replaced parts. Mower deck back in place
Did you find this story helpful?
Thanks for voting and helping fellow customers!
Mower deck wouldn't adjust correct
Russell - September 13, 2017
👍 6 of 8 people found this instruction helpful
Tool Type
Lawn Tractor
Difficulty
Easy
Time
30-60 minutes
Tools Used
Wrench Set, Adjustable Wrench
Removed old link lift.
Replaced with new link lift.
To lift the deck off the ground I used a brick.
Easy repair
Replaced with new link lift.
To lift the deck off the ground I used a brick.
Easy repair
Did you find this story helpful?
Thanks for voting and helping fellow customers!
Replaced damaged mandrel assembly & front deck balance linkage rod.
Ferrell - April 26, 2018
👍 2 of 2 people found this instruction helpful
Tool Type
Lawn Tractor
Difficulty
Medium
Time
1-2 hours
Tools Used
Pliers, Socket set, Wrench Set, Adjustable Wrench
1. First I had to disconnect the mower deck (not that difficult, just a few linkage points with pins).
2. The main body of my mandrel had completely broken off, but all 4 lugs remained with the bolts intact, so they had to be remove.
3. I placed the deck on it side to gain adequate access to the bottom area, I held the broken portion of each broken lug 1 at a time with channel lock pliers and socket with ratchet on the head of the bolts so as not to turn while removing them. The bolts are installed into the mandrel with self tapping threads, so this resulted in them being very tight so when removing them, they each broke off instead of unscrewing as would be expected.
4. I then used the new self tapping bolts that came with the new mandrel and the proper socket and ratchet to pre-start the bolts into the mandrel holes ( be sure to get the as straight as possible when pre-starting them). This made it much easier once I began to install the mandrel to the mower deck. There is a belt pulley that will have be remove from the upper top of the mandrel in order to remove it from the bottom of the deck, but it was relatively easy to remove also. You can use an adjustable wrench to remove the large nut on top of the shaft and then use a pulley puller if you have one available, but can also use a small block and pry bar to slow lift it off. It appears to be pressed on to the splined shaft but its not really that tight or difficult to remove.
5. Once you have installed the new mandrel through the bottom of the deck and replaced the belt pulley onto the splined shaft and everything is secure, the you are ready to return the deck to the lawn tractor. Just slide it back under the tractor, reattach all of the linkages, replace the belts to the proper positions and once you insure you have everything secure, you should be able to start mowing again. One other helpful note: Take pictures with an IPHONE or digital camera of each step of removing each linkage pin, bolt or any cables or belts so you will be able to review prior to use that you have everything reinstalled properly as was when you first started the repair process.
Did you find this story helpful?
Thanks for voting and helping fellow customers!
The front lift link that holds the mower deck up snapped as (I think) it is engineered to do.
Harriette - May 8, 2016
👍 4 of 6 people found this instruction helpful
Tool Type
Lawn Tractor
Difficulty
Medium
Time
1-2 hours
Tools Used
Wrench Set, Adjustable Wrench
Parts Used
I tried to follow the instructions in the manual (which was written by someone who assumed that the work was being done by an experienced repairman not an 82 year old woman) I had helped put the mower deck on before so I wasn't completely in the dark, but being a stubborn old woman I didn't want to ask for help. Had I followed the instruction in the proper order (which didn't make sense to me) it would have been an easier job. After re-reading the book once again I finally managed to get the damn cotter pins secured and the new part tightened up. Any way, it seems to be working pretty good, although the deck maybe not balanced as good as it could be. But, it was less expensive to do the work myself, as the delivery cost alone for the mower repair place to pick it up and return it is $45.
Did you find this story helpful?
Thanks for voting and helping fellow customers!
Poulan Pro PB19546LT Riding Mower- Replace Mower Deck Belt and Motion drive Belt- Replaced lost Front Mower Lift Link Suspension rod.
Kenneth - July 8, 2018
👍 1 of 1 people found this instruction helpful
Tool Type
Lawn Tractor
Difficulty
Hard
Time
More than 2 hours
Tools Used
Screwdriver, Pliers, Socket set, Wrench Set, Nutdriver, Adjustable Wrench, Curved Throat vise grips, Belt Sander, Blade balancer
The most difficult part after removing the mowing deck was the R&R of the motion belt. Even after raising the entire mower up on jack stands and crawling under the thing, trying to get that belt off seemed about impossible to see or reach at the transmission end, UNTIL, I removed the under seat battery and battery box. Then you could see and reach down onto the belt and remove it in the back. The front end, on the motor shaft, top pulley, 'looked' impossible to take off too because the belt keepers seemed to be fastened to the deck at both ends, so I cut belt in two, then it came off - easy. Now to put the new belt back on seemed impossible too. Finally I saw that the keepers were springy and were only fastened at one end so the belt could be worked around them. Not easy but it worked out. Later to remove the blades to sharpen, it takes a long handled extension to loosen the blade nut.To keep the blade from turning while trying to unloosen the nut I used the deep throat vise grips and locked it onto the mower deck edge as a stop so that the blade could not keep going. Two final things. I find that a belt sander does a far better sharpening job than a grind stone. Less material removed. Plus,
My Front Mower Lift Link Suspension rod that adjust the front deck height just disappeared because the deck end spring cotter key come off. I noticed that on the new rod a hole is drilled up close to the adjuster nuts. And a long spring lock cotter key goes thru it to prevent the rod from sliding out the front side of the bracket to get lost. All of this took 5 hours. I have all kinds of tools and reasonable know how. But the Poulan operator manual seems written loosely.
My Front Mower Lift Link Suspension rod that adjust the front deck height just disappeared because the deck end spring cotter key come off. I noticed that on the new rod a hole is drilled up close to the adjuster nuts. And a long spring lock cotter key goes thru it to prevent the rod from sliding out the front side of the bracket to get lost. All of this took 5 hours. I have all kinds of tools and reasonable know how. But the Poulan operator manual seems written loosely.
Did you find this story helpful?
Thanks for voting and helping fellow customers!
Lift link suspension in front broken
donald - July 6, 2018
👍 1 of 1 people found this instruction helpful
Tool Type
Lawn Mower
Difficulty
Easy
Time
Less than 15 minutes
Tools Used
Pliers, Adjustable Wrench
Parts Used
Removed broken part and replaced with new one, took longer to get tools together than replacing it, very easy job and the order came in a timely manner, thanks again for your help and I will recommend you,,,have a great day, a pleased customer
Did you find this story helpful?
Thanks for voting and helping fellow customers!
Lost the front lift link
Michael - May 27, 2018
👍 1 of 1 people found this instruction helpful
Tool Type
Lawn Tractor
Difficulty
Medium
Time
15-30 minutes
Tools Used
Pliers, Wrench Set
Attached the new link
Did you find this story helpful?
Thanks for voting and helping fellow customers!
The lift link broke while mowing
janice - May 5, 2018
👍 1 of 1 people found this instruction helpful
Tool Type
Lawn Tractor
Difficulty
Easy
Time
Less than 15 minutes
Tools Used
Adjustable Wrench
Parts Used
1. The lift link came loose and got stuck in the ground while mowing and broke in half.
2. I looked In my manual and matched the part number and ordered it.
3. I received the correct part in a few days.
4.I put the part in place and tightened the bolt and inserted the cotter key.
5. Perfect fix.
2. I looked In my manual and matched the part number and ordered it.
3. I received the correct part in a few days.
4.I put the part in place and tightened the bolt and inserted the cotter key.
5. Perfect fix.
Did you find this story helpful?
Thanks for voting and helping fellow customers!
The front deck suspension rod broke while mowing
Don - August 9, 2017
👍 1 of 1 people found this instruction helpful
Tool Type
Lawn Tractor
Difficulty
Easy
Time
15-30 minutes
Tools Used
Pliers, Socket set, Wrench Set, Adjustable Wrench, vice
Parts Used
I didn't have any parts to remove. The old one broke and scattered across the lawn. I had to purchase the suspension bar and and two cotter pins. I connected one end to the deck with a cotter pin. I then connected the other end to the frame. The hardest part was adjusting the nut so that it was the correct length. I had to put the part in a vice to undo the nuts. It took two tries to get this part right. Once the length was correct, I put in the other cotter pin and ensured the nuts were tightened. It works like a dream. Winner winner chicken dinner.
Did you find this story helpful?
Thanks for voting and helping fellow customers!
Load More Install Stories
OEM stands for Original Equipment Manufacturer and means the part you’re buying is sourced directly from the manufacturer who made your product. At eReplacementParts, we sell only genuine OEM parts, guaranteeing the part you’re purchasing is of better design and of higher quality than aftermarket parts.
Learn MoreOur product descriptions are a combination of data sourced directly from the manufacturers who made your product as well as content researched and curated by our content & customer service teams. This content is edited and reviewed internally before being made public to customers.
Our customer service team are at the ready daily to answer your part and product questions. We have a dedicated staff with decades of collective experience in helping customers just like you purchase parts to repair their products.
All our part reviews are solicited directly from other customers who have purchased this exact part. While we moderate these reviews for profanity, offensive language or personally identifiable information, these reviews are posted exactly as submitted and no alterations are made by our team.
All our customer repair instructions are solicited directly from other customers just like you who have purchased and replaced this exact part. While we moderate these reviews for profanity, offensive language or personally identifiable information, these reviews are posted exactly as submitted and no alterations are made by our team.
Based on data from past customer purchasing behaviors, these parts are most commonly purchased together along with the part you are viewing. These parts may be necessary or helpful to replace to complete your current repair.
All our installation videos are created and produced in collaboration with our in-house repair technician, Mark Sodja, who has helped millions of eReplacementParts customers over the last 13 years repair their products. Mark has years of experience in selling and repairing both commercial and residential products with a specialty in gas-powered equipment.
This data is collected from customers who submitted a repair instruction after replacing this exact part. Customers can rate how easy the repair was to complete and how long it took. We aggregate this data to provide a repair rating that allows customers to quickly determine the difficulty and time needed to perform their own repair.