

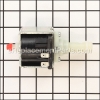
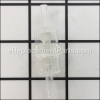
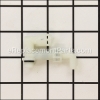
DeLonghi has made these part to be used with many different models of espresso makers. The Flowmeter is used to detect and measure the flow of water for brewing coffee or frothing milk. This part is normally replaced if it no longer reads the flow correctly, a read error has occurred, or if it has become physically damaged and leaks.
Tools Used:
• Philips Head Screwdriver
• Flat Head Screwdriver
• Needle Nose Pliers
Flowmeter 5213225251
OEM part for: DeLonghi
Part Number: 5213225251
$8.32
In Stock
Jump To:
Product Description ?
- Classification: Part
- Weight: 0.04 lbs.
- Shipping: Ships Worldwide
Frequently Purchased Together ?

Compatibility
This Flowmeter will fit the following 79 machines. Confirm this part works with your model, and view the detailed model diagrams and repair help we have to offer.
DeLonghi
Show More Compatible ModelsThis item works with the following types of products:
- Espresso Parts
- Coffee Maker Parts
This part replaces obsolete part #: 5213214671, 5213212861, 5232101400
Customer Part Reviews ?
Average Rating (out of 5):
Click to filter by ratings:
5 stars
1
4 stars
1
3 stars
0
2 stars
0
1 stars
0
< PREV
- 1
This one small part fixed the espresso supply for the entire office
Installation was a snap: just pulled off the sides and back of the machine, eased the hoses off of the old meter and disconnected the plug. Slid the hoses on to the new meter and attached the plug, and everything was golden (just remember to run some water through the steamer to get the air bubbles out of the line!).
Guest -
June 28, 2019
Verified Purchase
Easy repair
This was in great condition part and fit just like the old one. Great service
iGlobal -
September 6, 2019
Verified Purchase
Questions & Answers ?
Our customer Service team is at the ready daily to answer your part and product questions.

Ask our Team
We have a dedicated staff with decades of collective experience in helping customers just like you purchase parts to repair their products.
Does this fit my product?Questions & Answers for Flowmeter
No questions have been asked yet
Customer Repair Instructions ?
All our customer repair instructions are solicited directly from other customers just like you who have purchased and replaced this exact part.
Got "out of water" error when there was sufficient water
Michael - September 19, 2017
👍 6 of 6 people found this instruction helpful
Tool Type
Coffee Maker
Difficulty
Easy
Time
15-30 minutes
Tools Used
Screwdriver
Parts Used
Removed back and side covers from coffee pot.
Flow meter was a "press" fit so simply rocked and pulled the flow meter free from machine base.
Slipped off water lines from old flow meter and slipped on to the new one.
Pushed flow meter into machine base location.
Replaced covers.
No more "out of water" messages.
Flow meter was a "press" fit so simply rocked and pulled the flow meter free from machine base.
Slipped off water lines from old flow meter and slipped on to the new one.
Pushed flow meter into machine base location.
Replaced covers.
No more "out of water" messages.
Did you find this story helpful?
Thanks for voting and helping fellow customers!
No water from pump
Raffi - March 3, 2017
👍 1 of 1 people found this instruction helpful
Tool Type
Coffee Maker
Difficulty
Medium
Time
30-60 minutes
Tools Used
Screwdriver, Pliers
1: Turn off remove covers
2: Followed you tube video on replacing pump and gaskets
3: With covers off do a deep cleaning
4: Install covers
5: Run de-calsify cleaning
6: Enjoy coffee time !!!!!
2: Followed you tube video on replacing pump and gaskets
3: With covers off do a deep cleaning
4: Install covers
5: Run de-calsify cleaning
6: Enjoy coffee time !!!!!
Did you find this story helpful?
Thanks for voting and helping fellow customers!
Need water light was flashing
Michael - February 13, 2019
Tool Type
Coffee Maker
Difficulty
Easy
Time
15-30 minutes
Tools Used
Screwdriver
Parts Used
1. Removed cover.
2. Flowmeter just snaps in.
3. Put back tubing.
Easy repair. Flowmeters only last about 6 months and need to be replaced again.
2. Flowmeter just snaps in.
3. Put back tubing.
Easy repair. Flowmeters only last about 6 months and need to be replaced again.
Did you find this story helpful?
Thanks for voting and helping fellow customers!
Water red light indicator turned on before before completing cycle for a complete short or long cup.
George - September 20, 2018
Tool Type
Coffee Maker
Difficulty
Easy
Time
15-30 minutes
Tools Used
Screwdriver
Parts Used
UNPLUG THE MACHINE
1. Remove six screws holding the back and sides of the machine to the body of the machine.
2.Remove the sides and than the back of the machine.
3. Remove the rubber cover on the electrical socket attached to the flowmeter.
4. Remove the 3 wire connector from the electrical socket.
5. Pull off the flowmeter which is held in place by two molded pins on the bottom of the flowmeter.
6. Pop off the two hose from there restraining catches.
7. Pull the two hoses from the flowmeter paying attention to where on the flowmeter they came from.
8.Put the two hoses on the new flowmeter and then press it in place, and press the two hoses into their catches, replace the connector and the rubber cover.
PLUG IN THE MACHINE AND
Test machine before replacing the sides and back.
Did you find this story helpful?
Thanks for voting and helping fellow customers!
DeLonghi EC680 won't complete a brew cycle
Eduard - January 31, 2018
Tool Type
Coffee Maker
Difficulty
Medium
Time
1-2 hours
Tools Used
Screwdriver, Power Drill
Parts Used
1. Removed the back screws (next to watertank)
2. Removed bottom tamper-proof screws
3. Unscrewed pipes that were hold in place where watertank connects
4. Removed top cover by sliding it out horizontally
5. Removed screws that hold the pipe/wires that go to coffee filter socket (from the top)
6. Remove any other visible screw at the top that holds the entire inner assemble in place. No need to disassemble the inside.
7. Slowly slide down the assembly inside the cover. Flowmeter was now accessible, performed the repair.
Did you find this story helpful?
Thanks for voting and helping fellow customers!
Pump making loud noise.
Cary - May 1, 2017
👍 0 of 1 people found this instruction helpful
Tool Type
Coffee Maker
Difficulty
Medium
Time
30-60 minutes
Tools Used
Screwdriver, Pliers
1. Unplugged the coffeemaker.
2. Removed the back and the sides.
3. Removed the wires and the hoses connected to the pump and the flow meter.
4. Replaced the pump and the flow meter by pressing into place.
5. Replaced the wires and the hoses.
6. Replaced the back and the side panels.
7. Plugged in and made the coffee.
2. Removed the back and the sides.
3. Removed the wires and the hoses connected to the pump and the flow meter.
4. Replaced the pump and the flow meter by pressing into place.
5. Replaced the wires and the hoses.
6. Replaced the back and the side panels.
7. Plugged in and made the coffee.
Did you find this story helpful?
Thanks for voting and helping fellow customers!
OEM stands for Original Equipment Manufacturer and means the part you’re buying is sourced directly from the manufacturer who made your product. At eReplacementParts, we sell only genuine OEM parts, guaranteeing the part you’re purchasing is of better design and of higher quality than aftermarket parts.
Our product descriptions are a combination of data sourced directly from the manufacturers who made your product as well as content researched and curated by our content & customer service teams. This content is edited and reviewed internally before being made public to customers.
Our customer service team are at the ready daily to answer your part and product questions. We have a dedicated staff with decades of collective experience in helping customers just like you purchase parts to repair their products.
All our part reviews are solicited directly from other customers who have purchased this exact part. While we moderate these reviews for profanity, offensive language or personally identifiable information, these reviews are posted exactly as submitted and no alterations are made by our team.
All our customer repair instructions are solicited directly from other customers just like you who have purchased and replaced this exact part. While we moderate these reviews for profanity, offensive language or personally identifiable information, these reviews are posted exactly as submitted and no alterations are made by our team.
Based on data from past customer purchasing behaviors, these parts are most commonly purchased together along with the part you are viewing. These parts may be necessary or helpful to replace to complete your current repair.
All our installation videos are created and produced in collaboration with our in-house repair technician, Mark Sodja, who has helped millions of eReplacementParts customers over the last 13 years repair their products. Mark has years of experience in selling and repairing both commercial and residential products with a specialty in gas-powered equipment.
This data is collected from customers who submitted a repair instruction after replacing this exact part. Customers can rate how easy the repair was to complete and how long it took. We aggregate this data to provide a repair rating that allows customers to quickly determine the difficulty and time needed to perform their own repair.