
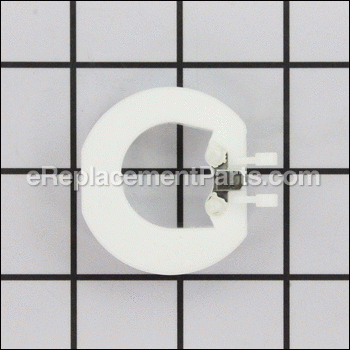


This authentic part is supplied by the original equipment manufacturer for Tecumseh engines commonly installed on Toro lawn and garden equipment. The float is used to allow fuel into the float chamber when the chamber has been drained and to stop fuel from entering the chamber when it is full. It provides an identical replacement for a missing or a faulty component that was installed on a new unit. Refer to the appropriate diagrams of your model for the correct location and application of this hardware. Keep in mind this high-quality float is made of durable plastic and is sold individually.
Float (plastic) 632816
OEM part for: Tecumseh, Toro
Part Number: 632816
$7.34
In Stock
Jump To:
Frequently Purchased Together ?


Compatibility
This Float (plastic) will fit the following 365 machines. Confirm this part works with your model, and view the detailed model diagrams and repair help we have to offer.
This item works with the following types of products:
- Snowblower Parts
This part replaces obsolete part #: TC-632802, 632765, 632802
Questions & Answers ?
Our customer Service team is at the ready daily to answer your part and product questions.

Ask our Team
We have a dedicated staff with decades of collective experience in helping customers just like you purchase parts to repair their products.
Does this fit my product?Questions & Answers for Float (plastic)
No questions have been asked yet
Customer Repair Instructions ?
All our customer repair instructions are solicited directly from other customers just like you who have purchased and replaced this exact part.
Wouldn't run smoothly.
Len - December 27, 2018
Tool Type
Snowblower
Difficulty
Medium
Time
30-60 minutes
Tools Used
Screwdriver, Pliers, Power Drill, Socket set, Wrench Set, Nutdriver
Removed carb and rebuilt it with new seals, replaced the float, and cleaned all the jets. Runs great!
Did you find this story helpful?
Thanks for voting and helping fellow customers!
Difficult to start; leaking fuel into crankcase; primer not working properly; very rough running.
Jerry - June 28, 2016
Tool Type
Lawn Mower
Difficulty
Medium
Time
1-2 hours
Tools Used
Screwdriver, Pliers, Socket set, Wrench Set, air compressor, blower nozzle, o-ring pick, needle-nose plie
Removed, cleaned, and disassembled carburetor. You will need to use compressed air and a blower nozzle to remove the old float needle seat. Just apply air pressure to the fuel inlet fitting. BE CAREFUL to hold the carb away from your body when you do this because the seat comes out with enough force to damage an eye if it were to strike your eye. Replaced old float, needle, and seat. Be sure to press new neoprene seat all the way to the bottom of the bore it seats into. A pin punch that fits inside the bore is a good tool for this. Just press with your fingers, not with a hammer! Assemble float, needle, and float hinge pin. Turn carb upside down, and adjust float so top of float (bottom when upside down) is parallel (but not even) with top of carb fuel bowl. Carefully bend float tang that presses on needle to achieve this position. DO NOT PRESS NEEDLE AGAINST SEAT! Use only the weight of the float to press needle against seat. Reassemble carb using new gaskets and o-rings from the kit. To replace the primer bulb, you will have to pry out the retainer ring holding it in place. The retainer has teeth facing outward to keep it in place, so it requires a little force to remove it. Be careful not to score the walls of the primer bore with your screwdriver. Press the new primer bulb into place using a socket that will fit in the primer bore. Be sure to press it all the way to the bottom of the bore. Reattach carb and linkages. NOTE: It is a good idea to take a picture of the carb linkage before you remove the carb, so you have a reference to assist you with correctly reassembling the linkages. Good luck!
Did you find this story helpful?
Thanks for voting and helping fellow customers!
OEM stands for Original Equipment Manufacturer and means the part you’re buying is sourced directly from the manufacturer who made your product. At eReplacementParts, we sell only genuine OEM parts, guaranteeing the part you’re purchasing is of better design and of higher quality than aftermarket parts.
Our product descriptions are a combination of data sourced directly from the manufacturers who made your product as well as content researched and curated by our content & customer service teams. This content is edited and reviewed internally before being made public to customers.
Our customer service team are at the ready daily to answer your part and product questions. We have a dedicated staff with decades of collective experience in helping customers just like you purchase parts to repair their products.
All our part reviews are solicited directly from other customers who have purchased this exact part. While we moderate these reviews for profanity, offensive language or personally identifiable information, these reviews are posted exactly as submitted and no alterations are made by our team.
All our customer repair instructions are solicited directly from other customers just like you who have purchased and replaced this exact part. While we moderate these reviews for profanity, offensive language or personally identifiable information, these reviews are posted exactly as submitted and no alterations are made by our team.
Based on data from past customer purchasing behaviors, these parts are most commonly purchased together along with the part you are viewing. These parts may be necessary or helpful to replace to complete your current repair.
All our installation videos are created and produced in collaboration with our in-house repair technician, Mark Sodja, who has helped millions of eReplacementParts customers over the last 13 years repair their products. Mark has years of experience in selling and repairing both commercial and residential products with a specialty in gas-powered equipment.
This data is collected from customers who submitted a repair instruction after replacing this exact part. Customers can rate how easy the repair was to complete and how long it took. We aggregate this data to provide a repair rating that allows customers to quickly determine the difficulty and time needed to perform their own repair.