


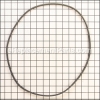
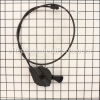
This drive control cable is a high quality replacement part that is sourced from original equipment manufacturer for use on high wheeled trimmers. The control cable stops the blade when the control handle is released, if the cable is broken it will cause the brake to not release even when the lever is pressed. Please note one durable rubber insulated cable is included per order.
Drive Control Cable 532181699
OEM part for: Husqvarna, Poulan, Weed Eater, Craftsman
Part Number: 532181699
$34.86
In Stock
Jump To:
Frequently Purchased Together ?


Compatibility
This Drive Control Cable will fit the following 51 machines. Confirm this part works with your model, and view the detailed model diagrams and repair help we have to offer.
This item works with the following types of products:
- Trimmer Parts
This part replaces obsolete part #: 181699
Customer Part Reviews ?
Average Rating (out of 5):
Click to filter by ratings:
5 stars
7
4 stars
0
3 stars
0
2 stars
0
1 stars
0
< PREV
- 1
Easy replacement process
Item arrived at regular Mail and well packed within delivery window.
René -
July 13, 2021
Verified Purchase
Drive control cable
The part was perfect and easy to install.
Guest -
January 18, 2021
Verified Purchase
So Simple
Fit like a glove! Works beautifully
Guest -
December 3, 2020
Verified Purchase
Great part
Fit as it should! Only problem I ran into was disassembling. Overcame, I'm a winner! !!
PayPal 2020-07-31 Fix -
August 19, 2020
Verified Purchase
Surprised
The part fit and works as it should. Not expecting that to happen on the first order. Normally it's the wrong part, too long, short, big or small.
Bill -
May 18, 2020
Verified Purchase
drive cable
Great condition, arrived quickly, easy installation
Guest -
July 23, 2019
Verified Purchase
Got place for parts
Perfect fit as I had hoped for. Your site is easy to use to find parts. Shipping time was right on so my machine had minimal downtime
Bill P
William -
July 17, 2019
Verified Purchase
Questions & Answers ?
Our customer Service team is at the ready daily to answer your part and product questions.

Ask our Team
We have a dedicated staff with decades of collective experience in helping customers just like you purchase parts to repair their products.
Does this fit my product?Questions & Answers for Drive Control Cable
What is the length of the proper control cable ? Mine appears to be too long
Johnny
for model number 917 773751
asked on 2023-01-06
Hi Johnny,
Thank you for your question. The length of the cable is 57.5 inches and the conduit length is 39.5 inches. If you need help placing an order for it, customer service is open 7 days a week and anyone will be happy to assist you. Please feel free to give us a call. We look forward to hearing from you!
eReplacementParts Team January 06, 2023
Please need to identify and buy a compatible drive cable for the crafsman walk behind trimmer mentioned above.
Ramn
for model number 917776740
asked on 2022-03-23
Hello Ramn, Thank you for your inquiry. We have researched the model number you have provided and show the drive control cable as part# 584954101. We hope this helps and if you need help placing an order, customer service is open 7 days a week. Please feel free to give us a call. We look forward to hearing from you!
eReplacementParts Team March 23, 2022
Customer Repair Instructions ?
All our customer repair instructions are solicited directly from other customers just like you who have purchased and replaced this exact part.
Drive control cable broke
Danny - April 16, 2023
👍 1 of 1 people found this instruction helpful
Tool Type
Trimmer
Difficulty
Easy
Time
30-60 minutes
Tools Used
Screwdriver, Pliers
I just removed the broken cable and replaced it with the new one. It took a little while to hook the new spring on the control
Did you find this story helpful?
Thanks for voting and helping fellow customers!
cable froze up
Carl - June 22, 2023
Tool Type
Hedge Trimmer
Difficulty
Medium
Time
30-60 minutes
Tools Used
Socket set
Parts Used
removed lower cover to access engagement pulleys and replaced cable
Did you find this story helpful?
Thanks for voting and helping fellow customers!
belt wore out,cable broke
John - June 5, 2023
Tool Type
Lawn Mower
Difficulty
Easy
Time
30-60 minutes
Tools Used
Screwdriver, Pliers, Socket set, Wrench Set
replaced belt
replaced cable
replaced cable
Did you find this story helpful?
Thanks for voting and helping fellow customers!
Trimmer control was broken
Dennis - October 22, 2022
Tool Type
Trimmer
Difficulty
Medium
Time
30-60 minutes
Tools Used
Screwdriver, Pliers, Socket set
Parts Used
Removed cover to get access to under side
Removed old control linkage
Installed new control
Replaced cover
Removed old control linkage
Installed new control
Replaced cover
Did you find this story helpful?
Thanks for voting and helping fellow customers!
drive control was sized and belt was worn
elmer - July 4, 2021
Tool Type
Trimmer
Difficulty
Medium
Time
15-30 minutes
Tools Used
Screwdriver, Socket set, Wrench Set
removed lower panel to access.
Did you find this story helpful?
Thanks for voting and helping fellow customers!
Replaced a couple of spring/cable assemblies.
Kenneth - May 23, 2021
Tool Type
Trimmer
Difficulty
Medium
Time
30-60 minutes
Tools Used
Screwdriver, Pliers
Pretty straight forward. The smaller spring was a little difficult because of the size of my hands.
Did you find this story helpful?
Thanks for voting and helping fellow customers!
Tiller Hard to start, trimer had drive cable broke & carrier plate broken
Howard - July 3, 2020
Tool Type
Trimmer
Difficulty
Medium
Time
1-2 hours
Tools Used
Screwdriver, Pliers, Socket set, Wrench Set, Bearing press
1. Removed fuel tank and carb from tiller and cleaned out tank.
2. Installed tank and crab. Filled gas tank and ops checked carb (tiller was hard to start and had to pour a little gas down the carb). After initial start up, I let it run for 15 mins. After shutdown, I attempted an other start after 2 hours and the tiller started on the first pull.
1. Removed carrier plate assembly and discovered a bearing had come apart. Purchased a new bearing at the auto parts store and installed. This operation required the use of a press to remove the gear.
2. Installed carrier plate
3. Removed and replaced drive cable and completed a successful operation check
Did you find this story helpful?
Thanks for voting and helping fellow customers!
Cable that actuates the trim head seized over the winter.
Gene - May 27, 2020
Tool Type
Trimmer
Difficulty
Medium
Time
30-60 minutes
Tools Used
Screwdriver, Pliers, Cordless Drill with Phillips Bit
Parts Used
Removed the top cover and trimmer head to access the cable where it attaches to the idler pulley. Pulled the old cable out of the case and removed it from the handle. Replaced the cable with the new one. Reinstalled the trimmer head.
Did you find this story helpful?
Thanks for voting and helping fellow customers!
Drive control and return spring broke. The drive control cable got tangled up in the V-belt and motor. The trimmer was not able to spin.
Timothy - May 24, 2019
👍 1 of 2 people found this instruction helpful
Tool Type
Trimmer
Difficulty
Easy
Time
30-60 minutes
Tools Used
Screwdriver, Pliers, Socket set, Wrench Set
1. Disconnect the old drive control cable from the trimmer head control bar.
2. Use a screwdriver to remove the plastic clip holding the drive control cable on the upper handle.
3. Use pliers to pinch plastic clip on drive control cable connected to the chassis.
4. Remove control cable from unit.
5. Follow 1-4 in reverse to install new drive control cable.
6. Tilt the trimmer at a 45 degree angle so I could access below the chassis where the return spring and drive control connects to the idler assembly.
7. Connect the drive control spring to the idler assembly.
8. Remove damaged return spring (idler spring) from the idler assembly.
9. Install new idler spring to the idler assembly.
10. I had a missing chassis cover screw that I added as well.
11. I referred to online instruction manuals for reference.
12. Current V-belt was still good, ordered new one as backup.
Did you find this story helpful?
Thanks for voting and helping fellow customers!
Spring was stretched on control cable
Ronald - August 19, 2016
👍 2 of 4 people found this instruction helpful
Tool Type
Trimmer
Difficulty
Medium
Time
30-60 minutes
Tools Used
Pliers, Socket set, Wrench Set, Nutdriver
Parts Used
1. Removed bottom shield.
2. Removed belt idler assembly and drive belt.
3. Removed bad control cable.
4. Installed new control cable, tied to handle.
5. Reinstalled belt idler assembly and belt.
6. Reinstalled bottom shield.
2. Removed belt idler assembly and drive belt.
3. Removed bad control cable.
4. Installed new control cable, tied to handle.
5. Reinstalled belt idler assembly and belt.
6. Reinstalled bottom shield.
Did you find this story helpful?
Thanks for voting and helping fellow customers!
Load More Install Stories
OEM stands for Original Equipment Manufacturer and means the part you’re buying is sourced directly from the manufacturer who made your product. At eReplacementParts, we sell only genuine OEM parts, guaranteeing the part you’re purchasing is of better design and of higher quality than aftermarket parts.
Our product descriptions are a combination of data sourced directly from the manufacturers who made your product as well as content researched and curated by our content & customer service teams. This content is edited and reviewed internally before being made public to customers.
Our customer service team are at the ready daily to answer your part and product questions. We have a dedicated staff with decades of collective experience in helping customers just like you purchase parts to repair their products.
All our part reviews are solicited directly from other customers who have purchased this exact part. While we moderate these reviews for profanity, offensive language or personally identifiable information, these reviews are posted exactly as submitted and no alterations are made by our team.
All our customer repair instructions are solicited directly from other customers just like you who have purchased and replaced this exact part. While we moderate these reviews for profanity, offensive language or personally identifiable information, these reviews are posted exactly as submitted and no alterations are made by our team.
Based on data from past customer purchasing behaviors, these parts are most commonly purchased together along with the part you are viewing. These parts may be necessary or helpful to replace to complete your current repair.
All our installation videos are created and produced in collaboration with our in-house repair technician, Mark Sodja, who has helped millions of eReplacementParts customers over the last 13 years repair their products. Mark has years of experience in selling and repairing both commercial and residential products with a specialty in gas-powered equipment.
This data is collected from customers who submitted a repair instruction after replacing this exact part. Customers can rate how easy the repair was to complete and how long it took. We aggregate this data to provide a repair rating that allows customers to quickly determine the difficulty and time needed to perform their own repair.