


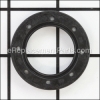
This genuine replacement part is used on small lawn and garden engines. Its purpose is to make an air tight seal so that no air/oil leakage occurs. Over time this gasket will deteriorate and will need to be replaced. This item is made out of composite material and it is sold individually. To complete this repair you will need a wrench.
Gasket-crankcase 692232
OEM part for: Briggs & Stratton Engines
Part Number: 692232
$6.39
In Stock
Jump To:
Frequently Purchased Together ?


Compatibility
This Gasket-crankcase will fit the following 16476 machines. Confirm this part works with your model, and view the detailed model diagrams and repair help we have to offer.
Briggs & Stratton Engines
Show More Compatible ModelsThis item works with the following types of products:
- Engine Parts
This part replaces obsolete part #: 4182, 272198
Customer Part Reviews ?
Average Rating (out of 5):
Click to filter by ratings:
5 stars
7
4 stars
0
3 stars
0
2 stars
0
1 stars
0
< PREV
- 1
Correct part
Part received was correct
Norman -
February 6, 2023
Verified Purchase
Gasket fit perfectly
Verry happy with part .oem part
Norman -
September 15, 2022
Verified Purchase
good part
The part was the correct one and fit correctly. My only concern with it was that they folded it and shipped it folded.
Kristy -
December 29, 2021
Verified Purchase
Time saver
Get it on when rain stops
Guest -
June 9, 2021
Verified Purchase
Every thing worked out well. Engine runs well. Thanks again
Every thing fit and works great. Thanks
Guest -
April 29, 2021
Verified Purchase
Worked as expected
Part arrived in a timely fashion and the fit was perfect
Guest -
October 17, 2019
Verified Purchase
Engine
Exact fit and arrived quickly. Mower runs great. Thank you
Charles -
August 8, 2019
Verified Purchase
Questions & Answers ?
Our customer Service team is at the ready daily to answer your part and product questions.

Ask our Team
We have a dedicated staff with decades of collective experience in helping customers just like you purchase parts to repair their products.
Does this fit my product?Questions & Answers for Gasket-crankcase
No questions have been asked yet
Customer Repair Instructions ?
All our customer repair instructions are solicited directly from other customers just like you who have purchased and replaced this exact part.
Leaking lower crankshaft seal.
Robert - November 15, 2015
👍 5 of 7 people found this instruction helpful
Tool Type
Lawn Mower
Difficulty
Easy
Time
30-60 minutes
Tools Used
Screwdriver, Socket set
Parts Used
Drain oil, remove engine from mower, remove lower half of crankcase and pry out the old seal. Clean up the crankshaft, push the new seal into the lower half of the crankcase, then install the new gasket and bolt everything back together.
Did you find this story helpful?
Thanks for voting and helping fellow customers!
Exhaust valve held open.
Robert - July 24, 2017
👍 1 of 1 people found this instruction helpful
Tool Type
Lawn Mower
Difficulty
Medium
Time
1-2 hours
Tools Used
Screwdriver, Socket set, Nutdriver, Hammer
1. Disassembled the engine.
2. Drove the valve guide back into place.
3. Reassembled the engine with the new gaskets.
2. Drove the valve guide back into place.
3. Reassembled the engine with the new gaskets.
Did you find this story helpful?
Thanks for voting and helping fellow customers!
Pressure washer motor ran hot causing it to jump time!
Richard - July 7, 2017
👍 1 of 1 people found this instruction helpful
Tool Type
Engine
Difficulty
Easy
Time
1-2 hours
Tools Used
Screwdriver, Pliers, Socket set, Nutdriver
Completely disassembled motor replaced timing gear and reassembled!
Did you find this story helpful?
Thanks for voting and helping fellow customers!
Seal leaking at out put shaft,letting oil drain out and locked the motor up.
joseph - February 2, 2017
👍 1 of 1 people found this instruction helpful
Tool Type
Engine
Difficulty
Medium
Time
1-2 hours
Tools Used
Screwdriver, Pliers, Socket set, Wrench Set, Adjustable Wrench
Parts Used
Removed the crank case cover. Replaced the out put shaft seal and case gasket. Flushed the engine out with gunk motor flushing oil. Reset the coil clearance. Started the motor, ran for 1/2 hour, drained the oil and replaced with fresh oil. This repair saved me getting a new power washer that would cost around 400.00 dollars. The hardest part was finding the m/n of the motor as I do not work on these very often.
Did you find this story helpful?
Thanks for voting and helping fellow customers!
New 21" front self propelled push mower 190cc B&S engine with less than 5 hours use. mower blade found part of fallen tree limb and it jammed between blade and mower deck. The impact broke the cam'
Kent - December 4, 2016
👍 1 of 1 people found this instruction helpful
Tool Type
Lawn Mower
Difficulty
Medium
Time
More than 2 hours
Tools Used
Screwdriver, Pliers, Socket set, Wrench Set, Inch pound torque wrench
Removed blade
Removed engine
Drained oil and fuel.
Removed crankcase cover and cylinder head.
Removed damaged camshaft assembly and oil slinger
Inspected crankshaft valves and lifters for damage (none)
Inspected installed crankshaft oil seal for tears/damage(none)
Used assembly lube on all moving parts.
Installed valves valve springs and keepers.
Installed lifters
Installed new cam aligned crankshaft/cam timing marks.
Piston at TDC rotated counter clockwise .250" to check valve to lifter clearance
Installed sump gasket replaced cover and torqued bolts to spec
Installed new cylinder head gasket and torqued cylinder head bolts to spec
Finished reassembly installed motor on to mower deck put on new blade
Pulled starter rope it started let engine warm up get the oil flowing.
MADE sure there were no gremlins in the yard to kill my mower again and cut the grass.
Did you find this story helpful?
Thanks for voting and helping fellow customers!
Blow by on the rings
Allen - July 16, 2023
Tool Type
Lawn Mower
Difficulty
Easy
Time
1-2 hours
Tools Used
Screwdriver, Socket set, Wrench Set
Pulled motor frame then pulled head and crankcase cover then pulled piston installed new rings and reassembled.
Did you find this story helpful?
Thanks for voting and helping fellow customers!
Leaking oil from crankcase
Steven - June 10, 2022
Tool Type
Engine
Difficulty
Easy
Time
15-30 minutes
Tools Used
Socket set, Nutdriver
Parts Used
Removed crankcase cover, replaced seal and gasket
Did you find this story helpful?
Thanks for voting and helping fellow customers!
Burned oil and blew Blue Smoke
James - August 29, 2021
Tool Type
Lawn Mower
Difficulty
Medium
Time
More than 2 hours
Tools Used
Socket set
Removed and replaced top accessories.
Did you find this story helpful?
Thanks for voting and helping fellow customers!
rings worn -valve tappets needed adjusting
Samuel - July 1, 2021
Tool Type
Lawn Mower
Difficulty
Expert
Time
1-2 hours
Tools Used
Power Drill, Socket set, Wrench Set, Nutdriver, cyliinder hone-ring compressor-feeler guages
overhauled engine-rebuilt carb-ground valves-reset coil air gap
Did you find this story helpful?
Thanks for voting and helping fellow customers!
Lawn mower leaked oil from bottom seal
Earl - November 25, 2020
Tool Type
Lawn Mower
Difficulty
Medium
Time
More than 2 hours
Tools Used
Screwdriver, Pliers, Socket set, Wrench Set, Nutdriver
Parts Used
I had engine off of mower. I removed old seal and replaced with new seal. Then I put lawn mower parts back together. I also replaced two front drive wheels.
Did you find this story helpful?
Thanks for voting and helping fellow customers!
Load More Install Stories
OEM stands for Original Equipment Manufacturer and means the part you’re buying is sourced directly from the manufacturer who made your product. At eReplacementParts, we sell only genuine OEM parts, guaranteeing the part you’re purchasing is of better design and of higher quality than aftermarket parts.
Our product descriptions are a combination of data sourced directly from the manufacturers who made your product as well as content researched and curated by our content & customer service teams. This content is edited and reviewed internally before being made public to customers.
Our customer service team are at the ready daily to answer your part and product questions. We have a dedicated staff with decades of collective experience in helping customers just like you purchase parts to repair their products.
All our part reviews are solicited directly from other customers who have purchased this exact part. While we moderate these reviews for profanity, offensive language or personally identifiable information, these reviews are posted exactly as submitted and no alterations are made by our team.
All our customer repair instructions are solicited directly from other customers just like you who have purchased and replaced this exact part. While we moderate these reviews for profanity, offensive language or personally identifiable information, these reviews are posted exactly as submitted and no alterations are made by our team.
Based on data from past customer purchasing behaviors, these parts are most commonly purchased together along with the part you are viewing. These parts may be necessary or helpful to replace to complete your current repair.
All our installation videos are created and produced in collaboration with our in-house repair technician, Mark Sodja, who has helped millions of eReplacementParts customers over the last 13 years repair their products. Mark has years of experience in selling and repairing both commercial and residential products with a specialty in gas-powered equipment.
This data is collected from customers who submitted a repair instruction after replacing this exact part. Customers can rate how easy the repair was to complete and how long it took. We aggregate this data to provide a repair rating that allows customers to quickly determine the difficulty and time needed to perform their own repair.