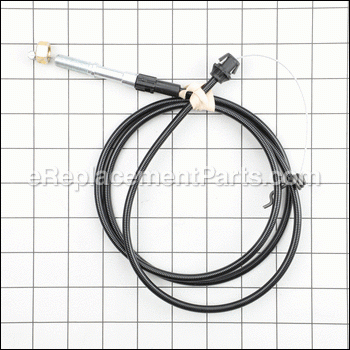
This is an OEM part sourced directly from the manufacturer. The control cable is commonly found in Craftsman lawn mowers. This part is a metal cable with a flexible plastic casing, and is used to connect the controls on the handle bar with the machine. You may require a screwdriver when replacing this item. The control cable is provided as an individual replacement part.
Drive Cable 532431650
OEM part for: Craftsman, Husqvarna
Part Number: 532431650
Jump To:
Frequently Purchased Together ?
Compatibility
This Drive Cable will fit the following 59 machines. Confirm this part works with your model, and view the detailed model diagrams and repair help we have to offer.
Displaying 20 of 59 matching models.
59 total model matches. Try the above search to narrow your results.
This is the official OEM part for the following brands:
- Craftsman
- Husqvarna
This item works with the following types of products:
- Lawn Mower
This part replaces obsolete part #: 431650
Customer Part Reviews ?
- 1
Questions & Answers ?
Our customer Service team is at the ready daily to answer your part and product questions.

Ask our Team
We have a dedicated staff with decades of collective experience in helping customers just like you purchase parts to repair their products.
Does this fit my product?Questions & Answers for Drive Cable
Customer Repair Instructions ?
All our customer repair instructions are solicited directly from other customers just like you who have purchased and replaced this exact part.
Self propel no longer worked.
Tool Type
Lawn Mower
Difficulty
Medium
Time
15-30 minutes
Tools Used
Screwdriver, Pliers
Parts Used
Adjust speed and sensitivity at adjuster nut.
Rear wheel drive cable broken
Tool Type
Lawn Mower
Difficulty
Easy
Time
30-60 minutes
Tools Used
Screwdriver, Pliers, Nutdriver
Parts Used
Cable broke at the control box
Tool Type
Lawn Mower
Difficulty
Easy
Time
Less than 15 minutes
Tools Used
Screwdriver
Parts Used
Lawn Mower drive control broken
Tool Type
Lawn Mower
Difficulty
Hard
Time
1-2 hours
Tools Used
Screwdriver, Pliers, Socket set
Parts Used
2. Power wash mower
3. Remove the battery
4. Remove the battery box (13mm socket)
5.Turn mower on side ( Ref. #1 above)
6. Secure mower to prevent movement (my preference: ratchet straps and hydraulic lift table)
7. Remove 2 each 8mm bolts from top of mower deck (one was under the battery box). The bolts hold the guard for the drive belt.
8. Remove the mower blade (14 mm socket)
9. Remove 1 each, 13mm bolt holding the guard for the drive belt.
10. Un-hook the remains of the old drive cable, needle nose pliers are handy.
11. Squeeze with pliers and pop the cable mount through the top of mower deck from the under side.
12. Use a torque screwdriver to remove the drive control handle mount. CAUTION: the control handle is spring loaded.
13. Carefully remove the old cable
14. Run new cable along the mounts built into the mower handle.
15. Carefully install the new cable
16. Bolt the hand control back on the mower handle.
NOTE: I put a spacer over the spring for the hand control. This enabled the cable about 1/4 inch more distance away from the drive belt. The Control Cable,
Part #: 532431650 fit perfect. It would have been nice if the if control cable could have been designed to be further away from the drive belt. If it breaks again, I will fix that.
16. Put everything back together
17. Warning! Let the mower set on it's wheels for several hours to let oil settle into the crankcase. You could damage your engine by attempting to start it too soon. Overall, this would have been a simple fix but I was trying to figure out how I could prevent it from happening again. Also, it is important to keep your drive cable adjusted properly.
OEM stands for Original Equipment Manufacturer and means the part you’re buying is sourced directly from the manufacturer who made your product. At eReplacementParts, we sell only genuine OEM parts, guaranteeing the part you’re purchasing is of better design and of higher quality than aftermarket parts.
Learn MoreOur product descriptions are a combination of data sourced directly from the manufacturers who made your product as well as content researched and curated by our content & customer service teams. This content is edited and reviewed internally before being made public to customers.
Our customer service team are at the ready daily to answer your part and product questions. We have a dedicated staff with decades of collective experience in helping customers just like you purchase parts to repair their products.
All our part reviews are solicited directly from other customers who have purchased this exact part. While we moderate these reviews for profanity, offensive language or personally identifiable information, these reviews are posted exactly as submitted and no alterations are made by our team.
All our customer repair instructions are solicited directly from other customers just like you who have purchased and replaced this exact part. While we moderate these reviews for profanity, offensive language or personally identifiable information, these reviews are posted exactly as submitted and no alterations are made by our team.
Based on data from past customer purchasing behaviors, these parts are most commonly purchased together along with the part you are viewing. These parts may be necessary or helpful to replace to complete your current repair.
All our installation videos are created and produced in collaboration with our in-house repair technician, Mark Sodja, who has helped millions of eReplacementParts customers over the last 13 years repair their products. Mark has years of experience in selling and repairing both commercial and residential products with a specialty in gas-powered equipment.
This data is collected from customers who submitted a repair instruction after replacing this exact part. Customers can rate how easy the repair was to complete and how long it took. We aggregate this data to provide a repair rating that allows customers to quickly determine the difficulty and time needed to perform their own repair.


