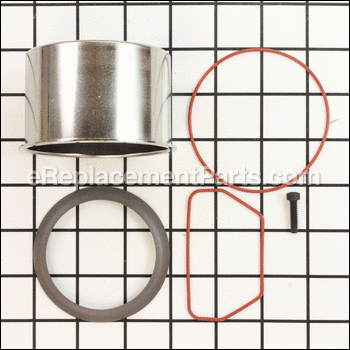
This is a Genuine OEM replacement part designed for use with Air Compressors. This kit includes parts commonly responsible for low compression, including the piston and compression ring. Please note that this kit does not include the valve plate, head gaskets, or any other compressor parts.
Replacing this kit you would need a Screwdriver and a Wrench.
Connecting Rod And Piston Asse N038785
OEM part for: DeWALT, Black and Decker, Bostitch
Part Number: N038785
7 - 12 business days
Jump To:
Product Description ?
- Includes cylinder tube, valve plate o-rings and a complete piston including the Bearing.
- Classification: Part
- Weight: 1.05 lbs.
- Shipping: Ships Worldwide
Frequently Purchased Together ?
Compatibility
This Connecting Rod And Piston Asse will fit the following 56 machines. Confirm this part works with your model, and view the detailed model diagrams and repair help we have to offer.
Displaying 20 of 56 matching models.
56 total model matches. Try the above search to narrow your results.
This is the official OEM part for the following brands:
- Black and Decker
- Bostitch
- DeWALT
This item works with the following types of products:
- Compressor
This part replaces obsolete part #: N021229, A17572
Customer Part Reviews ?
- 1
Questions & Answers ?
Our customer Service team is at the ready daily to answer your part and product questions.

Ask our Team
We have a dedicated staff with decades of collective experience in helping customers just like you purchase parts to repair their products.
Does this fit my product?Questions & Answers for Connecting Rod And Piston Asse
Customer Repair Instructions ?
All our customer repair instructions are solicited directly from other customers just like you who have purchased and replaced this exact part.
Piston and rings wore out
Tool Type
Compressor
Difficulty
Easy
Time
15-30 minutes
Tools Used
Screwdriver, Wrench Set, Adjustable Wrench
Parts Used
Piston and cylinder worn out.
Tool Type
Compressor
Difficulty
Medium
Time
30-60 minutes
Tools Used
Screwdriver, Power Drill, Socket set, Adjustable Wrench
2. Remove the lines.
3. Remove the head and the reed valves.
4. Remove the piston and the cylinder.
5. Install the new piston and cylinder.
6. Install the new gaskets.
7. Install the new air filter.
8. Install the lines.
9. Install the covers.
10. Start and run, check pressures, operating and tank.
Compressor wouldn't build pressure
Tool Type
Compressor
Difficulty
Medium
Time
15-30 minutes
Tools Used
Screwdriver, Socket set, Wrench Set
Parts Used
Not building air pressure
Tool Type
Compressor
Difficulty
Easy
Time
15-30 minutes
Tools Used
Wrench Set, Ratchet & torque wrench
Parts Used
Connecting rod and Bolt holding the flywheel, both broke
Tool Type
Compressor
Difficulty
Easy
Time
30-60 minutes
Tools Used
Screwdriver, Socket set, Adjustable Wrench, Torque wrench & torque screwdriver
from housing (not damaged).
2. Removed the piping from the compressor head to the tank. Removed the compressor head.
3. Removed the broken connecting rod, piston and cylinder sleeve from the compressor body.
Removed the broken bolt that secures the flywheel to the compressor housing.
4. Removed the screw that attaches the connecting rod to the flywheel (reused screw).
5. Attached flywheel to housing with new bolt and torqued to 100 ft-lbs.
6. Installed new cylinder sleeve, piston, and connecting rod and replaced the compressor head.
7. Connected the new connecting rod to the flywheel boss and installed the reused screw.
8. Torqued all bolts to required specs.
9. Installed the piping that was removed and replaced the rubber belt. Installed the plastic
covers.
10. Connected power and test ran. RUNS LIKE NEW.
Broken Rod
Tool Type
Compressor
Difficulty
Easy
Time
30-60 minutes
Tools Used
Screwdriver, Socket set, Wrench Set
removed flywheel screw (bent)
installed screw
installed piston and rod
installed head
Air compressor wouldn’t fill with air.
Tool Type
Compressor
Difficulty
Easy
Time
15-30 minutes
Tools Used
Socket set, Wrench Set, Allen wrenches
The old unit had a worn out compression ring. New one was most exce
Tool Type
Compressor
Difficulty
Easy
Time
30-60 minutes
Tools Used
Socket set, Wrench Set, Torque wrench
Parts Used
Started compressor when it was too cold ((5F)…blew the piston ring and subsequently blew sleeve and valve plate as well…
Tool Type
Compressor
Difficulty
Easy
Time
15-30 minutes
Tools Used
Pliers, Socket set, Wrench Set, Torque wrench
compressor would not compress air into the tank
Tool Type
Compressor
Difficulty
Easy
Time
Less than 15 minutes
Tools Used
Screwdriver, Socket set, Nutdriver, Adjustable Wrench, Torque Wrench
Loosened nut holding the Connecting Rod and Piston Assembly and removed assembly.
Removed Valve Plate Assembly and inspected parts for damage.
Installed in reverse order Connecting Rod and Piston Assembly.
Torqued the nut holding the Connecting Rod and Piston Assembly.
Replaced all O-rings and bolted Valve Plate Assembly back together.
Torqued all 4 nuts holding the Valve Plate Assembly
Replaced plastic cover over the compressor motor and tightened all screws.
Done
The compressor works great again :)
OEM stands for Original Equipment Manufacturer and means the part you’re buying is sourced directly from the manufacturer who made your product. At eReplacementParts, we sell only genuine OEM parts, guaranteeing the part you’re purchasing is of better design and of higher quality than aftermarket parts.
Learn MoreOur product descriptions are a combination of data sourced directly from the manufacturers who made your product as well as content researched and curated by our content & customer service teams. This content is edited and reviewed internally before being made public to customers.
Our customer service team are at the ready daily to answer your part and product questions. We have a dedicated staff with decades of collective experience in helping customers just like you purchase parts to repair their products.
All our part reviews are solicited directly from other customers who have purchased this exact part. While we moderate these reviews for profanity, offensive language or personally identifiable information, these reviews are posted exactly as submitted and no alterations are made by our team.
All our customer repair instructions are solicited directly from other customers just like you who have purchased and replaced this exact part. While we moderate these reviews for profanity, offensive language or personally identifiable information, these reviews are posted exactly as submitted and no alterations are made by our team.
Based on data from past customer purchasing behaviors, these parts are most commonly purchased together along with the part you are viewing. These parts may be necessary or helpful to replace to complete your current repair.
All our installation videos are created and produced in collaboration with our in-house repair technician, Mark Sodja, who has helped millions of eReplacementParts customers over the last 13 years repair their products. Mark has years of experience in selling and repairing both commercial and residential products with a specialty in gas-powered equipment.
This data is collected from customers who submitted a repair instruction after replacing this exact part. Customers can rate how easy the repair was to complete and how long it took. We aggregate this data to provide a repair rating that allows customers to quickly determine the difficulty and time needed to perform their own repair.


