

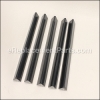
This genuine manufacturer sourced replacement burner tube set is designed for use with Weber gas grills. Burners are connected to the control valves and it is where the flames would rise from. These burners are made out of stainless steel and this set includes three (3) burner tubes, one (1) carry over tube and the hardware used to secure the burners.
You would need a wrench to complete this repair
• First make sure gas tank is disconnected
• Remove screws securing the old burners
• Disconnect old burners from control valves and replace them with a new burners
• Secure burners using the included hardware and
• Secure the carryover tube
• Connect the gas tank and test the burners
Burner Tube Kit 67722
OEM part for: Weber
Part Number: 67722
$79.82
In Stock
Jump To:
Product Description ?
- Burner Tubes 34-1/4 Inches long
- Crossover Tube is 12-3/4 Inches long
- Classification: Part
- Weight: 3.90 lbs.
- Shipping: Ships Worldwide
Frequently Purchased Together ?

Compatibility
This Burner Tube Kit will fit the following 182 machines. Confirm this part works with your model, and view the detailed model diagrams and repair help we have to offer.
This item works with the following types of products:
Repair Videos ?

Articles:
|
Having trouble getting your grill to light up? A common cause of this issue is a defective ignition switch. We'll sho...
November 08, 2012
|

Customer Part Reviews ?
Average Rating (out of 5):
Click to filter by ratings:
5 stars
1
4 stars
0
3 stars
0
2 stars
0
1 stars
0
< PREV
- 1
As Promised
Arrived quickly in great condition! TY!
Guest -
June 12, 2020
Verified Purchase
Questions & Answers ?
Our customer Service team is at the ready daily to answer your part and product questions.

Ask our Team
We have a dedicated staff with decades of collective experience in helping customers just like you purchase parts to repair their products.
Does this fit my product?Questions & Answers for Burner Tube Kit
No questions have been asked yet
Customer Repair Instructions ?
All our customer repair instructions are solicited directly from other customers just like you who have purchased and replaced this exact part.
Burners needed replaced
Gregory - April 11, 2016
👍 6 of 6 people found this instruction helpful
Tool Type
Outdoor Grill
Difficulty
Medium
Time
15-30 minutes
Tools Used
Screwdriver, Socket set, Pry bar
Parts Used
Helpful hint burners slide under washers at furthest end from gas knobs. Spray with a lubricating spray. A little prying at the end of the old burners was needed to remove them. No need to try to remove the screws holding the washers in place. Otherwise the instructions that came with the burner were pretty good.
Did you find this story helpful?
Thanks for voting and helping fellow customers!
Middle burner wouldn't ignite at the same as time as the front burner
Dan - February 6, 2016
👍 6 of 8 people found this instruction helpful
Tool Type
Outdoor Grill
Difficulty
Easy
Time
Less than 15 minutes
Tools Used
Socket set, Wrench Set
Parts Used
Went on you tube and followed directions given on there. no need to remove side assembly. Only part that didn't go as planned, I had to put WD-40 on the front burner screw to loosen it, no biggie. Works like a champ.
Did you find this story helpful?
Thanks for voting and helping fellow customers!
Burners rusted out
Glenn - March 30, 2020
👍 1 of 1 people found this instruction helpful
Tool Type
Outdoor Grill
Difficulty
Medium
Time
1-2 hours
Tools Used
Screwdriver, Pliers, Power Drill, Socket set, Grinder with cut-off wheels
Parts Used
Removed old burners. Rusted out bolt heads were cut off and drilled out. New stainless self tapping screws were then used to secure the ends of the burners. This would have been a 15 minute repair but for the severly rusted screw heads.
Did you find this story helpful?
Thanks for voting and helping fellow customers!
burners were not burning evenly
david - July 15, 2019
👍 1 of 1 people found this instruction helpful
Tool Type
Outdoor Grill
Difficulty
Medium
Time
30-60 minutes
Tools Used
Screwdriver, Pliers, Socket set, Nutdriver
Parts Used
took out old burners and replaced with new. followed the instructions
Did you find this story helpful?
Thanks for voting and helping fellow customers!
burners needed replacement
CHUCK - June 5, 2019
👍 1 of 1 people found this instruction helpful
Tool Type
Outdoor Grill
Difficulty
Medium
Time
15-30 minutes
Tools Used
Screwdriver, Socket set
Parts Used
disassembled grill and replaced burners
Did you find this story helpful?
Thanks for voting and helping fellow customers!
The burner tube was corroded after 11 years of use.
Teufik - May 26, 2019
👍 1 of 1 people found this instruction helpful
Tool Type
Outdoor Grill
Difficulty
Medium
Time
15-30 minutes
Tools Used
Pliers, Socket set
Parts Used
I removed the old one relatively easy,and the new one was very easy to install,I have a brand new grill.
Thanks.
Thanks.
Did you find this story helpful?
Thanks for voting and helping fellow customers!
Burner tubes and igniter both disintegrates
Ken - April 15, 2019
👍 1 of 1 people found this instruction helpful
Tool Type
Outdoor Grill
Difficulty
Easy
Time
30-60 minutes
Tools Used
Screwdriver, Wrench Set
Parts Used
Followed the excellent instructions sheets that accompanied the replacement parts. Very easy to follow.
Did you find this story helpful?
Thanks for voting and helping fellow customers!
The ignitor ceramic would not attach to the burner tubes with the gas shroud, had to reuse old ceramic to new control unit. Burner tubes do not come with the screw to secure the terminal ends.
Matt - April 2, 2019
👍 1 of 1 people found this instruction helpful
Tool Type
Outdoor Grill
Difficulty
Easy
Time
Less than 15 minutes
Tools Used
Nutdriver, vise grips
Remove all gratings, flavorizer bars, bottom pan and drip pan. Clean those and set aside. Clean inside the main body of the grill, especially around the 3 hex head / standard slotted screws holding in burner bars. Hit those with penetrating oil and let soak a little while. If you can get them out with a nut driver congratulations. I had to use vice grips on 2 of them. Remove the igniter ceramic from the front left burner tube by pull towards igniter button. Unscrew the igniter push button top. Compress the plastic tabs that hold the control unit in place and lower from hole.
Gently lift the left end of the burner tube and work them off the gas distribution manifold under the control knobs. Insert the middle burn bar and work onto manifold. Do not fasten yet. Repeat on rear bar. Insert cross over tube in hole on rear tube. Place front burner bar through hole to manifold and insert cross over tube in hole on other end. Gently work the tube into manifold and don't pull cross over tube out of either burner tube. Once all tubes are back in place, secure with the 3 screws on the left ends. Note that the hardware that comes with the tubes is for the manifold end and I did not use these. I wish the tubes came with these 3 screws. Slide the igniter into the ears on the front burner tube until it stops. Secure wire with the plastic clips to the manifold. Push new igniter control box into position until tabs lock, then connect the wires from the igniter. Install the AAA battery (not that it only works when battery is installed correctly). Screw on button. Reinstall the bottom pans, flavorizer bars and grates.
Gently lift the left end of the burner tube and work them off the gas distribution manifold under the control knobs. Insert the middle burn bar and work onto manifold. Do not fasten yet. Repeat on rear bar. Insert cross over tube in hole on rear tube. Place front burner bar through hole to manifold and insert cross over tube in hole on other end. Gently work the tube into manifold and don't pull cross over tube out of either burner tube. Once all tubes are back in place, secure with the 3 screws on the left ends. Note that the hardware that comes with the tubes is for the manifold end and I did not use these. I wish the tubes came with these 3 screws. Slide the igniter into the ears on the front burner tube until it stops. Secure wire with the plastic clips to the manifold. Push new igniter control box into position until tabs lock, then connect the wires from the igniter. Install the AAA battery (not that it only works when battery is installed correctly). Screw on button. Reinstall the bottom pans, flavorizer bars and grates.
Did you find this story helpful?
Thanks for voting and helping fellow customers!
Gas valves didnt work and tubes were rusted out.
William - March 4, 2019
👍 1 of 1 people found this instruction helpful
Tool Type
Outdoor Grill
Difficulty
Easy
Time
15-30 minutes
Tools Used
Screwdriver
Parts Used
Easy self explanatory
Did you find this story helpful?
Thanks for voting and helping fellow customers!
The Crossover tube was corroded
Deborah - August 19, 2018
👍 1 of 1 people found this instruction helpful
Tool Type
Outdoor Grill
Difficulty
Easy
Time
15-30 minutes
Tools Used
1. Cleaned cooking grates and removed and placed on newspaper.
2. Disconnected igniter electrode
3. Removed old Burner tubes
4. I did not need to take out old screws or bolts
5. Slide rear burner tube in first, then middle one( this one has the fitting for the crossover tube and then lastly slide the front burner tube in. Connect the ignitor electrode first before sliding all the way through.
6. Check to see that all burners light before replacing flavorizer bars.
7. Very easy to repair. Grill is like new.
Did you find this story helpful?
Thanks for voting and helping fellow customers!
Load More Install Stories
OEM stands for Original Equipment Manufacturer and means the part you’re buying is sourced directly from the manufacturer who made your product. At eReplacementParts, we sell only genuine OEM parts, guaranteeing the part you’re purchasing is of better design and of higher quality than aftermarket parts.
Our product descriptions are a combination of data sourced directly from the manufacturers who made your product as well as content researched and curated by our content & customer service teams. This content is edited and reviewed internally before being made public to customers.
Our customer service team are at the ready daily to answer your part and product questions. We have a dedicated staff with decades of collective experience in helping customers just like you purchase parts to repair their products.
All our part reviews are solicited directly from other customers who have purchased this exact part. While we moderate these reviews for profanity, offensive language or personally identifiable information, these reviews are posted exactly as submitted and no alterations are made by our team.
All our customer repair instructions are solicited directly from other customers just like you who have purchased and replaced this exact part. While we moderate these reviews for profanity, offensive language or personally identifiable information, these reviews are posted exactly as submitted and no alterations are made by our team.
Based on data from past customer purchasing behaviors, these parts are most commonly purchased together along with the part you are viewing. These parts may be necessary or helpful to replace to complete your current repair.
All our installation videos are created and produced in collaboration with our in-house repair technician, Mark Sodja, who has helped millions of eReplacementParts customers over the last 13 years repair their products. Mark has years of experience in selling and repairing both commercial and residential products with a specialty in gas-powered equipment.
This data is collected from customers who submitted a repair instruction after replacing this exact part. Customers can rate how easy the repair was to complete and how long it took. We aggregate this data to provide a repair rating that allows customers to quickly determine the difficulty and time needed to perform their own repair.