


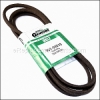
This is an OEM part sourced directly from the manufacturer. The belt is commonly found in MTD lawn mowers. This part is made of high-quality rubber, and is used to transfer motion from the engine to the pulleys, causing the mower blades to spin. Over time, it may become brittle or cracked and require replacement. You will need a wrench when replacing this part. This item is sold individually.
Belt-v Trans Drv 954-04207
OEM part for: MTD, Troy-Bilt, Cub Cadet
Part Number: 954-04207
$41.51
In Stock
Jump To:
Frequently Purchased Together ?
Compatibility
This Belt-v Trans Drv will fit the following 70 machines. Confirm this part works with your model, and view the detailed model diagrams and repair help we have to offer.
This item works with the following types of products:
- Lawn Mower Parts
- Lawn Tractor Parts
Customer Part Reviews ?
Average Rating (out of 5):
Click to filter by ratings:
5 stars
1
4 stars
0
3 stars
0
2 stars
0
1 stars
0
< PREV
- 1
belt replacement
the belt fit perfectly and my tractor works fine thanks for the quick service
Gary -
November 18, 2019
Verified Purchase
Questions & Answers ?
Our customer Service team is at the ready daily to answer your part and product questions.

Ask our Team
We have a dedicated staff with decades of collective experience in helping customers just like you purchase parts to repair their products.
Does this fit my product?Questions & Answers for Belt-v Trans Drv
what are the dimension of the belt
William
for model number 13WQ91AP056
asked on 2023-11-15
Hello William, Thank you for contacting us. This Belt is 79-1/2-Inch by-1/2-inch. We hope this helps!
eReplacementParts Team November 15, 2023
Customer Repair Instructions ?
All our customer repair instructions are solicited directly from other customers just like you who have purchased and replaced this exact part.
Transmission belt broke
Lee - September 11, 2023
Tool Type
Lawn Tractor
Difficulty
Hard
Time
30-60 minutes
Tools Used
Screwdriver, Socket set, Wrench Set
Parts Used
1) removed mower deck
2) unbolted motor
3) replaced belt
4) replaced all
2) unbolted motor
3) replaced belt
4) replaced all
Did you find this story helpful?
Thanks for voting and helping fellow customers!
Belts replaced and deck engagement cable replacement broke.
Mike - May 26, 2023
Tool Type
Lawn Tractor
Difficulty
Medium
Time
More than 2 hours
Tools Used
Screwdriver, Pliers, Power Drill, Socket set, Nutdriver, Impact driver impact socket
Removed belts put new ones on replaced deck engagement cable on riding lawnmower 2246 Troy bolt 2011 model use floor jack impact driver take deck off to get to transmission motor belt take your time to make sure everything goes back on right. thanks for the belts and cable all done runs real nice. Need impact driver for pulley on engine crank shaft to take off.
Did you find this story helpful?
Thanks for voting and helping fellow customers!
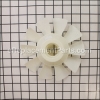
A stick forced the drive belt off which broke the fan
John - April 24, 2019
👍 1 of 3 people found this instruction helpful
Tool Type
Lawn Tractor
Difficulty
Medium
Time
30-60 minutes
Tools Used
Screwdriver, Socket set, Wrench Set, Nutdriver, Impact wrench
1. Removed mower deck, battery and battery box
2. Lifted front end of mower with mower jack.
3. Used impact wrench to loosen blade clutch bolt.
4. Unplugged clutch and lowered clutch after removing clutch bolt. Collect washers separating clutch from drive pulley.
5. Used screwdriver to slide down drive pulley and remove belt.
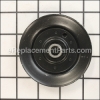
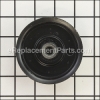
6. Used impact wrench to remove nut holding fan base and transmission drive pulley. (Note: to keep pulley from spinning I cut the old belt and fed one end around the pulley until it started wrapping under itself which bound up the pulley).
7. Route the new belt from front to back, lift transmission pulley and wrap new belt around it pushing it back into place so metal ears keep it from slipping off.
8. Route belt around idler pulleys, work belt onto Drive pulley and push it up into housing like I did on the rear pulley. Pull the spring loaded idler pulley to position the belt that is now under tension.
9. Replace the washers separating the pulley and clutch and slide on clutch with key way in slot. Hold in place while replacing the bolt. Tighten the bolt with impact wrench.
10. Reconnect clutch power cable.
11. Install fan, replace nut and tighten nut with impact wrench.
12. Reinstall battery box, battery and mower deck.
13. Double check to make sure you or I forgot anything.
2. Lifted front end of mower with mower jack.
3. Used impact wrench to loosen blade clutch bolt.
4. Unplugged clutch and lowered clutch after removing clutch bolt. Collect washers separating clutch from drive pulley.
5. Used screwdriver to slide down drive pulley and remove belt.
6. Used impact wrench to remove nut holding fan base and transmission drive pulley. (Note: to keep pulley from spinning I cut the old belt and fed one end around the pulley until it started wrapping under itself which bound up the pulley).
7. Route the new belt from front to back, lift transmission pulley and wrap new belt around it pushing it back into place so metal ears keep it from slipping off.
8. Route belt around idler pulleys, work belt onto Drive pulley and push it up into housing like I did on the rear pulley. Pull the spring loaded idler pulley to position the belt that is now under tension.
9. Replace the washers separating the pulley and clutch and slide on clutch with key way in slot. Hold in place while replacing the bolt. Tighten the bolt with impact wrench.
10. Reconnect clutch power cable.
11. Install fan, replace nut and tighten nut with impact wrench.
12. Reinstall battery box, battery and mower deck.
13. Double check to make sure you or I forgot anything.
Did you find this story helpful?
Thanks for voting and helping fellow customers!
OEM stands for Original Equipment Manufacturer and means the part you’re buying is sourced directly from the manufacturer who made your product. At eReplacementParts, we sell only genuine OEM parts, guaranteeing the part you’re purchasing is of better design and of higher quality than aftermarket parts.
Our product descriptions are a combination of data sourced directly from the manufacturers who made your product as well as content researched and curated by our content & customer service teams. This content is edited and reviewed internally before being made public to customers.
Our customer service team are at the ready daily to answer your part and product questions. We have a dedicated staff with decades of collective experience in helping customers just like you purchase parts to repair their products.
All our part reviews are solicited directly from other customers who have purchased this exact part. While we moderate these reviews for profanity, offensive language or personally identifiable information, these reviews are posted exactly as submitted and no alterations are made by our team.
All our customer repair instructions are solicited directly from other customers just like you who have purchased and replaced this exact part. While we moderate these reviews for profanity, offensive language or personally identifiable information, these reviews are posted exactly as submitted and no alterations are made by our team.
Based on data from past customer purchasing behaviors, these parts are most commonly purchased together along with the part you are viewing. These parts may be necessary or helpful to replace to complete your current repair.
All our installation videos are created and produced in collaboration with our in-house repair technician, Mark Sodja, who has helped millions of eReplacementParts customers over the last 13 years repair their products. Mark has years of experience in selling and repairing both commercial and residential products with a specialty in gas-powered equipment.
This data is collected from customers who submitted a repair instruction after replacing this exact part. Customers can rate how easy the repair was to complete and how long it took. We aggregate this data to provide a repair rating that allows customers to quickly determine the difficulty and time needed to perform their own repair.