


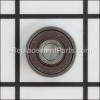
This is an authentic manufacturer approved replacement item. It is commonly used on Milwaukee angle grinders. This sealed metal bearing helps to secure armature while allowing it to spin freely. Includes one (1) bearing per order.
To complete this repair you would need a screwdriver and pliers.
• Remove the side handle
• Remove the guard
• Remove the handle
• Separate the grinder
• Disengage the brushes
• Remove the fan
• Remove the gear case
• Remove the armature
• Remove the pinion gear
• Remove the front bearing
• Install the new bearing
• Reassemble unit and test it
Ball Bearing 02-04-0620
OEM part for: Milwaukee
Part Number: 02-04-0620
$4.99
In Stock
Jump To:
Product Description ?
- Classification: Part
- Weight: 0.01 lbs.
- Shipping: Ships Worldwide
Frequently Purchased Together ?


Compatibility
This Ball Bearing will fit the following 138 machines. Confirm this part works with your model, and view the detailed model diagrams and repair help we have to offer.
Milwaukee
Show More Compatible ModelsThis item works with the following types of products:
- Grinder Parts
Repair Videos ?
Watch the Repair Video for
Ball Bearing

Customer Part Reviews ?
Average Rating (out of 5):
Click to filter by ratings:
5 stars
2
4 stars
0
3 stars
0
2 stars
0
1 stars
0
< PREV
- 1
Easy enough repair ome part fits neatly happy!
Milwaukee grinder: Each bearing came in it's own small package nice.
Fixed! Working smooth again.
The whole process was smooth, arrived in about 2 weeks (international shipping
Thanks replacement parts
Will order again if I need anything and it's cost effective for me ship international.
iGlobal -
November 7, 2023
Verified Purchase
Right Part. Quick Ship
Great that eReplacement Parts carried this bearing. Schematic was accurate and part was an exact match. For less than $10 I was able to fix my $100 grinder. Good to save the money and a tool that has worked well for me for longer than I remember.
Guest -
October 16, 2020
Verified Purchase
Questions & Answers ?
Our customer Service team is at the ready daily to answer your part and product questions.

Ask our Team
We have a dedicated staff with decades of collective experience in helping customers just like you purchase parts to repair their products.
Does this fit my product?Questions & Answers for Ball Bearing
No questions have been asked yet
Customer Repair Instructions ?
All our customer repair instructions are solicited directly from other customers just like you who have purchased and replaced this exact part.
Bad ball bearings
Jimmy - June 1, 2023
Tool Type
Grinder
Difficulty
Easy
Time
Less than 15 minutes
Tools Used
Screwdriver, Pliers, Socket set
Parts Used
Just removed the grinder casing with a screwdriver. And it all came apart to replace the ball bearing.
Did you find this story helpful?
Thanks for voting and helping fellow customers!
Bearing wore out
MICHAEL - October 16, 2020
Tool Type
Grinder
Difficulty
Medium
Time
30-60 minutes
Tools Used
Screwdriver, Wrench Set, Gear puller, torx bit
Parts Used
As with most things these days you have to have the right tool.
Not much to the repair if you have a set of Torx bits and a gear puller. You can get away without the puller but you risk damaging other parts as you remove the old bearing.
To repair, remove the head by taking out the 4 Torx screws. Remove nut on end of armature along with gear and washer. Put small puller on armature and remove whats left of your bearing... Get rid of any stray pieces in the head. Place new bearing on armature and push into place. Put washer and gear back then tighten nut to seat bearing. Put head back on and you're done.
Probably the trickiest part is if you pull out the entire armature as I did to check the second bearing and then have to compress the springs that hold the brushes in place. You don't want to crack either of them and it's a very tight space.
This was the first time I've needed to repair my Milwaukee grinder and it took probably 40 minutes. The next time it will take 10.
Did you find this story helpful?
Thanks for voting and helping fellow customers!
Armature bearings had failed.
John - May 10, 2018
Tool Type
Grinder
Difficulty
Medium
Time
30-60 minutes
Tools Used
, Torx driver
1) Removed the side cover screws and split the two halves.
2) Unscrewed the 4 head screws to remove head.
3) Unscrewed armature bolt to remove drive gear and release armature.
4) Replaced armature bearings.
5) Put armature back in head, install drive gear and retaining nut and grease gears.
6) Screw down head plate.
7) Replaced brushes and then refit side covers.
Then tested.
Did you find this story helpful?
Thanks for voting and helping fellow customers!
OEM stands for Original Equipment Manufacturer and means the part you’re buying is sourced directly from the manufacturer who made your product. At eReplacementParts, we sell only genuine OEM parts, guaranteeing the part you’re purchasing is of better design and of higher quality than aftermarket parts.
Our product descriptions are a combination of data sourced directly from the manufacturers who made your product as well as content researched and curated by our content & customer service teams. This content is edited and reviewed internally before being made public to customers.
Our customer service team are at the ready daily to answer your part and product questions. We have a dedicated staff with decades of collective experience in helping customers just like you purchase parts to repair their products.
All our part reviews are solicited directly from other customers who have purchased this exact part. While we moderate these reviews for profanity, offensive language or personally identifiable information, these reviews are posted exactly as submitted and no alterations are made by our team.
All our customer repair instructions are solicited directly from other customers just like you who have purchased and replaced this exact part. While we moderate these reviews for profanity, offensive language or personally identifiable information, these reviews are posted exactly as submitted and no alterations are made by our team.
Based on data from past customer purchasing behaviors, these parts are most commonly purchased together along with the part you are viewing. These parts may be necessary or helpful to replace to complete your current repair.
All our installation videos are created and produced in collaboration with our in-house repair technician, Mark Sodja, who has helped millions of eReplacementParts customers over the last 13 years repair their products. Mark has years of experience in selling and repairing both commercial and residential products with a specialty in gas-powered equipment.
This data is collected from customers who submitted a repair instruction after replacing this exact part. Customers can rate how easy the repair was to complete and how long it took. We aggregate this data to provide a repair rating that allows customers to quickly determine the difficulty and time needed to perform their own repair.