


Video
Tools & Materials
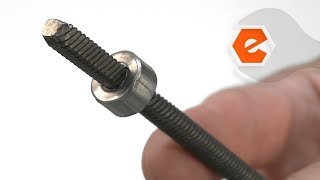
The lower flexible drive shaft transfers power from the engine unit to the trimmer attachment. The ends on the cable are formed square and attach to the fittings in both the coupler and the gear box. The most common problem with the drive shaft is wear to the square ends, which causes them to slip. If the tool is overloaded, the cable can be kinked.
Let's get started.
REMOVING THE LOWER FLEXIBLE DRIVE SHAFT 1. Remove the gear head.
a. Disconnect the trimmer attachment from the power unit.
b. Remove the anti-rotation screw from the gearbox.
c. Remove the two clamp screws from the gearbox.
d. Remove the gearbox (and trimmer head) from the lower boom assembly.
2. Remove the lower flexible drive shaft.
a. Pull the lower flexible drive shaft out of the lower boom assembly.
INSTALLING THE NEW LOWER FLEXIBLE DRIVE SHAFT
3. Install the lower flexible drive shaft.
a. Install the new lower flexible drive shaft (into the bottom of the boom assembly).
REASSEMBLING THE UNIT
4. Reinstall the gear head.
a. Install the gearbox (and trimmer head) onto the lower boom assembly.
b. Rotate the trimmer head (as necessary) to align the coupling (in the gearbox) with the squared end of the new drive shaft.
c. Install and tighten the anti-rotation screw.
d. Install and tighten the two clamping screws to secure the gear head.
5. Reinstall the trimmer attachment.
a. Connect and secure the trimmer attachment to the power unit.
