


Why Read This Article?
Finish Nailer Repair - Replacing the Driver Guide (Ridgid Part # 79004001022)
Article Breakdown
Finish Nailer Repair - Replacing the Driver Guide (Ridgid Part # 79004001022)
Video

Tools & Materials
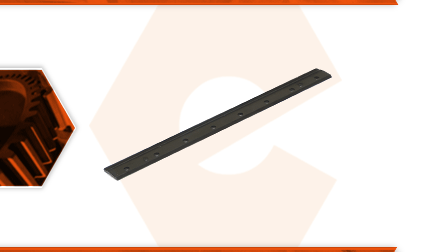
The blade clamp is a steel bar that is used to secure the planer knives to the cutter head. The clamp lays over the top of the knife and is secured to the cutter head by a series of screws. This clamps the knife to the cutter head. The most common issue with the blade clamp is damage caused by wood chips wedging between the knife and the clamp. Once a chip makes its way between the two, a gap is opened up and more chips will wedge their way in. This will bend the blade clamp.
Let's get started.
REMOVING THE BLADE CLAMP 1. Remove the dust hood.
a. Remove the (3) screws securing the dust hood to the tray.
b. Pivot the dust hood up and toward the planer to release the locking tabs.
c. Remove the dust hood from the unit.
2. Remove the tray.
a. Remove the two screws securing the tray to the back of the planer.
b. Remove the tray from the unit.
3. Lock the cutter head.
a. Carefully rotate the cutter head (toward the rear of the planer) until the locking clamp engages.
4. Remove the blade clamp.
a. Remove the (8) screws securing the blade clamp to the cutter head.
b. Use the magnetic end of the wrench (supplied with the planer) to remove the blade clamp from the cutter head.
c. It is not uncommon for the planer blade to adhere to the blade clamp or to disengage from the cutter head during removal of the blade clamp. The following steps include instructions for reinstalling the blade as well.
INSTALLING THE NEW BLADE CLAMP
5. Install the blade clamp.
a. If necessary, reinstall the planer blade onto the cutter head. To do this, align the two elongated holes on the planer blade with the alignment pins on the cutter head, and use the magnetic wrench to seat the blade onto the cutter head.
b. Install the new blade clamp onto the cutter head assembly (on top of the blade).
c. Secure the blade clamp with the (8) screws. It may be helpful to install the two outermost screws first, which will help keep the assembly aligned as the remainder of the screws are tightened.
REASSEMBLING THE UNIT
6. Reinstall the tray.
a. Install the tray onto the back of the planer.
b. Secure the tray with the two screws.
7. Reinstall the dust hood.
a. Install the dust hood onto the tray and align the retaining clips with the tray.
b. Pivot the dust hood (down) to engage the retaining clips.
c. Secure the dust hood with the (3) screws.
