


Why Read This Article?
Finish Nailer Repair - Replacing the Driver Guide (Ridgid Part # 79004001022)
Article Breakdown
Finish Nailer Repair - Replacing the Driver Guide (Ridgid Part # 79004001022)
Video

Tools & Materials
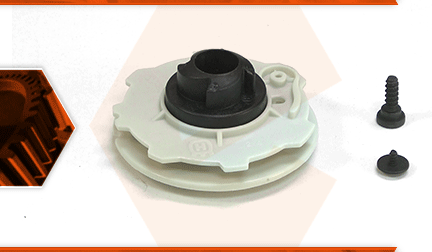
The starter kit is a rebuild kit for your chainsaw's starter. The kit consists of the starter pulley, the assist spring, the starter hub, and the screws for assembly. The most common problem solved by the starter kit is a worn starter hub. If the teeth wear off the hub, it will no longer catch the pawls on the flywheel to start the engine. The kit will also fix a worn or broken starter pulley.
Let's get started.
REMOVING THE STARTER KIT 1. Remove the starter assembly.
a. Remove the screws securing the starter to the saw.
b. Remove the starter assembly from the saw.
2. Remove the starter rope.
a. Slowly pull the starter rope all the way out of the starter assembly (until the pulley stops rotating).
b. Hold the pulley to prevent it from recoiling.
c. Remove the screw securing the starter rope to the starter pulley. d. Pull the starter rope out of the pulley.
e. Carefully allow the starter pulley to recoil (until the tension is discharged).
3. Disassemble the starter assembly.
a. Remove the screw securing the hub and pulley to the starter housing.
b. Remove the hub from the starter pulley.
c. Remove the soft-start spring from the starter pulley.
d. Carefully life the starter pulley out of the starter housing. (Do not allow the recoil spring to lift out of the starter assembly.)
INSTALLING THE NEW STARTER KIT
4. Install the starter kit.
a. Install the new starter pulley into the starter housing, aligning the opening on the bottom of the pulley with the knob on the recoil spring.
b. Install the new soft-start spring into the starter pulley.
c. Install the new hub onto the starter pulley, aligning the opening on the bottom of the hub with the vertical portion of the spring.
d. Secure the starter kit with the new screw (provided in the kit).
5. Reinstall the starter rope.
a. Maintain a firm grip on the starter pulley while rotating it in a clockwise direction. Be careful not to release the pulley during this step. Doing so can result in injuries to your fingertips.
b. Continue rotating the starter pulley in a clockwise direction until it cannot be rotated any further.
c. Once the spring is fully tensioned; rotate the pulley in a counter-clockwise direction until the opening on the pulley (for the starter rope) aligns with the eyelet in the starter housing. Do not release the pulley at this point.
d. Insert the starter rope through the starter housing (from the exterior), and through the opening in the starter pulley (from inside the pulley to the outside).
e. Loop the exposed portion of the starter rope around itself and tuck the loop into the slot on the starter pulley.
f. Secure the starter rope to the pulley with the new screw (provided in the kit).
g. Carefully allow the starter rope to recoil into the starter housing.
REASSEMBLING THE UNIT
6. Reinstall the starter assembly.
a. Install the starter assembly.
b. Pull the starter rope slightly (as necessary) to align the internal components.
c. Secure the starter assembly with the screws.
