


Video

Tools & Materials
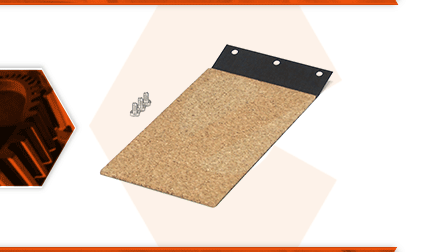
The shoe assembly consists of a steel shoe, a cork platen, and the screws used to fasten it to your sander. The shoe assembly is the platform that the sandpaper belt rubs against on the bottom of the sander. The shoe assembly will eventually wear down, because it is in constant contact with the sandpaper belt as it rotates at high speed. The shoe assembly is considered a normal-wear item that will need to be replaced periodically. The cork can also wear down from the shoe (which can lead to uneven sanding). The steel portion of the shoe can wear thin, and eventually break off.
Let's get started.
REMOVING THE SHOE 1. Remove the sandpaper belt.
a. Pivot the tensioning lever to loosen tension on the sandpaper belt.
b. Slide the sandpaper belt off the pulleys.
2. Remove the shoe.
a. Remove the screws securing the shoe to the sander.
b. Remove the shoe from the sander.
INSTALLING THE NEW SHOE
3. Install the shoe.
a. Install the new shoe assembly onto the base of the sander.
b. Align the mounting holes and install the screws.
c. Before tightening the screws, verify that the new shoe assembly is square with the base of the sander.
d. Tighten the screws to secure the new shoe to the sander.
REASSEMBLING THE UNIT
4. Reinstall the sandpaper belt.
a. Install the sandpaper belt.
b. Secure the sandpaper belt with the tensioning lever.
