


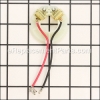
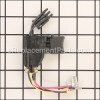
This genuine OEM sourced replacement part is designed for use with Makita drills/drivers. This item includes an armature, fan, armature bearing and commutator end bearing.
Due to constant contact with carbon brushes armature will eventually wear out and would need to be replaced. It is highly recommended to replace both carbon brushes when replacing an armature.
Remember to be especially careful of the armature fan when you remove it, because if you break it, you will have to replace the entire armature.
To replace this armature you would need a screwdriver.
Armature 619263-3
OEM part for: Makita
Part Number: 619263-3
$25.00
In Stock
Jump To:
Product Description ?
- Classification: Part
- Weight: 0.32 lbs.
- Shipping: Ships Worldwide
Frequently Purchased Together ?


Compatibility
This Armature will fit the following 22 machines. Confirm this part works with your model, and view the detailed model diagrams and repair help we have to offer.
Makita
Show More Compatible ModelsThis item works with the following types of products:
- Cordless Drill Parts
- Drill Parts
- Hammer Drill Parts
Repair Videos ?
Watch the Repair Video for
Armature

Articles:
|
Armature Hammered? Step-by-step instructions show you how to remove and install the armature on your Makita cordless dri...
April 12, 2016
|

Customer Part Reviews ?
Average Rating (out of 5):
Click to filter by ratings:
5 stars
5
4 stars
0
3 stars
0
2 stars
0
1 stars
0
< PREV
- 1
Easy to find and order OEM parts
I managed to burn up some components on my cordless drill, but was able to resurrect it with relative ease. Parts came in well packaged and fit without issue.
Guest -
April 30, 2024
Verified Purchase
Worked perfect
Evrething was perfect part and time, my drills working like new.
Daniel -
March 7, 2023
Verified Purchase
Fit right in
Fit right in the first time
Anonymous -
April 30, 2022
Verified Purchase
worked great
was able to fix my drill with this bad boy
Guest -
June 15, 2021
Verified Purchase
Easy and fast repair. Excelent part
Arrived very quickly and fit my old drill perfectly now its back and running again.
Guest -
May 8, 2020
Verified Purchase
Questions & Answers ?
Our customer Service team is at the ready daily to answer your part and product questions.

Ask our Team
We have a dedicated staff with decades of collective experience in helping customers just like you purchase parts to repair their products.
Does this fit my product?Questions & Answers for Armature
No questions have been asked yet
Customer Repair Instructions ?
All our customer repair instructions are solicited directly from other customers just like you who have purchased and replaced this exact part.
Burnt up motor "Armature"
Jason - April 21, 2016
👍 3 of 3 people found this instruction helpful
Tool Type
Hammer Drill
Difficulty
Medium
Time
15-30 minutes
Tools Used
Screwdriver
Parts Used
Remove all screws starting with the rear ones 1st,
Gently! remove cover plate, making sure you don't move any of the parts inside.
Take a marker and draw a line across the parts in a straight line.
This will save time putting it back together.
Just remove the rear brush assembly, be sure to take the spring tension off the brushes, I took a small screwdriver and pushed the spring up to the side.
Once everything has been marked, remove the entire assembly, being careful to watch how these little pieces go back together or you could spend a few hours figuring out how they went back together.
Pull the "motor" out and change it with your new one.
Put everything back together in the order that it was removed. Don't force anything back together or you could be replacing more then just the motor.
Good luck
Did you find this story helpful?
Thanks for voting and helping fellow customers!
Armature bearing went bad
Bruce - March 4, 2017
👍 1 of 1 people found this instruction helpful
Tool Type
Cordless Drill
Difficulty
Medium
Time
15-30 minutes
Tools Used
Screwdriver
Parts Used
1. Remove tool back plate.
2. Remove screws connecting body halves.
3. Remove armature assembly carefully noting alignment of all parts.
4. Check and replace brushes if necessary.
5. Replace armature unit.
6. Reverse above steps to reassemble.
2. Remove screws connecting body halves.
3. Remove armature assembly carefully noting alignment of all parts.
4. Check and replace brushes if necessary.
5. Replace armature unit.
6. Reverse above steps to reassemble.
Did you find this story helpful?
Thanks for voting and helping fellow customers!
The drill was over heated, burnt and seized the brushes, burnt the armature, and melted the cooling fan attached to the armature.
David - February 24, 2016
👍 1 of 1 people found this instruction helpful
Tool Type
Hammer Drill
Difficulty
Easy
Time
15-30 minutes
Tools Used
Screwdriver, Pick set, nylon brush
1. disassemble the drill housing. 2. Remove armature and brush carrier. 3. Clean housing 4. Install new brushes in brush carrier. 5. Install new parts in drill housing. 6. Test
Did you find this story helpful?
Thanks for voting and helping fellow customers!
Drill would stop after few seconds.
Joseph - April 18, 2018
Tool Type
Cordless Drill
Difficulty
Medium
Time
30-60 minutes
Tools Used
Screwdriver
Parts Used
Disassembled drill, removing screws. Detached one wire or connection at a time, so as to attach each new wire or connection as the old wire was taken out.
Did you find this story helpful?
Thanks for voting and helping fellow customers!
Drill got hot and burned up brushes and armature.
Andrew - March 26, 2018
Tool Type
Cordless Drill
Difficulty
Medium
Time
15-30 minutes
Tools Used
Screwdriver, Pliers, Pick
1. Removed rear cover (
2. Removed all screws and separated case in half
3. Removed brush holder, armature, and motor from case
4. Replaced parts
5. Assembled and tested drill
2. Removed all screws and separated case in half
3. Removed brush holder, armature, and motor from case
4. Replaced parts
5. Assembled and tested drill
Did you find this story helpful?
Thanks for voting and helping fellow customers!
Makita Drill/ Hammer Drill would not turn on.
Josh - July 31, 2017
Tool Type
Cordless Drill
Difficulty
Easy
Time
15-30 minutes
Tools Used
Screwdriver, Pliers
1. Removed all screws from the plastic housings.
2. Removed rear cap and removed all screws.
3. Separated the plastic housings.
4. Removed the rear heat sink.
5. Removed the rear brush holder, armature, and gear box.
6. Cleaned all the parts and greased the gear box.
7. Used Pliers to unplug old brush holder from trigger assembly.
8. Plugged new brush holder into trigger assembly.
9. Installed new armature into brush holder and gear box.
10. Reinserted assembly back into the housing and reinstalled heat sink.
11. Installed housing and reinstalled screws.
12. Installed brushes into brush holder.
13. Installed rear cap.
Did you find this story helpful?
Thanks for voting and helping fellow customers!
Over heated and froze the motor
Robert - August 11, 2016
Tool Type
Hammer Drill
Difficulty
Medium
Time
30-60 minutes
Tools Used
Screwdriver, Wrench Set
1. Got online to your website
2. Looked at posted video
3. Ordered parts
4. Installed parts
5. Drill works great
2. Looked at posted video
3. Ordered parts
4. Installed parts
5. Drill works great
Did you find this story helpful?
Thanks for voting and helping fellow customers!
Brush holder and armature over heated needed to be replaced.
JR - July 3, 2016
Tool Type
Cordless Drill
Difficulty
Medium
Time
15-30 minutes
Tools Used
Screwdriver
Parts Used
Split the case and removed the parts put in the new parts and put them back together. Putting the cases back together was a little tricky, but with a little patience wiggled them back together.
Did you find this story helpful?
Thanks for voting and helping fellow customers!
OEM stands for Original Equipment Manufacturer and means the part you’re buying is sourced directly from the manufacturer who made your product. At eReplacementParts, we sell only genuine OEM parts, guaranteeing the part you’re purchasing is of better design and of higher quality than aftermarket parts.
Our product descriptions are a combination of data sourced directly from the manufacturers who made your product as well as content researched and curated by our content & customer service teams. This content is edited and reviewed internally before being made public to customers.
Our customer service team are at the ready daily to answer your part and product questions. We have a dedicated staff with decades of collective experience in helping customers just like you purchase parts to repair their products.
All our part reviews are solicited directly from other customers who have purchased this exact part. While we moderate these reviews for profanity, offensive language or personally identifiable information, these reviews are posted exactly as submitted and no alterations are made by our team.
All our customer repair instructions are solicited directly from other customers just like you who have purchased and replaced this exact part. While we moderate these reviews for profanity, offensive language or personally identifiable information, these reviews are posted exactly as submitted and no alterations are made by our team.
Based on data from past customer purchasing behaviors, these parts are most commonly purchased together along with the part you are viewing. These parts may be necessary or helpful to replace to complete your current repair.
All our installation videos are created and produced in collaboration with our in-house repair technician, Mark Sodja, who has helped millions of eReplacementParts customers over the last 13 years repair their products. Mark has years of experience in selling and repairing both commercial and residential products with a specialty in gas-powered equipment.
This data is collected from customers who submitted a repair instruction after replacing this exact part. Customers can rate how easy the repair was to complete and how long it took. We aggregate this data to provide a repair rating that allows customers to quickly determine the difficulty and time needed to perform their own repair.