


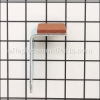
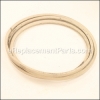
This is a genuine replacement part manufactured for use with lawn tractors from Craftsman. This part applies pressure on the pulley to stop the blades from turning when the blades are released. It is recommended to review your models diagram to verify the parts compatibility. This mower brake arm is made of metal and sold individually.
Arm Brake Mower 597074201
OEM part for: Poulan, Husqvarna, Craftsman
Part Number: 597074201
$8.71
In Stock
Jump To:
Frequently Purchased Together ?
Compatibility
This Arm Brake Mower will fit the following 250 machines. Confirm this part works with your model, and view the detailed model diagrams and repair help we have to offer.
This item works with the following types of products:
- Lawn Mower Parts
- Lawn Tractor Parts
This part replaces obsolete part #: 197261, 532197402 (Lh), 5321972-61, 532197402, 197402, 532197261
Customer Part Reviews ?
Average Rating (out of 5):
Click to filter by ratings:
5 stars
3
4 stars
2
3 stars
0
2 stars
0
1 stars
0
< PREV
- 1
good people
good people to work with
Guest -
October 31, 2023
Verified Purchase
The right part!
After searching several websites and thinking I was getting the right part for my lawn mower only to receive a part and finding out it was wrong, I found ereplacementparts.com!
They not only had the right part, I could actually tell it was the right part before ordering it.
When I need another part for my mower, this site is THE place I will check first!
Guest -
June 9, 2022
Verified Purchase
Arrived quickly
easy install works great
Guest -
September 13, 2021
Verified Purchase
Good service
New parts in a timely manner.
Guest -
November 25, 2020
Verified Purchase
mower brake
lt works
Guest -
June 26, 2020
Verified Purchase
Questions & Answers ?
Our customer Service team is at the ready daily to answer your part and product questions.

Ask our Team
We have a dedicated staff with decades of collective experience in helping customers just like you purchase parts to repair their products.
Does this fit my product?Questions & Answers for Arm Brake Mower
How do you install the arm brake and spring tension brake?
Richard
for model number YTH2042
asked on 2022-04-25
Hello Richard, Thank you for the question. There are no instructions for this but using Diagram C and locating part 17 (the spring brake) you can see it attaches to part 225 (the transmission belt keeper) and part 163 (rod pedal control). Using Diagram F locate part 60 (arm brake) you can see that part 57 (screw) will go through parts 42, 43 and 56 and fastens it to part 192 (bracket brake stand and then to the deck. You will have to blow the picture up to follow this in the diagram. There are also a few different instructions for the arm brake underneath the part itself that previous customers have written in on how they performed this repair as well. I hope this helps and good luck with your repair.
eReplacementParts Team April 25, 2022
Customer Repair Instructions ?
All our customer repair instructions are solicited directly from other customers just like you who have purchased and replaced this exact part.
Brake pads were worn out
Glenn - January 3, 2022
Tool Type
Lawn Tractor
Difficulty
Medium
Time
30-60 minutes
Tools Used
Pliers, Socket set
1. Removed mower deck from lawn tractor.
2. Pushed idler pulley inward to relieve pressure on arm brake and used a wooden block to hold it in place.
3. Using a socket wrench, remove the two bolts holding the brake arm in place.
4. Remove the brake arm and replace it with the new brake arm.
5. Leaving the block in place, remove the second brake arm.
6. Be careful this brake arm has its own spring and has considerable tension on it.
7. Remove the brake arm assembly, noting how each piece of the assembly is placed.
8. Place the brake arm washer in place and place the new brake arm over the washer.
9. Place the spring and spring washer in place, making sure the end of the spring is properly placed on the brake arm.
10. Place the brake arm bolt in the center hole and tighten in place.
11. Remove the wooden block.
Did you find this story helpful?
Thanks for voting and helping fellow customers!
Mowing blades didn't stop when disengaged.
Lowell - September 12, 2020
Tool Type
Lawn Tractor
Difficulty
Easy
Time
15-30 minutes
Tools Used
Screwdriver, Socket set
1. Remove the mowing deck
2. Simply remove the bolts holding the brake mechanisms and replace.
3. The left side is spring loaded and needs a little special attention. This is the trickiest part of re assembling. Be sure to observe this mechanism before disassembly.
4. Replace the mowing deck.
2. Simply remove the bolts holding the brake mechanisms and replace.
3. The left side is spring loaded and needs a little special attention. This is the trickiest part of re assembling. Be sure to observe this mechanism before disassembly.
4. Replace the mowing deck.
Did you find this story helpful?
Thanks for voting and helping fellow customers!
Mower blades keep turning
Larry - September 6, 2020
Tool Type
Lawn Mower
Difficulty
Medium
Time
15-30 minutes
Tools Used
Pliers, Socket set
Removed bolt and spring on left side
Replaced brake arm
Tightened bolt
Replaced spring
Removed bolt and spring and washer on right side
Replaced brake arm
Tightened bolt as spring is hooked
Replaced brake arm
Tightened bolt
Replaced spring
Removed bolt and spring and washer on right side
Replaced brake arm
Tightened bolt as spring is hooked
Did you find this story helpful?
Thanks for voting and helping fellow customers!
Break broke on my mower
Bernadette - May 20, 2020
Tool Type
Lawn Mower
Difficulty
Easy
Time
Less than 15 minutes
Tools Used
Wrench Set
Parts Used
1.Took the belt off the mower.
2. Took the broken break off with spring.
3. Took the blade engaging arm off.
4. Replace the blade engaging arm.
5. Replace the break and spring.
6. Replaced belt and completed my yard job.
2. Took the broken break off with spring.
3. Took the blade engaging arm off.
4. Replace the blade engaging arm.
5. Replace the break and spring.
6. Replaced belt and completed my yard job.
Did you find this story helpful?
Thanks for voting and helping fellow customers!
Arm Brakes and Front lift
Billy - October 14, 2019
Tool Type
Lawn Mower
Difficulty
Medium
Time
30-60 minutes
Tools Used
Socket set, Wrench Set, Adjustable Wrench
Remove deck, Replace arm brakes and lift rod. Replace deck. Getting deck off and back on was the hardest part of repair.
Did you find this story helpful?
Thanks for voting and helping fellow customers!
Arm brake chewed up due to broken spindle housing.
Donald - July 31, 2017
👍 0 of 1 people found this instruction helpful
Tool Type
Lawn Tractor
Difficulty
Easy
Time
Less than 15 minutes
Tools Used
Wrench Set
Parts Used
Removed the broken arm and replaced with the new part.
Did you find this story helpful?
Thanks for voting and helping fellow customers!
The original mandrel assembly cracked badly around the screws that hold it to the deck, and the brake arm was bent and no longer contacting the pulley
Zach - November 16, 2015
👍 1 of 3 people found this instruction helpful
Tool Type
Lawn Tractor
Difficulty
Easy
Time
15-30 minutes
Tools Used
Socket set, Wrench Set, Adjustable Wrench
Once the mower deck was removed the repair was simple. Remove nut on top of mandrel holding the pulley wheel in place and remove wheel. Remove screws holding the old mandrel assembly to the deck, make note of where the belt guides are, and remove old mandrel (blade still attached and must remove by pulling the mandrel down through the deck). Remove nut holding blade on and remove blade. Take the mandrel screws and use them to cut threads into the screw holes of the new mandrel (the holes in the new mandrel are not pre-threaded). Put new mandrel in place, replace belt guides in their proper positions, line up the holes and replace the screws and tighten firmly. The brake pad is self explanatory: remove nut and take off old brake, put new brake on and replace nut.
Did you find this story helpful?
Thanks for voting and helping fellow customers!
OEM stands for Original Equipment Manufacturer and means the part you’re buying is sourced directly from the manufacturer who made your product. At eReplacementParts, we sell only genuine OEM parts, guaranteeing the part you’re purchasing is of better design and of higher quality than aftermarket parts.
Our product descriptions are a combination of data sourced directly from the manufacturers who made your product as well as content researched and curated by our content & customer service teams. This content is edited and reviewed internally before being made public to customers.
Our customer service team are at the ready daily to answer your part and product questions. We have a dedicated staff with decades of collective experience in helping customers just like you purchase parts to repair their products.
All our part reviews are solicited directly from other customers who have purchased this exact part. While we moderate these reviews for profanity, offensive language or personally identifiable information, these reviews are posted exactly as submitted and no alterations are made by our team.
All our customer repair instructions are solicited directly from other customers just like you who have purchased and replaced this exact part. While we moderate these reviews for profanity, offensive language or personally identifiable information, these reviews are posted exactly as submitted and no alterations are made by our team.
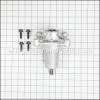
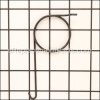
Based on data from past customer purchasing behaviors, these parts are most commonly purchased together along with the part you are viewing. These parts may be necessary or helpful to replace to complete your current repair.
All our installation videos are created and produced in collaboration with our in-house repair technician, Mark Sodja, who has helped millions of eReplacementParts customers over the last 13 years repair their products. Mark has years of experience in selling and repairing both commercial and residential products with a specialty in gas-powered equipment.
This data is collected from customers who submitted a repair instruction after replacing this exact part. Customers can rate how easy the repair was to complete and how long it took. We aggregate this data to provide a repair rating that allows customers to quickly determine the difficulty and time needed to perform their own repair.