


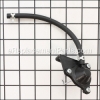
This authentic part is specially designed for Kohler engines commonly installed on lawn and garden equipment, it is supplied by the original manufacturer. It is an identical replacement for a missing or damaged auto choke arm assembly which was originally installed on a new unit, for correct application please refer to the appropriate diagrams of your model. The part connects to the carburetor in order to control the choke of the engine. Keep in mind this durable component is made of high-quality metal and is sold individually, please note the hardware to secure it is sold separately.
Arm Assy 14 187 04-S
OEM part for: Kohler
Part Number: 14 187 04-S
$31.63
In Stock
Jump To:
Frequently Purchased Together ?
Compatibility
This Arm Assy will fit the following 20 machines. Confirm this part works with your model, and view the detailed model diagrams and repair help we have to offer.
Kohler
Show More Compatible ModelsThis item works with the following types of products:
- Engine Parts
Customer Part Reviews ?
Average Rating (out of 5):
Click to filter by ratings:
5 stars
2
4 stars
1
3 stars
0
2 stars
0
1 stars
0
< PREV
- 1
Lawnmower parts
Quick shipping,nicely packaged and the parts worked perfectly. Mower started right up.
Guest -
May 28, 2021
Verified Purchase
Arrived quickly but most of all was easy to find with the parts diagram
The parts diagram makes it easy to locate the part without knowing the actual part name. The price is competitive I know because I looked for the price on other sites
Guest -
May 17, 2020
Verified Purchase
Works OK
Not a very good design by Toro. Needs to open sooner. Fast shipping. Double boxed. Very nice.
Guest -
October 30, 2019
Verified Purchase
Questions & Answers ?
Our customer Service team is at the ready daily to answer your part and product questions.

Ask our Team
We have a dedicated staff with decades of collective experience in helping customers just like you purchase parts to repair their products.
Does this fit my product?Questions & Answers for Arm Assy
No questions have been asked yet
Customer Repair Instructions ?
All our customer repair instructions are solicited directly from other customers just like you who have purchased and replaced this exact part.
Engine ran fine with starter fluid but would not start, hot or cold, even after carb cleaning
Jeffrey - July 9, 2017
👍 3 of 3 people found this instruction helpful
Tool Type
Lawn Mower
Difficulty
Easy
Time
15-30 minutes
Tools Used
Pliers, Socket set, Wrench Set, Torx driver
Convinced the carb was still the issue despite cleaning attempts, and since I was replacing the carb, to bring the mover back to practically new specks (It was 4 years old), I replaced the carb, choke, and diaphragm. Fuel frequently evaporates around the gas cap, so I am also replacing the gas cap since ethanol fuel is such a problem nowadays
1. Removed the starter (71"Lbs)
2. Removed the engine housing
3. Clamped and disconnected the fuel line (Small amount of gas drained)
4. Removed the air filter housing and air filter
5. Removed the three carb retaining nuts (71"Lbs)
6. Unplugged the spark plug
7. Removed the auto choke retaining nuts (No torque specs, just moderately tight)
8. Removed the choke torx screws (2)
9. Removed the diaphragm torx screws (2)
10. Removed the vacuum lines going to the carb/air cleaner housing
11. Completely removed the air cleaner housing
12. Completely removed the choke assembly
13. Completely removed the diaphragm assembly
14. Removed all linkages, used a small pair of needle nose on the throttle spring
15. Removed the old carb and gaskets
16. Pulled the old gas cap out of the tank (The fingers are plastic and will bend with a small amount of force)
17. Swapping old parts with new parts, assemble by reversing disassembly steps. Ensure you put in the two new carb gaskets and torque everything as documented by Kohler
By about halfway through a starter pull, the engine was running. It had not started that fast since it was new, and ran like new once re-assembled. You can probably cut the expense by a third if you just replace the carburetor, but I wanted a like new machine starting over again for at least 4 years. Pay close attention to fuel stabilizers and emptying the tank at year end. These things gum way too quickly with modern fuels. I never did figure out what I missed cleaning the original carb
Did you find this story helpful?
Thanks for voting and helping fellow customers!
Choke was weak and allowed the linkage to vibrate loose. Replaced both and mower started first pull.
Andy - August 12, 2020
Tool Type
Engine
Difficulty
Easy
Time
Less than 15 minutes
Tools Used
Pliers, Socket set, Wrench Set
Remove air cleaner box.
Remove carburetor.
Remove and replace auto choke assembly.
Replace choke linkage and reinstall carburetor and air filter housing.
Remove carburetor.
Remove and replace auto choke assembly.
Replace choke linkage and reinstall carburetor and air filter housing.
Did you find this story helpful?
Thanks for voting and helping fellow customers!
OEM stands for Original Equipment Manufacturer and means the part you’re buying is sourced directly from the manufacturer who made your product. At eReplacementParts, we sell only genuine OEM parts, guaranteeing the part you’re purchasing is of better design and of higher quality than aftermarket parts.
Our product descriptions are a combination of data sourced directly from the manufacturers who made your product as well as content researched and curated by our content & customer service teams. This content is edited and reviewed internally before being made public to customers.
Our customer service team are at the ready daily to answer your part and product questions. We have a dedicated staff with decades of collective experience in helping customers just like you purchase parts to repair their products.
All our part reviews are solicited directly from other customers who have purchased this exact part. While we moderate these reviews for profanity, offensive language or personally identifiable information, these reviews are posted exactly as submitted and no alterations are made by our team.
All our customer repair instructions are solicited directly from other customers just like you who have purchased and replaced this exact part. While we moderate these reviews for profanity, offensive language or personally identifiable information, these reviews are posted exactly as submitted and no alterations are made by our team.
Based on data from past customer purchasing behaviors, these parts are most commonly purchased together along with the part you are viewing. These parts may be necessary or helpful to replace to complete your current repair.
All our installation videos are created and produced in collaboration with our in-house repair technician, Mark Sodja, who has helped millions of eReplacementParts customers over the last 13 years repair their products. Mark has years of experience in selling and repairing both commercial and residential products with a specialty in gas-powered equipment.
This data is collected from customers who submitted a repair instruction after replacing this exact part. Customers can rate how easy the repair was to complete and how long it took. We aggregate this data to provide a repair rating that allows customers to quickly determine the difficulty and time needed to perform their own repair.